 |
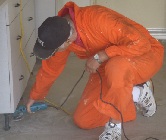
| Fig.1 Grinding bad spots |
Supplies and Tools:
Electric grinder
Extension cord
Brooms floor, soft
Dust masks (purchase a package)
Rue Phon hired my repair service to clean up his three car garage because his domesticated research rats had invaded the area. He owned a beautiful home overlooking Azusa Hills, California. In this post my partner Carl will be helping me solve and work this job. You may need more than 6-steps to do this job. If the job is done correctly than this is one more step that will guarantee that the epoxy paint will adhere to the floor.
This post shows the six steps to grind the paint or rust stains or any cement bumps or bad cement stains.
Step 1: Sweep the entire garage floor. Put on a dust mask if sensitive to dust. Use a smooth push broom to do the job.
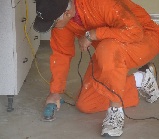
Step 2: Fig.1 and fig.2 shows the electric grinder removing any bumps or deformation of the garage cement.
 |
| Fig.2 Grinding paint of cement |
 |
| Fig.3 Oil spots |
 |
| Fig.4 Old paint lacquer |
 |
| Fig.5 Cement high spots |
 |
| Fig.6 Carl grinding |
 |
| Fig.7 edges grinder |
 |
| Fig.8 Carl grinding edges |
 |
| Fig.9 Carl removing paint |
 |
| Fig.10 Carl grinding around furniture |
 |
| Fig.11 Carl with grinder |
-
Part 1 of 10 - Garage Rat Invasion Repair
-
Part 2 of 10 - Paint Garage Walls to Eliminate Pets
-
Part 3 of 10 - Rat Ate Electrical Wire Repair
-
Part 4 of 10 - Dryer External Vent Capped Off
-
Part 5 of 10 - Dryer Metal Air Duct Replacement
-
Part 6 of 10 - Garage Floor Grinding
-
Part 7 of 10 - Vinegar Kills Urine Odor
-
Part 8 of 10 - Use of Degreaser
-
Part 9 of 10 - Applying Acid Etch
- Part 10 of 10 - Epoxy Paint Application
Note: A 50-foot electrical cord is needed to work all three sections of this garage. This eliminates unplugging the grinder several times and using one cord will make this job faster.
Update: DIY Advisor has New blogs check them today:
- Handyman Blog: DIY Advisor
- DIY Advisor Sitemap
- Food Blog: From Kiwis To Pistachios
- Food Blog Sitemap
- Tool Blog: DIY Advisor Toolbox
- Tool Blog Sitemap
- Artwork Blog: Light in Dark Artwork
- Artwork Blog Sitemap
- Class-A Tests: DIY Class-A Drivers License Tests
- Class-A Tests Sitemap: Class-A Sitemap
- DIY Poem: DIY Poem Meter Blog
- DIY Poem Sitemap: DIY Poem Sitemap
- Cookie Alert: European Union laws requires that you know that this blog uses cookies. If you are concerned about this please click here to see how Google uses this information.
Note: The DIY Advisor assumes no liability for omissions, errors or the outcome of any jobs. The reader must always exercise reasonable caution, follow current codes and regulations that may apply, and is urged to consult with a licensed contractor if in doubt about any steps on these posts. All names were changed to protect client's privacy. DIY Advisor. Reproduction of site content including photos without permission prohibited. All rights reserved. © Copyright 2011-

No comments:
Post a Comment