Tuesday, April 30, 2013

How to Hang Pre-hung Door - Part 14 of 15 - Exterior Door Molding

Fig.1 Air compressor 
and wood molding
By Gary Boutin

Supplies and Tools:
Brads
Brad nailer 
Compound saw or miter saw
Compressor and air hose 
DAP® wood filler 
Electrical cords 
Hack Saw   
Wood molding

Mr. Victor Longpont hired my services to remove his garage door that had become damaged after a bad rain storm. The door had not been painted for over 30 years, the bottom of the door was damaged by a badly worn door sweep that allowed water into the bottom of the door. 

This post shows the twelve steps to installing exterior wood molding on a pre-hung door.

Step 1: The first step after the door is sound is to replaced the stucco molding with standard wood molding. Fig.1 shows the air compressor that will be used to provide air pressure for the brad nailer that will be used in this job. Also shown is the wood molding that will be applied around the door. Fig.2 shows the wood molding that will cover the stucco patch and finish the exterior of the door. Stucco molding should have been used for this door, the edge of the door matched up with the edge of the stucco wall, so the molding could not be used and an alternative solution was used instead of stucco molding.
Fig.2 wood molding
left side
Stucco molding
Step 2: Fig.3 shows the two wood molding placed at each side of the door. The door is approximately 80 inches long. 
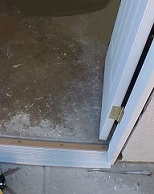
Fig.3 pre-hung door metal 
threshold plate
Step 3: Fig.4 shows the bottom of the molding is being cut to accommodate the bottom of the metal threshold plate. Use a mini hack saw to cut the molding.
Fig.4 cutting for 
threshold plate
Step 3: Below fig.5 shows the handyman using a brad nailer to staple the wood molding to the outside of the door. Fig.6 shows the handyman staple the bottom of the door molding.
Fig.5 Nailing wood molding
Fig.6 Applying brads 
to door molding
Step 4: Fig.7 shows that both vertical parts of the door have been cut and have been stapled to the door edge. Only the last piece needs to be added to the top of the door frame. 
Fig.7 Preparing top molding
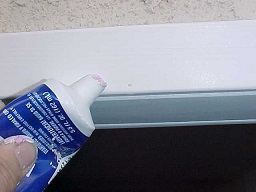
Step 5: Use DAP® wood filler that is pink when wet and dries white
DAP® Wood filler
Step 6: Fig.9, fig.10 and fig.11 shows that after the wood molding has been stapled to the door, the edges need to be caulked and so does the wood molding corners. Apply the wood filler in the corners and on the door side of the molding. 
Fig.8 Wood filler on corners
Fig.9 Wood filler dried
Fig.10 Dried wood filler


How to Hang a Pre-hung Door:


  • Part 1 of 15 Introduction Why Replace This Garage Door
  • Part 2 of 15 Removing The Damaged Door
  • Part 3 of 15 Door Hardware Removed
  • Part 4 of 15 Door Threshold Removal
  • Part 5 of 15 Installing Door
  • Part 6 of 15 Recycled Metal Removed
  • Part 7 of 15 Caulking Outside Door Edges
  • Part 8 of 15 New Door Hardware Installed
  • Part 9 of 15 Caulking Door Screws Holes
  • Part 10 of 15 Inside Door Mud
  • Part 11 of 15 Inside Door Taping
  • Part 12 of 15 Inside Door Painted
  • Part 13 of 15 Applying Stucco To Door Edge
  • Part 14 of 15 Exterior Door Molding
  • Part 15 of 15 Old Door Cut to Trash


  • Update: DIY Advisor has New blogs check them today:

    • Cookie Alert: European Union laws requires that you know that this blog uses cookies. If you are concerned about this please click here to see how Google uses this information.

    Note: The DIY Advisor assumes no liability for omissions, errors or the outcome of any jobs. The reader must always exercise reasonable caution, follow current codes and regulations that may apply, and is urged to consult with a licensed contractor if in doubt about any steps on these posts. All names were changed to protect client's privacy. DIY Advisor. Reproduction of site content including photos without permission prohibited. All rights reserved. © Copyright 2011-

    Saturday, April 27, 2013

    How to Hang Pre-hung Door - Part 8 of 15 - New Door Hardware Installed

    By Gary Boutin
    Door Tools


    Supplies and Tools:
    Claw hammer 
    Cordless screwdriver with Phillip bit
    Phillip tip
    Wood chisel 1-inch

    Mr. Victor Longpont hired my services to remove his garage door that had become damaged after a bad rain storm. The door had not been painted for over 30 years, the bottom of the door was damaged by a badly worn door sweep that allowed water into the bottom of the door.

    This post shows the four steps on how to remove a damaged garage door.

    Step 1: Fig.1 shows the door handle plate on the door jamb has been pre-drilled. Fig.2 shows the brass plate has been installed on the door jamb. A cordless screwdriver with a Phillip bit was used to drive in the wood screws into the plate. This door hardware was re-used and was still in good working order.
    Fig.1 Door frame 
    metal plate
    Fig.2 Brass plate 
    with one Phillip screw
    Step 2: Fig.3 shows the Handyman is using a wood chisel to fit the dead bolt door jamb plate. Fig.4 shows the wood had been carved out. Fig.5 shows the plate ready for use and fig.2 a cordless screwdriver with a Phillip tip was used to drive the wood screws into the door jamb.
    Fig.3 Using a wood chisel
    Fig.4 Chiseling 
    for brass plate
    Fig.5 Brass plate
     Step 3: Next the door hardware is inserted into the door. Fig.6 shows the deadbolt bolt is in the door and fig.7 shows the handyman installation of the deadbolt into the door.
    Fig.6 Deadbolt plate
    Fig.7 Installing deadbolt
    Step 4: Fig.8 and fig.9 shows the door handle and the deadbolt assembly.
    Fig.8 Lock set finished
    Fig.9 Job finished

    How to Hang a Pre-hung Door:


  • Part 1 of 15 Introduction Why Replace This Garage Door
  • Part 2 of 15 Removing The Damaged Door
  • Part 3 of 15 Door Hardware Removed
  • Part 4 of 15 Door Threshold Removal
  • Part 5 of 15 Installing Door
  • Part 6 of 15 Recycled Metal Removed
  • Part 7 of 15 Caulking Outside Door Edges
  • Part 8 of 15 New Door Hardware Installed
  • Part 9 of 15 Caulking Door Screws Holes
  • Part 10 of 15 Inside Door Mud
  • Part 11 of 15 Inside Door Taping
  • Part 12 of 15 Inside Door Painted
  • Part 13 of 15 Applying Stucco To Door Edge
  • Part 14 of 15 Exterior Door Molding
  • Part 15 of 15 Old Door Cut to Trash


  • Update: DIY Advisor has New blogs check them today:

    • Cookie Alert: European Union laws requires that you know that this blog uses cookies. If you are concerned about this please click here to see how Google uses this information.

    Note: The DIY Advisor assumes no liability for omissions, errors or the outcome of any jobs. The reader must always exercise reasonable caution, follow current codes and regulations that may apply, and is urged to consult with a licensed contractor if in doubt about any steps on these posts. All names were changed to protect client's privacy. DIY Advisor. Reproduction of site content including photos without permission prohibited. All rights reserved. © Copyright 2011-

    Thursday, April 25, 2013

    How to Hang Pre-hung Door - Part 7 of 15 - Caulking Outside Door Edges

    By Gary Boutin
    Fig.1 Manual Caulking Gun


    Supplies and Tools:
    Caulking gun - manual
    Latex caulking
    Painter's scraper blade 1-inch

    Mr. Victor Longpont hired my services to remove his garage door that had become damaged after a bad rain storm. The door had not been painted for over 30 years, the bottom of the door was damaged by a badly worn door sweep that allowed water into the bottom of the door. 

    This post shows the five steps on how caulk the gaps in a garage door exterior edge.

    Step 1: Fig.2 shows the left bottom side and fig.3 shows the right bottom side. Look at the edges of the door and determine how much caulking will need to fill these areas. This door had some spots that needed lots of caulking to fill the holes around the new door and the stucco wall. For this job stucco mold could not be used because the door was flush with the stucco exterior wall.
    Fig.2 Bottom side 
    exterior wood 
    molding
    Fig.3 Bottom side 
    filled with silicone caulking
    Step 2: Fig.1 above right and Fig.4 shows a manual caulking gun that was used to fill the holes at the bottom of the door. Start from the bottom of one side of the wood frame and apply the caulking all the way to the other side. Fig.5 shows the caulking going up the door, now caulking is at the middle of the left side of the frame.
    Fig.4 Caulking filling 
    in the edges of the door
    Fig.5 Silicone filling the gaps from the door
    Step 3: Its not enough to put in the caulking into the cracks of the door, Fig.6 shows a finger is used to push the caulking into the door cracks. Fig.7 shows the caulking was pushed smooth with a 1-inch painter's scraper blade. 
    Fig.6 Using your finger press
    it into the cracks
    Fig.7 Nice clean edge 
    for the exterior
    Step 4: Fig.8 shows that the top part of the door had more caulking applied to this area.
    Fig.8 More caulking for
    large gap above the door
    Step 5: Fig.9 shows the door is completed. This part of the door is done.
    Fig.9 Door caulking done

    How to Hang a Pre-hung Door:


  • Part 1 of 15 Introduction Why Replace This Garage Door
  • Part 2 of 15 Removing The Damaged Door
  • Part 3 of 15 Door Hardware Removed
  • Part 4 of 15 Door Threshold Removal
  • Part 5 of 15 Installing Door
  • Part 6 of 15 Recycled Metal Removed
  • Part 7 of 15 Caulking Outside Door Edges
  • Part 8 of 15 New Door Hardware Installed
  • Part 9 of 15 Caulking Door Screws Holes
  • Part 10 of 15 Inside Door Mud
  • Part 11 of 15 Inside Door Taping
  • Part 12 of 15 Inside Door Painted
  • Part 13 of 15 Applying Stucco To Door Edge
  • Part 14 of 15 Exterior Door Molding
  • Part 15 of 15 Old Door Cut to Trash


  • Update: DIY Advisor has New blogs check them today:

    • Cookie Alert: European Union laws requires that you know that this blog uses cookies. If you are concerned about this please click here to see how Google uses this information.

    Note: The DIY Advisor assumes no liability for omissions, errors or the outcome of any jobs. The reader must always exercise reasonable caution, follow current codes and regulations that may apply, and is urged to consult with a licensed contractor if in doubt about any steps on these posts. All names were changed to protect client's privacy. DIY Advisor. Reproduction of site content including photos without permission prohibited. All rights reserved. © Copyright 2011-

    How to Hang Pre-hung Door - Part 9 of 15 - Caulking Door Screws Holes

    By Gary Boutin

    Supplies and Tools:
    DAP Drydex Spackling and Nail Hole Filler, 5.5 oz
    Paint scraper 1-inch

    Mr. Victor Longpont hired my services to remove his garage door that had become damaged after a bad rain storm. The door had not been painted for over 30 years, the bottom of the door was damaged by a badly worn door shoe and sweep that allowed water into the bottom of the door.

    This post shows the three steps to caulking the drill holes within the pre-hung door frame.

    Step 1: Use DAP Nail Hole Filler to fill in the holes from the drill. DAP states from their website that the Nail Hole Filler contains an indicator that causes the application to change from pink to white. This spackling compound is good for outdoor use. It did shrink a little but applying a second coat to the nail holes fix that problem, and the nail hole filler was easy to sand and later paint. 
    Step 2: Fig.1 shows two areas that hole filler was applied and filled the holes. 
    Step 3: Fig.2 shows the hinge side of the door frame, notice the pink holes in the frame show that the area is still drying.
    Fig.1 Latch side of door
    Fig.2 Hinge side of the door

    How to Hang a Pre-hung Door:


  • Part 1 of 15 Introduction Why Replace This Garage Door
  • Part 2 of 15 Removing The Damaged Door
  • Part 3 of 15 Door Hardware Removed
  • Part 4 of 15 Door Threshold Removal
  • Part 5 of 15 Installing Door
  • Part 6 of 15 Recycled Metal Removed
  • Part 7 of 15 Caulking Outside Door Edges
  • Part 8 of 15 New Door Hardware Installed
  • Part 9 of 15 Caulking Door Screws Holes
  • Part 10 of 15 Inside Door Mud
  • Part 11 of 15 Inside Door Taping
  • Part 12 of 15 Inside Door Painted
  • Part 13 of 15 Applying Stucco To Door Edge
  • Part 14 of 15 Exterior Door Molding
  • Part 15 of 15 Old Door Cut to Trash


  • Update: DIY Advisor has New blogs check them today:

    • Cookie Alert: European Union laws requires that you know that this blog uses cookies. If you are concerned about this please click here to see how Google uses this information.

    Note: The DIY Advisor assumes no liability for omissions, errors or the outcome of any jobs. The reader must always exercise reasonable caution, follow current codes and regulations that may apply, and is urged to consult with a licensed contractor if in doubt about any steps on these posts. All names were changed to protect client's privacy. DIY Advisor. Reproduction of site content including photos without permission prohibited. All rights reserved. © Copyright 2011-

    How to Hang Pre-hung Door - Part 5 of 15 - Installing Door

    By Gary Boutin
    Claw Hammer


    Supplies and Tools:
    Cordless screwdriver with Phillip bit
    Claw hammer
    Deck screws 3-inch
    Drill bit set
    Level 4-foot and 2-foot level
    Painter scraper thick blade
    Pre-hung metal door

    Mr. Victor Longpont hired my services to remove his garage door that had become damaged after a bad rain storm. The door had not been painted for over 30 years, the bottom of the door was damaged by a badly worn door shoe and sweep that allowed water into the bottom of the door. In this job Dave Vickers, was invaluable in solving the details of this job.

    This post shows the ten steps on how to install a pre-hung garage door.

    Step 1: Fig.1 shows Dave's truck that was used to pick up and deliver the pre-hung door. Fig.2 shows the pre-hung door that was purchased at Lowe's Warehouse Store.
    Fig.1 Truck to transport door
    Fig.2 New door and wood frame
    Step 2: Fig.3 shows the door must be unpacked before placing it in the door area. Remove all the cardboard packaging around the door. The hard fiberboard on the bottom of the door and both sides of the door shoe will needs to be removed. Fig.4 shows a claw hammer with a thick blade scraper that will pull away the fiberboard away from the door. There are staples in place to protect the bottom of the door. The staples are very sharp watch your hands.
    Fig.3 Remove hardboard 
    from bottom of door
    Fig.4 Use a scraper
    Step 3: After the fiberboard have been removed, the next step is to remove the plastic lock plate.  The lock plate locks the door in place while at the store to prevent the door from popping its hinges and damaging its integrity. This plastic lock must to be removed before the door is placed in the doorway area. Fig.5 shows the black plastic lock in the pre-drilled lock plate area.
    Fig.5 Remove lock bolt
    Step 4: The door has has brass hinges plastic caps, remove them before placing the door in the doorway. The caps are there to keep the brass hinge polished and in good condition for transport. 
    Step 5: Next with a friend place the pre-hung door in the doorway. Use a 4-foot level to level the door in both directions. 
    Step 6: Notice fig.6 and fig.7 shows the door is in the doorway, the door is not secured and needs to be screwed into the wood studs.
    Fig.6 New threshold plate
    Fig.7 Sides need caulking
    Step 7: Fig.8 shows the handyman holding two small wood drills that will be used to pre-drilled the door wood frame. This pilot hole will reduce damage to the exterior wood frame prior to  installing the decks screws into the door. Some installers use nails but with screws the door can be adjusted within the door area to get a good fit.
    Fig.8 Titanium wood drills
    Step 8:
    Fig.9, fig.10 and fig.11 shows the drill used to make the pilot holes. Three holes on the side of each door jamb top, middle and bottom and matching on the other side.  The top door jamb only needs tow holes on each side.
    Fig.9 Pilot hole for the top
    Fig.10 Pilot hole for the middle area
    Fig.11 Pilot hole for the bottom jamb
    Step 9: Fig. 12 and fig.13 shows that after the pilot holes have been drilled, use the cordless screwdriver to drive in the deck screws into the wood stud.
    Fig.12 Inserting deck screws
    Fig.13 Inserting 
    bottom latch side
    Step 10: Fig.14 shows the one hole by the brass hinge and fig.15 shows the two holes that have been screwed into the wood stud.
    Fig.14 New clean hinge
    Fig.15 Holes in new frame

    How to Hang a Pre-hung Door:


  • Part 1 of 15 Introduction Why Replace This Garage Door
  • Part 2 of 15 Removing The Damaged Door
  • Part 3 of 15 Door Hardware Removed
  • Part 4 of 15 Door Threshold Removal
  • Part 5 of 15 Installing Door
  • Part 6 of 15 Recycled Metal Removed
  • Part 7 of 15 Caulking Outside Door Edges
  • Part 8 of 15 New Door Hardware Installed
  • Part 9 of 15 Caulking Door Screws Holes
  • Part 10 of 15 Inside Door Mud
  • Part 11 of 15 Inside Door Taping
  • Part 12 of 15 Inside Door Painted
  • Part 13 of 15 Applying Stucco To Door Edge
  • Part 14 of 15 Exterior Door Molding
  • Part 15 of 15 Old Door Cut to Trash


  • Update: DIY Advisor has New blogs check them today:

    • Cookie Alert: European Union laws requires that you know that this blog uses cookies. If you are concerned about this please click here to see how Google uses this information.

    Note: The DIY Advisor assumes no liability for omissions, errors or the outcome of any jobs. The reader must always exercise reasonable caution, follow current codes and regulations that may apply, and is urged to consult with a licensed contractor if in doubt about any steps on these posts. All names were changed to protect client's privacy. DIY Advisor. Reproduction of site content including photos without permission prohibited. All rights reserved. © Copyright 2011-