Showing posts with label cordless screwdriver. Show all posts

Monday, April 6, 2015

How to Install Kitchen Nook Wall - Part 3 of 5 - Remove Wet Wall

Fig.1 Dining room walls damages
Left, middle and right wall repair
By Gary Boutin

Supplies and Tools: 
500 watt Heat lamp
Caulking white
Cordless screwdriver with many tips
Razor knife and extra blades
Scraper (2 in. 3 in. and 5 in. wall knife)
Screwdriver Flat (regular and small)
Screwdriver Phillip
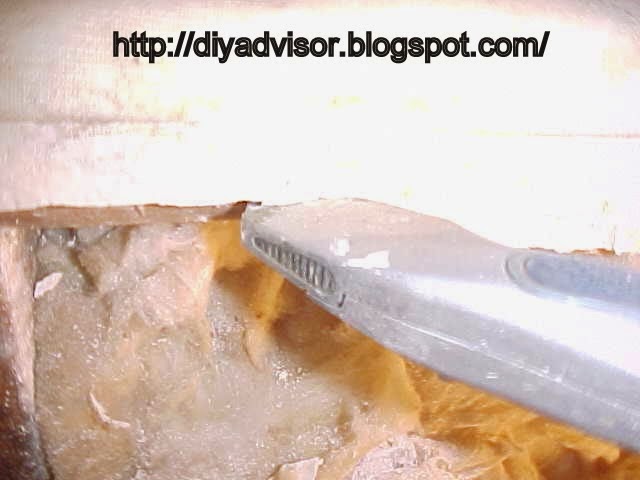
Fig.2 Drywall knife
Sponge large yellow
Tarps cotton 9 ft. x 12 ft.
Trash  bag or trash can
Tool bag
Vacuum Cleaner 
Vice Grip 
Wall tape (paper)

A client in Santa Clarita, California was selling their home and moving to Colorado. Their realtor checked the kitchen nook and noticed that the dining room wallpaper was loose. She also noticed that the kitchen windows had bad rubber seals and leaked when the backyard sprinklers were sprayed on the glass windows. This needed to be repaired immediately. 

This post shows the seven steps showing the damages to this kitchen nook wall.

Step 1: Fig.1 shows the kitchen nook wall that needs repair and fig.2 shows a drywall knife used to cut up the wall so it can be square for repairs.
Step 2: Fig.3 through fig.5 shows the removal of the electrical plug that was in the center damaged wall. All the fiberglass was wet and needed to dry out before the new wall panels were replaced. Fig.4 shows that a small flat tipped screwdriver was used to remove the two outlet screws.  Fig.5 shows the outlet completely out of the electrical box.
Fig.3 Wet electrical
Fig.4 Remove outlet screws
Fig.5 Pullout duplex plug
Step 3: Fig.6 shows the use of razor knife to keep the edge straight to make it easier to install the new wallboard.
Fig.6 Cut edges square
Step 4: Fig.7 shows that part of the wall was removed to half of the wood stud. This will give the new piece some support. Fig.8 shows that the middle wall on the left side was completely removed and was not repairable.
Fig.7 Cut to stud
Fig.8 Wallboard removed
Step 5: Fig.9 shows that the more the wall was looked at more of the wall was removed. Almost half the wall was so wet that it was removed and not repairable. Even the fiberglass was damaged from the leak, notice that the right side is a different color than the left side. The water damage was worst on the left side than the right side.
Fig.9 Wallboard removed
Step 6: Fig.10 and fig.11 shows that a use of the vacuum cleaner was used to remove all the loose debris (pieces) that was left inside and outside the wall. Bigger portion of the wall was placed into a trash can. The wallpaper was stripped from the wall and saved for later application.
Fig.10 Cleaning the studs
Fig.11 Vacuuming inside the wall
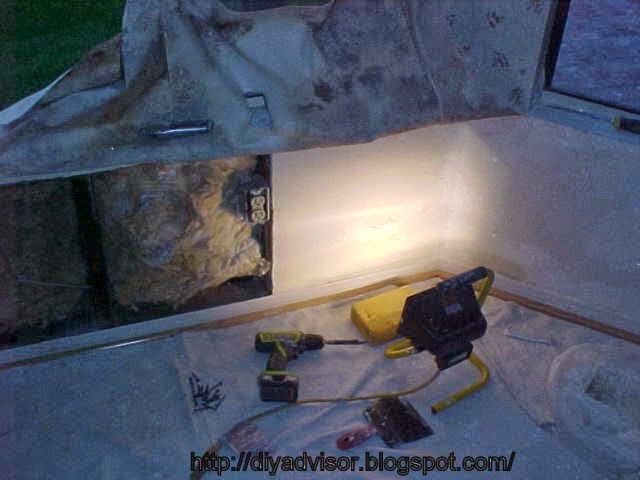
Step 7: Fig.12 shows the right part of the wall was repaired at the bottom and not entirely replaced. A 500 watt heat lamp was used to dry the insulation and the wall repair. Noticed all the wallpaper was moved upwards away from the repair. Now the wall is ready for its new skin.
Fig.12 Drying insulation

How To Repair a Kitchen Nook Wall:


Update: DIY Advisor has New blogs check them today:
  • Cookie Alert: European Union laws requires that you know that this blog uses cookies. If you are concerned about this please click here to see how Google uses this information.


Note: The DIY Advisor assumes no liability for omissions, errors or the outcome of any jobs. The reader must always exercise reasonable caution, follow current codes and regulations that may apply, and is urged to consult with a licensed contractor if in doubt about any steps on these posts. All names were changed to protect client's privacy. DIY Advisor. Reproduction of site content including photos without permission prohibited. All rights reserved. © Copyright 2011-


Monday, March 23, 2015

How to Install Two kitchen Knifes Magnetic Bars

Fig.1 New Knife Rack
By Gary Boutin
 

Supplies and Tools: 
Claw hammer
Cordless screwdriver (hand held)
Level
Pencil #2
Phillip bit
Phillip Screwdriver manual
Screws and anchors
Tool rack holder organizer

George Baker is a used car salesman who live in Chino Hills, California. He live in a studio cottage overlooking a golf course overrun by carts and flying golf balls. He had installed a short metal magnetic knife holder in the kitchen but it wasn't large enough to hold all of his kitchen knives.

This post shows the ten steps on how to install an new magnetic organizer bar.

Step 1: Fig.1 shows how the new magnetic bar will look like.
Step 2: Fig.2 shows the tools needed for this job. A claw hammer, a hand held screwdriver with Phillip bit, two screwdriver both Phillip tip.
Fig.2 The installation tools
Step 3: Fig.3 shows the UPC sticker and description for two extra long tool rack holder organizer purchased on the Internet. 
Fig.3 Tool Rack Holder Organizer
Step 4: Fig.4 shows the packaged screws for the organizer. Fig.5 and fig.6 shows the screws and anchors for hanging the organizer bar. This set came with 4-metal screws, but it did not come with wall anchors. Fig.6 shows many types of wall anchors, some plastic and some metal. For this job large plastic wall anchors were used.
Fig.4 Package screws
Fig.5 Many sized wall anchors
Fig.6 Plastic anchors
Step 5: Fig.7 through fig.10 shows the removal of the old magnetic bar. Fig.7 shows the old magnetic bar. Fig.8 through fig.10 shows the steps to remove the bar. The magnetic bar had to be pried apart to remove the front cover. Once the cover was removed the installation screws could be removed. The block of wood was used to give some space between the outside cover and the wall.
Fig.7 Old magnetic knife bar
Fig.8 White magnet gray backing
Fig.9 Magnetic strips
Fig.10 Parts taken apart and stored
Step 6: Fig.11 shows the two magnetic bars that will be installed in the kitchen wall.
Fig.11 Two magnetic bars
Step 7: Fig.12 shows the one magnetic bar over the electrical plug. The magnetic torpedo level is attached to the metal rail to keep it straight. Use a pencil to assist that will be installed in the kitchen wall. It shows were to make the holes in the walls.
Fig.12 Torpedo Level
Step 8: Fig.13 and fig.14 shows to use of a #2 pencil to mark the holes for the magnetic rail. Fig.14 shows the use of a Phillip screwdriver to punch a hole in the wall. This techniques help when using plastic anchors.
Step 13: #2 pencil
Step 14: Phillip screwdriver
Step 9: Fig.15 shows the plastic anchor is placed in the wall. The plastic anchor is a place holder for the metal screws that will hold the metal rail on the wall. Four anchors were used for the knife rail. Use the claw hammer to hammer the plastic anchor flat into the wall. Just pushing the anchor in the wall will not work as well as if a hammer is used.
Step 15: Plastic anchor
Step 10: Fig.16 through fig.18 shows three pictures were the knives were placed on the magnetic organizer.
Fig.16 Left side
Fig.17 Middle
Fig.18 Knife rack color coded

Update: DIY Advisor has New blogs check them today:
  • Cookie Alert: European Union laws requires that you know that this blog uses cookies. If you are concerned about this please click here to see how Google uses this information.


Note: The DIY Advisor assumes no liability for omissions, errors or the outcome of any jobs. The reader must always exercise reasonable caution, follow current codes and regulations that may apply, and is urged to consult with a licensed contractor if in doubt about any steps on these posts. All names were changed to protect client's privacy. DIY Advisor. Reproduction of site content including photos without permission prohibited. All rights reserved. © Copyright 2011-

Saturday, March 15, 2014

How to Paint Garage Bedroom - Part 2 of 19 - Paint - Window Wall Shelf Removed

Fig.1 Wood shelf to be removed
By Gary Boutin

Supplies and Tools:
Cordless screwdriver with Phillip bit
Hacksaw with new blade 
Hacksaw with new metal blade

Mrs D. wanted to upgrade her bedroom. She needed the bedroom repaired before her new tenet would arrive in three days.

This post shows the five steps to removing a window shelf.

Step 1: Fig.1 shows the shelf that will be removed prior to painting the wall. 
Step 2: Fig.2 and fig.3 shows the shelf railing by the window that will be removed. Presently it being held by 4-sheetrock screws.
Fig.2 The rail without the shelf
Fig.3 Two rails put together
Step 3: Fig.4 and fig.5 shows the progression of removing the 3-inch sheetrock screw using a cordless screwdriver from the bedroom studs.
Fig.4 Removing 3 inch screws
Fig.5 Removing 
sheetrock screws
Step 4: Fig.6 and fig.7 shows another sheetrock screws removed from the middle of the shelf rail.
Fig.6 Cordless screwdriver 
removed screws
Fig.7 One side removed
Step 5: Fig.8 and fig.9 shows that only one screw would not unscrew, the sheetrock screw was stripped. The cordless screwdriver was just spinning the Phillips head and stripping the screw. The only way to remove the screw without damaging the wall was to saw the screw. Use a hand held hacksaw and pull up and push down until the screw is cut. This job is done and the next post shows it's time to repair the wall damages.
Fig.8 Hacksaw blade
cutting stripped screw
Fig.9 Job done

How to Paint a Garage Bedroom:

Update: DIY Advisor has New blogs check them today:

  • Cookie Alert: European Union laws requires that you know that this blog uses cookies. If you are concerned about this please click here to see how Google uses this information.

Note: The DIY Advisor assumes no liability for omissions, errors or the outcome of any jobs. The reader must always exercise reasonable caution, follow current codes and regulations that may apply, and is urged to consult with a licensed contractor if in doubt about any steps on these posts. All names were changed to protect client's privacy. DIY Advisor. Reproduction of site content including photos without permission prohibited. All rights reserved. © Copyright 2011-

Tuesday, May 7, 2013

How to Hang Pre-hung Door - Part 10 of 15 - Inside Door Mud

Fig.1 Joint compound
By Gary Boutin

Supplies and Tools:
Cordless screwdriver with Phillip bit
Mud knives
Mud also called joint compound
Wall tape

Mr. Victor Longpont hired my services to remove his garage door that had become damaged after a bad rain storm. The door had not been painted for over 30 years, the bottom of the door was damaged by a badly worn door sweep that allowed water into the bottom of the door. 

This post shows the six steps to applying joint compound inside the door jamb. 

Step 1: Fig.1 shows that the joint compound was removed from a new container and applied to the open gaps in the doorway.  
Step 2: Fig.2 shows the a mud knife was used to apply the mud and make an edge for the corner bead.
Fig.2 Tape and joint compound
Step 3: Fig.3 shows the application of mud all around the door and flatten the mud as much as possible.  
Fig.3 Taping top
Step 4: Fig.4 shows a gap between the door jamb and the sheetrock. This side is not as bad as the hinge side.
Fig.4 Taping 
around lock plate
Step 5: Fig.5 and fig.6 shows that mud was applied on the top right of the door. Fig.6 shows a larger perspective of the work done inside the door jamb.
Fig.5 Taping 
around door edges
Fig.6 Above electrical alarm
Step 6: Fig.7 shows the door jamb is smooth all ready to apply the corner bead to the door jamb edges and fig.8 shows that this part of the job is finished.
Fig.7
Fig.8 Tape 
behind door hinges

How to Hang a Pre-hung Door:


  • Part 1 of 15 Introduction Why Replace This Garage Door
  • Part 2 of 15 Removing The Damaged Door
  • Part 3 of 15 Door Hardware Removed
  • Part 4 of 15 Door Threshold Removal
  • Part 5 of 15 Installing Door
  • Part 6 of 15 Recycled Metal Removed
  • Part 7 of 15 Caulking Outside Door Edges
  • Part 8 of 15 New Door Hardware Installed
  • Part 9 of 15 Caulking Door Screws Holes
  • Part 10 of 15 Inside Door Mud
  • Part 11 of 15 Inside Door Taping
  • Part 12 of 15 Inside Door Painted
  • Part 13 of 15 Applying Stucco To Door Edge
  • Part 14 of 15 Exterior Door Molding
  • Part 15 of 15 Old Door Cut to Trash


  • Update: DIY Advisor has New blogs check them today:

    • Cookie Alert: European Union laws requires that you know that this blog uses cookies. If you are concerned about this please click here to see how Google uses this information.

    Note: The DIY Advisor assumes no liability for omissions, errors or the outcome of any jobs. The reader must always exercise reasonable caution, follow current codes and regulations that may apply, and is urged to consult with a licensed contractor if in doubt about any steps on these posts. All names were changed to protect client's privacy. DIY Advisor. Reproduction of site content including photos without permission prohibited. All rights reserved. © Copyright 2011-