Showing posts with label level. Show all posts

Monday, March 23, 2015

How to Install Two kitchen Knifes Magnetic Bars

Fig.1 New Knife Rack
By Gary Boutin
 

Supplies and Tools: 
Claw hammer
Cordless screwdriver (hand held)
Level
Pencil #2
Phillip bit
Phillip Screwdriver manual
Screws and anchors
Tool rack holder organizer

George Baker is a used car salesman who live in Chino Hills, California. He live in a studio cottage overlooking a golf course overrun by carts and flying golf balls. He had installed a short metal magnetic knife holder in the kitchen but it wasn't large enough to hold all of his kitchen knives.

This post shows the ten steps on how to install an new magnetic organizer bar.

Step 1: Fig.1 shows how the new magnetic bar will look like.
Step 2: Fig.2 shows the tools needed for this job. A claw hammer, a hand held screwdriver with Phillip bit, two screwdriver both Phillip tip.
Fig.2 The installation tools
Step 3: Fig.3 shows the UPC sticker and description for two extra long tool rack holder organizer purchased on the Internet. 
Fig.3 Tool Rack Holder Organizer
Step 4: Fig.4 shows the packaged screws for the organizer. Fig.5 and fig.6 shows the screws and anchors for hanging the organizer bar. This set came with 4-metal screws, but it did not come with wall anchors. Fig.6 shows many types of wall anchors, some plastic and some metal. For this job large plastic wall anchors were used.
Fig.4 Package screws
Fig.5 Many sized wall anchors
Fig.6 Plastic anchors
Step 5: Fig.7 through fig.10 shows the removal of the old magnetic bar. Fig.7 shows the old magnetic bar. Fig.8 through fig.10 shows the steps to remove the bar. The magnetic bar had to be pried apart to remove the front cover. Once the cover was removed the installation screws could be removed. The block of wood was used to give some space between the outside cover and the wall.
Fig.7 Old magnetic knife bar
Fig.8 White magnet gray backing
Fig.9 Magnetic strips
Fig.10 Parts taken apart and stored
Step 6: Fig.11 shows the two magnetic bars that will be installed in the kitchen wall.
Fig.11 Two magnetic bars
Step 7: Fig.12 shows the one magnetic bar over the electrical plug. The magnetic torpedo level is attached to the metal rail to keep it straight. Use a pencil to assist that will be installed in the kitchen wall. It shows were to make the holes in the walls.
Fig.12 Torpedo Level
Step 8: Fig.13 and fig.14 shows to use of a #2 pencil to mark the holes for the magnetic rail. Fig.14 shows the use of a Phillip screwdriver to punch a hole in the wall. This techniques help when using plastic anchors.
Step 13: #2 pencil
Step 14: Phillip screwdriver
Step 9: Fig.15 shows the plastic anchor is placed in the wall. The plastic anchor is a place holder for the metal screws that will hold the metal rail on the wall. Four anchors were used for the knife rail. Use the claw hammer to hammer the plastic anchor flat into the wall. Just pushing the anchor in the wall will not work as well as if a hammer is used.
Step 15: Plastic anchor
Step 10: Fig.16 through fig.18 shows three pictures were the knives were placed on the magnetic organizer.
Fig.16 Left side
Fig.17 Middle
Fig.18 Knife rack color coded

Update: DIY Advisor has New blogs check them today:
  • Cookie Alert: European Union laws requires that you know that this blog uses cookies. If you are concerned about this please click here to see how Google uses this information.


Note: The DIY Advisor assumes no liability for omissions, errors or the outcome of any jobs. The reader must always exercise reasonable caution, follow current codes and regulations that may apply, and is urged to consult with a licensed contractor if in doubt about any steps on these posts. All names were changed to protect client's privacy. DIY Advisor. Reproduction of site content including photos without permission prohibited. All rights reserved. © Copyright 2011-

Sunday, September 14, 2014

How to Paint Brown Living Room - Part 3 of 7 - Vacuum and Texture Clean Up

Fig.1 Vacuum
By Gary Boutin

Supplies and Tools:
Particle mask 
Painter's tarp
Vacuum Cleaner with tools

Tyler Zowat lives in Perris, California. Had hired a local plumber to replace
Fig.2 Dust mask
his bathroom shower and sink hardware. Somehow the plumber noticed the wall was wet and replaced the pipe but he had to cut a hole in the living room wall. The plumber stated he does no finish work. That when he used my service company. He purchased all his paint and plumbing parts from
The Home Depot.


This post shows the six steps to clean up the repair mess. 

Step 1: Above right fig.1 shows a vacuum cleaner and fig.2 shows a particle mask to protect the lungs form the joint compound dust. Below in fig.3 shows the vacuum brush is vacuuming up the wall dust.
Fig.3 Joint compound dust
Step 2: Fig.4 below shows the vacuum tools has cleaned up the gray tarp used in the wall repair.
Fig.4 Vacuum brush
Step 3: Fig.5 shows the vacuum with an extended pole vacuuming the edges of the living room wall. Vacuuming below the tarp will be needed too.
Fig.5 Remove dust 
from baseboards
Step 4: Fig.6 shows the gray tarp has been removed and the vacuuming of thee edges has been done and some more vacuuming of the painter's tarp is being done. Vacuum on top of the cloth duct tape too.
Fig.6
Step 5: Fig.7 shows a another round around the damaged baseboards and very edge of the living room carpeting.
Fig.7
How To Paint Brown Living Room:

Update: DIY Advisor has New blogs check them today:
  • Cookie Alert: European Union laws requires that you know that this blog uses cookies. If you are concerned about this please click here to see how Google uses this information.
 
Note: The DIY Advisor assumes no liability for omissions, errors or the outcome of any jobs. The reader must always exercise reasonable caution, follow current codes and regulations that may apply, and is urged to consult with a licensed contractor if in doubt about any steps on these posts. All names were changed to protect client's privacy. DIY Advisor. Reproduction of site content including photos without permission prohibited. All rights reserved. © Copyright 2011-

Wednesday, September 18, 2013

How to Install a Kitchen Gallery Shelf Unit

Mural shelf unit
By Gary Boutin

Parts and Supplies:  
Electric drill 
Gallery shelf kit and instructions
Level  
Screwdriver
Tape measure

Michael works for a program called Uncommon Good that teaches students about green energy. His home is located in Upland, California, a beautiful neighborhood with mature trees in a rural setting. He had just purchased a century-old home and wanted to preserve its look. Being a principal member of Uncommon Good, he was using the house to teach others how to go green. He called my repair service to install a kitchen shelf.

This post shows the ten steps to assemble and install a wooden shelf above the kitchen range. 

Step 1: Fig.1 shows the picture on the box. It shows that the shelf is 23 inches long and it's white.
Fig.1 Gallery shelf kit
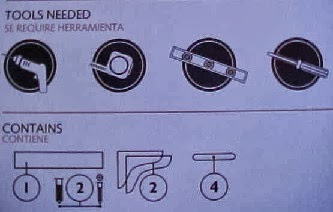
Step 2: Fig.2 shows the tools needed for this job. An electric drill, a tape measure, a level and a screwdriver. The bottom  of the box also shows a visual representation of what parts are inside this box.
Fig.2 Tools needed
Step 3: Fig.3 shows the instructions on how to assemble this shelf unit.
Fig.3 The directions
Step 4: Fig.4 shows this part of the box sent a phone number if the directions or if there are missing parts. 1-800-582-7021
Fig.4 Phone number
Step 5: Fig.5 shows the hardware package filled with wood plugs, plastic anchors and metal screws.
Fig.5 Hardware
Step 6: Fig.6 shows the first side of the shelf with two wood plugs inserted into the pre-drilled holes. These wood plugs will hold the base shelf.
Fig.6 Plugs
Step 7: Fig.7 through fig.9 shows the progression on placing the metal screw into the wall. Use the measuring tape to get the exact location. Fig.7 shows the marks on the wall from measuring the exact location of each screw that will hold the shelf. Fig.8 shows a cordless screwdriver placing a metal screw into a plastic wall anchor. Fig.9 shows the exact measurement of the metal screw that will hold the wood shelf and carry all the weight needed. You will need to make two measurement to hold both sides of the shelf.

Fig.7 Measured holes
Fig.8 Cordless screwdriver
Fig.9 The metal screw support
Step 8: Fig.10 shows the pre-drilled screw-slot that will tie onto the screw holding the wood shelf.
Fig.10 Test the screw
Step 9: Fig.11 shows the assembly of the wood shelf, the first leg is on the wall. Fig.12 shows the top shelf is on the legs. Now the shelf is secured and almost ready to use.
Fig.11 Against the wall
Fig.12 Against the wall
Step 10: Fig.13 shows the shelf completed and ready for kitchen herbs and condiments.
Fig.13 All finished

Update: DIY Advisor has New blogs check them today:

  • Cookie Alert: European Union laws requires that you know that this blog uses cookies. If you are concerned about this please click here to see how Google uses this information.

Note: The DIY Advisor assumes no liability for omissions, errors or the outcome of any jobs. The reader must always exercise reasonable caution, follow current codes and regulations that may apply, and is urged to consult with a licensed contractor if in doubt about any steps on these posts. All names were changed to protect client's privacy. DIY Advisor. Reproduction of site content including photos without permission prohibited. All rights reserved. © Copyright 2011-

Sunday, March 31, 2013

How to Install Bedroom Exterior Side Door

Fig.1: Carl with all the supplies
By Gary Boutin

Supplies and Tools:
Caulking gun
Cordless drills with a Phillips bit
Compound saw
Drywall joint compound
Electrical cords
Latex caulking
Level 4-foot
Paint brushes, paint frames, roller cover, paint trays 
Pre-hung door 30-inches
Radial saw
Razor knife (cut sheetrock)
Reciprocating saw with 6-inch metal blade
Saw horses
Sheetrock screws 2-1/2 and 3-inch screws
Shims - composite
T-square 
Utility knife and extra blades
White Latex Primer
Wood molding (inside and outside of door) 
Wood putty

A client from Wrightwood, California called my repair service to place a new door in a servant room. This job was done with my good friend Carl who helped me do this project.

This post shows the ten steps on how to remove and replace a damaged door. 

From Wikipedia, the free encyclopedia; Wrightwood has an elevation of 5,935 feet (1,809 meter) and a population of 4,525. This city is a pine covered valley in the San Gabriel Mountains, the area was first developed as cattle ranches and broken up into residential in 1920. Early ski enthusiasts discovered the north facing slopes of the San Gabriel Valley. Wrightwood has evolved from a vacation community to home to over 4000 full-time residents. At nearly 6000 feet in elevation, its valley is protected by the Blue Ridge to the South.

Step 1: Enjoy the drive and bring all the tools, pre-hung door and equipment necessary to do the job. No easy hardware stores in this area so everything must be brought in by truck. Fig.1 and fig.2 shows the two plastic horses that will hold the old door and keep our tools within easy reach.
Fig.2: Two saw horses
Step 2: Remove the door by removing the hing pins. Place the door outside to be cut and disposed. Use electrical cords to supply power to the reciprocating saw that will cut the door out of its existing area. Sometimes to get the door out the door jamb need to be cut in the middle to remove them to the trash area. Fig.3 shows the door has been cut and placed in the trash can for disposal.
Fig.3 Door in trash can

Step 3: Unpacked the 30-inch pre-hung door. Remember prior to ordering the door make sure the measurement are correct. Not all warehouse stores will return a door if the measurements are incorrect. Fig.4 shows the staples being removed from the bottom of the door, the cardboard has been discarded but the information has been kept for the clients records. This door has energy credit available for income tax benefits.


Fig.4 Bottom of pre-hung door
Step 4: Use both a 2-foot and 4-level to level the door. Place the door in the doorway and use 3-inch screws with with composite wood shims to square the door in the existing doorway. A partner makes this step a good choice. Fig.5 shows the screw (3-inch screws) is by the brass hinge and another hole below on the door frame.
Fig.5 Pre-hung 
door frame


Step 5: Fig.6 through fig.8 shows that the wood putty is being applied over the screws after the door in in place.
Fig.6 Putty on 
door frame

Fig.7 Putty 
on door jamb
Fig.8 Putty 
on lock side

Step 6: Fig.9 shows the exterior door edges have had stucco applied to the external wall and the new door jamb.
Fig.9 Stucco patch 
by wood frame
Step 7: After the door is in place, it  needs to be painted with primer. The wood putty needs to be sealed. Fig.10 and fig.11 shows Carl is priming the wood putty holes. Parts needed are 2-inch paint brushes, and a paint trays. Sheetrock will use up the blades (utility knife blades) so its important to keep a good supply on hand.
Fig.10 Carl painting 
wood frame

Carl painting bottom 
of wood frame

Step 8: Fig. 12 shows Carl is working on the door threshold plate.
Fig.12 Carl and 
threshold plate
Step 9: After the door was painted we worked on placing the new wood molding. The wall had to be repaired and new wall mud (drywall joint compound), tape and sheetrock screws will be screwed using a cordless screwdriver with a Phillips bit to repair the wall. Fig.13 shows the interior molding that was cut using a compound saw to cut the 45 degree angles. Use caulking gun and latex caulking after the wood molding is on the door to seal the molding to the wall. It also give the molding a finished look. Use a razor knife to cut the sheetrock and a T-square to cut it straight. This job does not require much taping and replacing sheetrock.
Fig.13 Inside mud 
around wood molding
Step 10: Fig.14 shows the door is complete and the maid quarters private entrance door.
Fig.14 Door finished
 

Update: DIY Advisor has New blogs check them today:

  • Cookie Alert: European Union laws requires that you know that this blog uses cookies. If you are concerned about this please click here to see how Google uses this information.

Note: The DIY Advisor assumes no liability for omissions, errors or the outcome of any jobs. The reader must always exercise reasonable caution, follow current codes and regulations that may apply, and is urged to consult with a licensed contractor if in doubt about any steps on these posts. All names were changed to protect client's privacy. DIY Advisor. Reproduction of site content including photos without permission prohibited. All rights reserved. © Copyright 2011-