Wednesday, October 29, 2014

How Praying Mantis (Mantis religiosa) Can Help Your Garden

Praying mantis
By Gary Boutin

Supplies and Tools: 
Praying Mantis (preferably alive)
Fresh Green Plants (Chives)

There are 2300 Praying Mantis species on mother earth. Some Praying Mantis have wings and can fly from bush to bush and some do not. According to the on-line Britannica "other names for the Praying Mantis are Mantidae; mantis; praying mantid; praying mantis". 

This post shows this praying mantis and how it was found laying on the hot asphalt driveway and what was done to find this Mantis a safe harbor so it can continue to populate its species.

About two weeks after the summer of 2014 several praying mantis started showing up around my home. Fig.1 and fig.2 shows the same Praying Mantis on a brown wood bench.
Fig.1 Bench
Fig.2 Close-up
Late September of 2014 while walking my two Basenji's, Kindu and Star, we noticed a very uncomfortable praying mantis, on the side of the our asphalt driveway. Capturing it was easy since the praying mantis had jumped over to avoid the many cats that roam our neighborhood. It was hot and not moving very fast. It allowed me to capture it and bring it to my garden. Fig.3 through fig.6 shows the praying mantis moving rapidly from one hand to another in hopes of getting away from me.
Fig.3 Walking on my arms

Fig.4 Walking on my arms

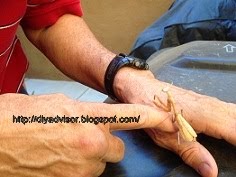
Fig.5 Walking on my finger
Fig.6 Walking on my hand
Fig.7 through fig.9 shows that the Praying Mantis was placed on green chives but soon realized the praying mantis was unhappy as it was perched on a white plastic chair. 
Fig.7 From my arm to chives
Fig.8 Moving to green chives
Fig.9 The white chair
While reading more about praying mantis the insect was moved from the patio to the front yard Begonias pots. The mantis immediately moved to lower plants stems and started to hide within the plant.
Fig.10 Free in the begonias
Fig.11 Moving away
Internet links about praying mantis.
  1. Wiktionary Praying Mantis
  2. The Old Farmer's Almanac
  3. 2014 Dictionary.com
  4. eNature
  5. Connecticut's Beardsley Zoo
  6. Tom Clothier's Garden Walk and Talk
  7. MOTHER EARTH NEWS: Nature and Environment Beneficial Insects Praying Mantis
  8. Prey Capture In The Praying Mantis by Brian J. Corrette. The Journal of Experimental Biology 

Update: DIY Advisor has New blogs check them today:
  • Cookie Alert: European Union laws requires that you know that this blog uses cookies. If you are concerned about this please click here to see how Google uses this information.

Note: The DIY Advisor assumes no liability for omissions, errors or the outcome of any jobs. The reader must always exercise reasonable caution, follow current codes and regulations that may apply, and is urged to consult with a licensed contractor if in doubt about any steps on these posts. All names were changed to protect client's privacy. DIY Advisor. Reproduction of site content including photos without permission prohibited. All rights reserved. © Copyright 2011-

Tuesday, October 21, 2014

How to Install Missing Air Gap Hose

Slot screwdriver
By Gary Boutin

Supplies and Tools:  
Air Gap Black PVC Disposer Hose (Watts)
Dishwasher Hose (new)  
Flashlight or portable light 
Measuring tape
Nut driver or Hex Socket (for hose clamps)
Stainless Steel Hose Clamps (Worm Drive)
Screwdriver Slot
Scissors
Shallow Pan (for drips)
Vacuum Cleaner

Janet a former customer who lives at Inland Empire Apartments needed a simple job done in her newly designed kitchen. The apartment came with all new appliances before she moved into her unit. She had looked at the air gap and noticed that it was not operational and had been told by a local plumber that the air gap should be in use for her new dishwasher to work correctly. She had called the service desk several time and tried to get a date when the job could be done but she was unable to placed work order for an immediate assignment. Upon arrival the handyman noticed the air gap was placed on the new granite counter top but was not attached to either the dishwasher or the garbage disposal. The dishwasher hose was installed on the garbage disposal unit so it could drain. A new hose would need to be installed onto the air gap and also attached the dishwasher hose to the garbage disposal. Janet had purchased the Watt hose below. She neglected to purchase the hose clamps that would secure the rubber hose to the air gap. She had a new Maytag manual that shows a complete installation of how the unit needed to be installed. For more information, please click on Maytag link above.

The main part for this job is the Watt Air Gap Hose obtained from The Home Depot web page. "This utility hose is designed with PVC compounds and reinforced with polyester braiding. The braiding offers better fitting retention and less chance of blow off than non-braided styles. It is designed for use as a washing machine or dishwasher inlet and drain hose." If more specification is needed, please click on The Home Depot link above.

This post shows the seven steps used to install a rubber hose onto an air gap.

Step 1: Obtain the parts for the job. Fig.1 shows a Watts Black PVC Disposer Hose 7/8 in. x 2 ft. made in Mexico.
Fig.1 Air gap hose
Step 2: Fig.2 shows the instructions on the back of the air gap packaging.
Fig.2 Pictograph directions
Step 3: Fig.3 shows written directions on how to install the rubber hoses to the air gap.

Fig.3 Written directions
Step 4: Fig.4 shows that scissors were used to cut the end of the dishwasher discharge hose so it could be attached to the bottom of the air gap.
Fig.4 Tools
Step 5: Fig.5 shows a worm drive hose clamp attached to the air gap rubber hose and another one attached to the dishwasher discharge hose. For more information on worm hose clamps click here. A slotted screwdriver (top above right) was used to tightened the hose clamps to each end of the air gap.
Fig.6 Worn hose clamp
Step 6: Fig.6 shows the rubber hose is attached to the garbage disposal discharge inlet.

Fig.6 Discharge inlet
Step 7: Fig.7 shows the air gap is completely installed. The new rubber hose is discharging its waste correctly into the garbage disposal according to the Maytag manual. Janet's job is done.
Fig.7 Air gap hose finished


Update: DIY Advisor has New blogs check them today:
  • Cookie Alert: European Union laws requires that you know that this blog uses cookies. If you are concerned about this please click here to see how Google uses this information.
 
Note: The DIY Advisor assumes no liability for omissions, errors or the outcome of any jobs. The reader must always exercise reasonable caution, follow current codes and regulations that may apply, and is urged to consult with a licensed contractor if in doubt about any steps on these posts. All names were changed to protect client's privacy. DIY Advisor. Reproduction of site content including photos without permission prohibited. All rights reserved. © Copyright 2011-

Monday, October 13, 2014

How to Replace Damaged Bedroom Door

Fig.1 Two portable 
work benches
By Gary Boutin
 
Supplies and Tools:   
Aluminum metal gate for Saw
Brass Door Hinges 3.5 inch (2)
Brass #9 wood screws with 5/8 inch radius
Circular saw 
Caulking latex 
Cordless Screwdriver - Phillip tip
Door 6-panel 32 inch
Polished Doorknob Privacy Set  
Extension cords   
Pencil #2
Porter-Cable Router
Porter-Cable Door Hinge Template 
Spring clamp - Large (2)
Tape measure - large print
White wood filler
Work benches-portable

Henry Drake works nights and lives in a single story home in the City of Highland. He has two daughters between the age of 16 and 18 years. One night both boyfriends were caught in his daughter bedrooms. They had locked themselves in the largest bedroom. Henry, instead of waiting it out, lost his patience and kicked in the bedroom door. The door could not close unless it was picked up by the door handle. All doors and hardware were purchased at The Home Depot.

This post shows the twelve steps on how to remove, replace and re-hang a six-panel door.  

Step 1:
Above right fig.1 shows the portable work benches that the door will be placed on to cut each edge. Fig.2 shows that the bedroom door hinges were upside down.
Fig.2 Upside down hinge
Step 2: Fig.3
shows that the door frame and the door casing were from kicking in the door. Later this door jamb was filled with white wood filler and white latex caulking.
Fig.3 Door jamb damaged
Step 3: Fig.4
and fig.5 shows both sides the damaged bedroom door.
Fig.4 Bedroom hall side
Fig.5 door hardware removed
Step 4: Fig.6
shows the door hinge has been removed. 
Fig.6 Bedroom inside
Step 5:
The bedroom door had two problems. The first problem was the new 6-panel door was to tall and to wide. The second problem was the door hinge hardware was crushed and could not be reused. Fig.7 shows were the old door was attached using spring clamps to get the right fit. Fig.8 shows the Pencil line that will be as a guide for the saw to cut the door.
Fig.7 Spring clamped
Fig.8 Pencil line

Step 6: Fig.9 shows saw metal gate used to guide the saw. Each side top and bottom of the door was held by an Orange large spring clamp. A circular saw was used to cut the door down. 
Fig.9 Saw clamp
Step 7: Fig.10
shows a close-up view of the tape measure and how much wood will be needed to be cut. Barely a quarter inch needed to be removed from the vertical side of the door.
Fig.10 Tape measure large numbers
Step 8: Fig.11
shows the door jamb is not damaged and fig.12 shows the painted door hinges were removed and had new stripped brass screws. The same hinge cutout will need to be used on the door before it can be re-hung.
Fig.11 Door jamb
Fig.12 Door hinges damaged screws
Step 9: Fig.13
shows new brass door hinges and new brass #9 screws were used to re-install the door hinges. Below the door hinge was cut using a wood router and template.
Fig.13 Brass hinge
Step 10: Fig.14
shows door jamb hardware was removed when new door hardware was purchased for the bedroom door. Fig.15 shows the new door strike plate being installed on the door jamb and the door handle was installed in the new door.
Fig.14 Door jamb hardware removed
Fig.15 New door strike plate
Step 11: The use #9 brass screws that came with the packaging. Fig.16 shows the top hinge of the door.
Fig.16 Door Hinges replaced
Step 12: Finished. Mr. Drake had a new doorknob set replaced. The edges of the door will be painted later in the year. Fig.17 shows the new door knobs placed on the repaired and trimmed door. Fig.18 shows the finished door. The wood part was left unpainted because the home would be painted in the following weeks.
Fig.17 Chrome door knobs set
Fig.18 Door finished 
with new door knob


Update: DIY Advisor has New blogs check them today:
  • Cookie Alert: European Union laws requires that you know that this blog uses cookies. If you are concerned about this please click here to see how Google uses this information.
 
Note: The DIY Advisor assumes no liability for omissions, errors or the outcome of any jobs. The reader must always exercise reasonable caution, follow current codes and regulations that may apply, and is urged to consult with a licensed contractor if in doubt about any steps on these posts. All names were changed to protect client's privacy. DIY Advisor. Reproduction of site content including photos without permission prohibited. All rights reserved. © Copyright 2011-

How to Paint Brown Living Room - Part 4 of 7 - Texture and Clean Up

Fig.1
Gary Boutin

Supplies and Tools:
Homex© Spray Texture spray can
Large sponge

Tyler Zowat 's home was in Perris, California. He had a huge family that visited his large home regularly. I received a call from Tyler that his local plumber had repaired a leak in the bathroom wall and he needed to have someone fix the wall, and paint two walls in the living room. All his parts were purchase from The Home Depot.

This post will show the two steps needed to apply texture to the living room wall.  

Step 1: Fig.1 shows Homex© Spray Texture spray can. 
Step 2: Click on my page below to see how to apply texture to this living room wall.  "How to apply Orange Peel Spray Texture".

How to Paint Brown Living Room:


Update: DIY Advisor has New blogs check them today:
  • Cookie Alert: European Union laws requires that you know that this blog uses cookies. If you are concerned about this please click here to see how Google uses this information.

Note: The DIY Advisor assumes no liability for omissions, errors or the outcome of any jobs. The reader must always exercise reasonable caution, follow current codes and regulations that may apply, and is urged to consult with a licensed contractor if in doubt about any steps on these posts. All names were changed to protect client's privacy. DIY Advisor. Reproduction of site content including photos without permission prohibited. All rights reserved. © Copyright 2011-

Friday, October 10, 2014

How to Vacuum Bathroom Fan

Fig.1 Fan motor
By Gary Boutin


Supplies and Tools:   
Vacuum Cleaner 
Flat Brush
Air Vent Cover

I was called by a Mr. Applehumber in Santa Clarita, California. They were selling their homes and moving up to Colorado. After the Realtor checked their beautiful home, she requested a huge laundry list of repairs. Jim wanted to find out why his all his bathroom fan had clogged fans. 

 
This post shows the seven steps to clean a bathroom fan cover. 

Step 1: Fig.1 above right shows the opened air vent lid. Remove one side of the vent by clipping off the metal clip from the plastic vent.
Step 2: Fig.2 shows below shows a small vacuum cleaner brush to get rid of the cobwebs and dust.
Fig.2 Vacuum flat brush
Step 3: Fig.3 shows clean the exterior metal base too and the motor.
Fig.3 Clean wall edges
Step 4: Fig.4 shows fan cover clips that hold the plastic cover.

Fig.4 Vent clip
Step 5:
Fig.5 shows the metal clips the metal body to the plastic vent.
Fig.5 Vent body clip
Step 6: Fig.6 shows replacing plastic vent to wall. Re-attaching cover to metal base.
Fig.6 Re-placing
Step 7: The Job finished and dust has been removed. This needs to be done at least twice a year and sometime more if you live in a dry desert climate. You might have to wash the plastic vent with soap and water or replace the plastic unit. 


Update: DIY Advisor has New blogs check them today:
  • Cookie Alert: European Union laws requires that you know that this blog uses cookies. If you are concerned about this please click here to see how Google uses this information.
 
Note: The DIY Advisor assumes no liability for omissions, errors or the outcome of any jobs. The reader must always exercise reasonable caution, follow current codes and regulations that may apply, and is urged to consult with a licensed contractor if in doubt about any steps on these posts. All names were changed to protect client's privacy. DIY Advisor. Reproduction of site content including photos without permission prohibited. All rights reserved. © Copyright 2011-