 |
| Fig.1 LiftMaster® Garage opener |
Supplies and Tools:
Energizer® Batteries #2032
Jewel Phillip screwdriver (on some models)
Our LiftMaster® garage door opener stopped working, the batteries last approximately two years. This post shows how easy it is to replace the batteries in your garage door opener.
This post shows the fourteen steps on how to change batteries in a garage door opener unit.
Step 1: Fig.1 shows the garage door opener removed from the car visor.
Step 2: Fig.2 shows the opener is on my lap and ready to be repaired. Most garage opener comes with all the tools to replace the batteries. Some have screws and you will need a jewel Phillip screwdriver to separate the two pieces. This one has to be pried open,
 |
| Fig.2 Garage opener back |
 |
| Fig.3 Taken apart |
 |
| Fig.4 Place the clip at the arrow |
 |
| Fig.5 Opener is opened up |
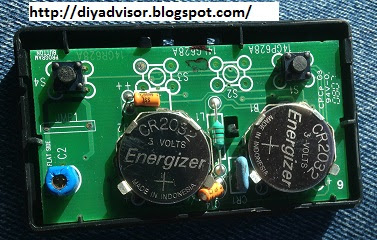 |
| Fig.6 Energizer® batteries |
 |
| Fig.7 Round batteries #2032 |
 |
| Fig.8 Battery Identifier |
 | |
| Fig.9 Battery protector |
 |
| Fig.10 Got Battery |
 |
| Fig.11 Two battery per unit |
 |
| Fig.12 New garage door opener batteries |
 |
| Fig.13 Align the corners |
 |
| Fig.14 Ready to use |
 |
| Fig.15 Clip back on |
 |
| Fig.16 Moved on the left side |
Update: DIY Advisor has New blogs check them today:
- Handyman Blog: DIY Advisor
- DIY Advisor Sitemap
- Food Blog: From Kiwis To Pistachios
- Food Blog Sitemap
- Tool Blog: DIY Advisor Toolbox
- Tool Blog Sitemap
- Artwork Blog: Light in Dark Artwork
- Artwork Blog Sitemap
- Class-A Tests: DIY Class-A Drivers License Tests
- Class-A Tests Sitemap: Class-A Sitemap
- DIY Poem: DIY Poem Meter Blog
- DIY Poem Sitemap: DIY Poem Sitemap
- Cookie Alert: European Union laws requires that you know that this blog uses cookies. If you are concerned about this please click here to see how Google uses this information.
Note: The DIY Advisor assumes no liability for omissions, errors or the outcome of any jobs. The reader must always exercise reasonable caution, follow current codes and regulations that may apply, and is urged to consult with a licensed contractor if in doubt about any steps on these posts. All names were changed to protect client's privacy. DIY Advisor. Reproduction of site content including photos without permission prohibited. All rights reserved. © Copyright 2011-
