Saturday, January 28, 2012

Blue Bedroom - Part 3 of 7 - Sanding and Priming the Ceiling

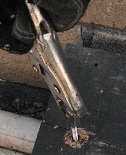
Fig.1 Ceiling to be sanded
By Gary Boutin

Supplies and Tools: 

150 grit sanding screen
Extension pole 2 feet
Latex primer 3 gallons
Masking tape 2-inch
Metal paint tray with plastic inserts
Paint brush 2 inch

Pole sander
Roller cover 3/8 inch nap
Roller frame 9 inch

Sandpaper
Tarps 9x12 

Tyler Zowat, noticed the listing and called me to come to his home in Perris, California. He had a little girl's room with blue walls and since his daughter had grown up and moved to private school, he wanted the bedroom closet finished. This post is a continuation of the previous post to finish the sanding and priming of the ceiling.
 
This post show the six steps of sanding and sealing the ceiling. 

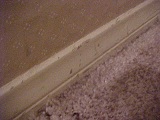
Step 1: Fig.1 and fig.2 shows that after the popcorn the ceiling is very uneven and needed to be sanded.  
Fig.2 Ceiling ready to be sanded
Step 2: Fig.3 and fig.4 shows a pole sander was used to sand the ceiling. A 150 grit sanding screen was used for the ceiling.
Fig.3 Pole sander sanding the ceiling flat
Fig.4 Pole sander by ceiling vent
Step 3: Fig.5 shows the ceiling was rolled using latex primer with a nine-inch paint frame and a 3/8 inch (9.525 millimeter) nap roller cover.  Cover the floor to protect the carpeting and tape the tarp with 2-inch masking tape at the edges.
Fig.5 Paint with primer
Step 4: Fig.6
shows the primer to be used on the ceiling. Pour the paint into a metal paint tray with a plastic liner. Used an extension pole and screwed into the paint frame. This gives you more control over the roller and also helps reduce fatigue. Now dip the roller into the paint and applied the paint to the ceiling edges around the complete perimeter of the room.
Fig.6 Use Kilz primer
Step 5: 
After the first coat is finished, roll the second coat in the opposite direction.
Step 6:
Fans were used in the room to the ceiling area to assist in drying the paint. This type of primer dries in one hour and is ready for the next job. 


Blue Bedroom:

DIY Advisor Blogs:
  • Handyman Blog: DIY Advisor
  • Food Blog: From Gary Boutin
  • Artwork Blog: Light in Dark Artwork
  • Class-A Tests: DIY Class-A Drivers License Tests

    • Cookie Alert: European Union laws requires that you know that this blog uses cookies. If you are concerned about this please click here to see how Google uses this information.

    Note: The DIY Advisor assumes no liability for omissions, errors or the outcome of any jobs. The reader must always exercise reasonable caution, follow current codes and regulations that may apply, and is urged to consult with a licensed contractor if in doubt about any steps on these posts. All names were changed to protect client's privacy. DIY Advisor. Reproduction of site content including photos without permission prohibited. All rights reserved. © Copyright 2011-

    Sunday, January 22, 2012

    How to Replace an Aluminum Front door Screen

    Re-screening Tools
    By Gary Boutin

    Supplies and Tools:
    Spline 11/64-inch

    Fiberglass charcoal screening
    Screen tool
    1/4 inch screwdriver
    Needle nose pliers
    Scissors 
    Razor knife 
    Hammer

    I received a call from Michael, from Uncommon Good, a program teaching students green energy. His home is located in Upland, California, a beautiful neighborhood with mature trees in a rural setting. He had just purchased a century-old home and wanted to preserve its look. Being a principal member of Uncommon Good, he was using the house to teach others how to go green. Instead of replacing the aging aluminum door, he decided to re-screen it.

    This post shows the nine steps on how to replace the fiberglass screening on an aluminum screen door.

    Step 1: Fig.1
    shows the door has been removed, on the right side is the aluminum hinge with the pin inserted inside not to lose it. It is now ready for re-screening. Place the door on a clean dry surface, for example a cement driveway, to have a flat surface to work on., or use an asphalt driveway. The door must be placed screen towards the sky, and the metal decorations on the pavement, the channels must be in clear view to remove the spline from the screen channels.
    Fig.1 Door pin
    Step 2: Fig.2
    and fig.3 shows the spline, that will catch the edges of the screen securing it into the metal channel. This job required the purchase of number .160 round or 11/64 inch spline package. The fiberglass screen comes in gray or charcoal and the size for this job was 36 by 84 inches. The package comes in a small bag and the spline in rolled in a circle. When you purchase the screen it will come in a 3-foot size roll. Now that the spline and screen has been purchased and the door is on a flat surface, use needle-nose pliers, or a 1/4 inch (6.35 millimeter) flat head screwdriver to remove the old spline.
    Fig.2 Door and spline
    Fig.3 Removing spline
    Step 3:
    Once the tip of the spline is free, use the needle-nose pliers to pull the spline about 4-inches out of the metal channel. Then use your hands to pull the spline out of the metal channel freeing the old screen from the door. Remove the used spline and screen to the trash. Next, lay the new screen over the door, do not cut any of it, and get the new spline package.
    Step 4: Fig.4 shows the spline is guided into the metal door channel with the screen underneath it. Next use the screen tool to roll the spline into the metal channel.

    Fig.4 Screen tool
    Step 5: Fig.5 shows as you move around the door to the metal handle, cut the screen around the handle. If you do not cut around the handle then the screen will not lay flat as the spline is pushed into the metal channel. Next when you do the other side, you must stretch the screen as you roll the spline into the channel. This is the process of getting a flat screen on the door. After the spline has been installed into the metal channel and you are satisfied that the screen is stretched flat and taut, then it's time to cut the excess screen off the door. Use the scissors to cut the bottom of the door screen, remove any excess.  
    Fig.5 Door latch
    Step 6: Fig.6
    shows the use of a razor knife to cut the screen at the spline, not on the screen side, but on the metal side of the door.
    Fig.6 Razor knife
    Step 7: Fig.7
    shows that the door has a new screen, the door needs to be rehung on the hinges. Use a hammer to hit the pins into the door hinges.

    Fig.7 Hammer
    Step 8: Fig.8 shows that after the door has been hung, re-install the door spring. The two screws need to be re-tightened because this spring helps the door re-close after it is opened.

    Fig.8 Door spring
    Step 9: Fig.9 shows the door re-screening is finished, and the screen keeps the bugs out. Looking at this post re-screening looks easy, but it can take up to 2 hours, but after a few screens the job does get faster.
    Fig.9 Finished


    DIY Advisor Blogs:
  • Handyman Blog: DIY Advisor
  • Food Blog: From Gary Boutin
  • Artwork Blog: Light in Dark Artwork
  • Class-A Tests: DIY Class-A Drivers License Tests

    • Cookie Alert: European Union laws requires that you know that this blog uses cookies. If you are concerned about this please click here to see how Google uses this information.

    Note: The DIY Advisor assumes no liability for omissions, errors or the outcome of any jobs. The reader must always exercise reasonable caution, follow current codes and regulations that may apply, and is urged to consult with a licensed contractor if in doubt about any steps on these posts. All names were changed to protect client's privacy. DIY Advisor. Reproduction of site content including photos without permission prohibited. All rights reserved. © Copyright 2011-

    How to Remove Aluminum Decking Screws From Spa Deck

    Fig.1 Vice Grip®
    By Gary Boutin

    Supplies and Tools:
    Cordless screwdriver with Phillip bit 

    Crescent wrench for additional torque 

    This job required the removal of 20-screws using my cordless screwdriver, but some fifteen 3-inch aluminum screws remained. The deck had to be removed to repair a spa pipe that had been leaking. 

    This post shows the five steps on how to remove damaged aluminum head screws from a Douglas Fir wood deck. 

    Step 1: Fig.1 shows the Vice Grip® around each screw top.
    Step 2: Fig.2 shows the jaws of the pliers around the screw and turn counter-clockwise until the screw comes out of the wood. I had to dig out the wood around the aluminum screw for room for the tip of the pliers.  
    Fig.2 Vice Grip® Pliers

    Step 3: Fig.3, fig.4 and fig.5 shows each picture shows the screw being removed from the deck. The process must be repeated until all the screws are removed. Each screw takes about 3-minutes to remove. You must have good hand strength for this task. If you do not have the strength, then use a Crescent Wrench on the narrow side of the Vice Grip® and use the torque of the wrench to give you additional pressure.
    Fig.3 unscrewing from top
    Fig.4 Turning
    Fig.5 Its out job finished


    DIY Advisor Blogs:
  • Handyman Blog: DIY Advisor
  • Food Blog: From Gary Boutin
  • Artwork Blog: Light in Dark Artwork
  • Class-A Tests: DIY Class-A Drivers License Tests

    • Cookie Alert: European Union laws requires that you know that this blog uses cookies. If you are concerned about this please click here to see how Google uses this information.

    Note: The DIY Advisor assumes no liability for omissions, errors or the outcome of any jobs. The reader must always exercise reasonable caution, follow current codes and regulations that may apply, and is urged to consult with a licensed contractor if in doubt about any steps on these posts. All names were changed to protect client's privacy. DIY Advisor. Reproduction of site content including photos without permission prohibited. All rights reserved. © Copyright 2011-

    How to Tightened Custom Bathroom Handles

    Fig.1 Custom handle
    By Gary Boutin 

    Supplies and Tools:
    Allen wrench set
    Alligator vice grips
    Phillips screwdriver

    While doing my check list from a local Realtor, the master bathroom faucets handles on the master vanity and tub where loose. The handles worked fine but both the cold and hot were loose. 

    This post show the six steps needed to repair these tub handles. 

    Step 1: Above right fig.1 shows the handle screw on the top of the handle is loose. 
    Step 2: Fig.2 shows Alligator Vice Grips® were used to turn the top screw counterclockwise thus removing the screw from the handle base. 
    Step 3: Fig.3 shows the screw in inside the base cover and the decorative plastic cover is on the right.
    Fig.2 Handle top nut
    Fig.3 Handle base
    Step 4: Fig.4 shows the plastic cover to the metal base and inserting the cover over the faucet stem. 
    Step 5: Fig.5 shows the screw is being placed in the center of the handle and tightened tub handles have been adjusted. 
    Step 6: Ninety percent of bathroom and tub faucets are going to have a Phillips screw in the center of the handle. But on custom unpopular bathroom faucets it can be a simple Allen screw in the center or an Allen screw on the sides of the handle. To adjust these screws an Allen wrench set is needed and a must for all plumbing repairs.
    Fig.4 Screw installation
    Fig.5 Job finished


    DIY Advisor Blogs:
  • Handyman Blog: DIY Advisor
  • Food Blog: From Gary Boutin
  • Artwork Blog: Light in Dark Artwork
  • Class-A Tests: DIY Class-A Drivers License Tests

    • Cookie Alert: European Union laws requires that you know that this blog uses cookies. If you are concerned about this please click here to see how Google uses this information.

    Note: The DIY Advisor assumes no liability for omissions, errors or the outcome of any jobs. The reader must always exercise reasonable caution, follow current codes and regulations that may apply, and is urged to consult with a licensed contractor if in doubt about any steps on these posts. All names were changed to protect client's privacy. DIY Advisor. Reproduction of site content including photos without permission prohibited. All rights reserved. © Copyright 2011-

    How to Clean Wooden Baseboards

    Fig.1 Baseboards
    By Gary Boutin

    Supplies and Tools:
    Plastic or metal pail of soapy water
    Scrubby with sponge
    Powdered cleanser - Ralph
    Dry towels
    Vacuum 

    I was called by a client in Santa Clarita, California. They were selling their home and moving to Colorado. After the Realtor checked each room of their beautiful home, she requested a huge laundry list of repairs that needed to be addressed immediately. One job was to clean up all the baseboards.  These baseboard pictures were from one of the bedrooms.

    This post shows how to clean up wooden baseboards in your home.

    Step 1: The first step was vacuum the baseboards and the top and bottom edges to get as much dust or dirt off as possible. Fig.1, fig.2 and fig.3 shows all three baseboards were dirty. Above Fig.1 shows baseboards were damage from the vacuum cleaner rubber edge. 
    Step 2: Fig.2 shows baseboard damage was from bedroom furniture.
    Fig.2 Coffee
    baseboards
    Step 3: Fig.3 shows the baseboard damage was from wear and tear and general use.
    Fig.3 Nicked
    baseboards
    Step 4: Fig.4 shows a clean plastic pail filled with warm water and soap.
    Fig.4 Water pail
    Step 5: Fig.5 shows Ralph scouring powder but any scouring will do.
    Fig.5 Scouring powder
    Step 6: Fig.6 shows a green scrubbing pad.
    Fig.6 Clean sponge
    Step 7: Fig.7 shows powder cleanser removing the dirt with a green scrubber.
    Fig.7 Press and clean
    Step 8: Fig.8 shows the removal of dirt, grease, or stains.   
    Fig.8 Clean baseboards
    Step 9: Try not to press too hard but hard enough to remove the dirt from the baseboards. Use a clean towels to dry the baseboards. The purpose was to clean the baseboards, not to repaint them.


    DIY Advisor Blogs:
  • Handyman Blog: DIY Advisor
  • Food Blog: From Gary Boutin
  • Artwork Blog: Light in Dark Artwork
  • Class-A Tests: DIY Class-A Drivers License Tests
    • Cookie Alert: European Union laws requires that you know that this blog uses cookies. If you are concerned about this please click here to see how Google uses this information.

    Note: The DIY Advisor assumes no liability for omissions, errors or the outcome of any jobs. The reader must always exercise reasonable caution, follow current codes and regulations that may apply, and is urged to consult with a licensed contractor if in doubt about any steps on these posts. All names were changed to protect client's privacy. DIY Advisor. Reproduction of site content including photos without permission prohibited. All rights reserved. © Copyright 2011-

    Backyard Gate Wall Latch

    Fig.1 Latch fell out
    By Gary Boutin

    Supplies and Tools:
    Crescent wrench  
    Cordless electric drill and 1/8-inch drill bit
    Flat washer 1/4-Inch
    Hammer
    Lag Bolt 1/4 by 3-1/2 Inch
    Lead wall anchors
    Wood shims cut in 1/4-inch sections

    Last week Emma called from Ontario, California. She stated she saw my Craig-list advertisement on the Internet and wanted to know if I was the repair services. She asked me to come to her home and repair her backyard gate screw latch that fell off the wall.

    This post shows the seven steps to repairing a gate screw latch.

    Step 1: Above fig.1 shows the custom wall leg gate had a missing lag bolt. 
    Step 2: Fig.2 shows a 1-1/2 inch lag screw, not nearly long enough to stay inside the wall and hold the gate leg up for a reasonable length of time. The lag screw needs to go through the stucco, past the stucco wire, one or two layers of 30-pound felt paper and into the wood beam. In this case only the tip of the screw was making contact with the wood behind the stucco. But that little bit lasted 5-years.
    Fig.2 Lag screw damage

    Step 3: Fig.3 shows the hole inside the wall, noticed that only one piece of the lead anchor was inside the wall and the second part was missing or it might have fallen inside the stucco wall. 
    Step 4: Inserted four 3-inch x 1/4-inch (82.55
    millimeter) wide wood shims. The shims allows the stucco hole to create pressure against the lead anchor when the new lag bolt would be inserted into the wall hole.
    Fig.3 Fill the hole
    Step 5: Fig.4 shows the new lag bolt and flat washer that will go into the wall hole to give the lag bolt screw more support.
    Fig.4 Replaced hex head lag
    Step 6: Fig.5 shows a 3-1/2-inch lag bolt that will give the gate a chance to hold on to its gate leg.
    Fig.5 Insert new washer, 
    place into stucco
    Step 7: Fig.6 shows the edges of the wood shims with a metal hammer to flatten the area, then drilled an 1/8-inch (3.175
    millimeter) pilot hole into the wood. Pushing the metal leg over the hole, screw in the lag bolt into the pilot hole in the hole with a crescent wrench. Now the the job was finished and should hold up the gate for quite some time. 
    Fig. 6 Tightened 
    and job is finished


    DIY Advisor Blogs:
  • Handyman Blog: DIY Advisor
  • Food Blog: From Gary Boutin
  • Artwork Blog: Light in Dark Artwork
  • Class-A Tests: DIY Class-A Drivers License Tests

    • Cookie Alert: European Union laws requires that you know that this blog uses cookies. If you are concerned about this please click here to see how Google uses this information.

    Note: The DIY Advisor assumes no liability for omissions, errors or the outcome of any jobs. The reader must always exercise reasonable caution, follow current codes and regulations that may apply, and is urged to consult with a licensed contractor if in doubt about any steps on these posts. All names were changed to protect client's privacy. DIY Advisor. Reproduction of site content including photos without permission prohibited. All rights reserved. © Copyright 2011-

    How to Repair Bathroom Faucet Seal Secret Quick Fix

    Fig.2 Remove 
    handle
    By Gary Boutin

    Supplies and Tools: 

    Crescent wrench
    Phillips screwdriver

    Henry Drake is an average person, works nights, lives in a single story home, and has all the newest gadgets. He also had the dreaded water drip. The drip became an obsession and Henry could not take it any longer. He decided to call a professional plumber. The plumber came and told him it would cost him $300 to repair. Henry did more homework on the Internet and finally called my Yahoo advertisement. He explained that he had a custom water faucet and the drip was very difficult to sleep with during the day.

    This post shows a quick fix to repairing a high-end with nice chrome and very well polished faucet.


    Step 1: Fig.1 shows the removal of the faucet screw in the chrome handle.
    Fig.1 Unscrew the 
    Phillip screw
    Step 2: Upper right fig.2 shows the use a Phillips screwdriver to removed the chrome screw in the middle of he handle. 
    Step 3: Fig.3 shows the base of the faucet handle. Next remove the handle with a crescent wrench.


    Tip: Any pliers can be used but it may damage the brass water stem.
    Fig.3 Use Crescent 
    Wrench
    to unscrew stem
    Step 4: Fig.4 shows the removal of the water stem.
    Fig.4 Pull out
    Step 5: Fig.5 shows the hot water faucet stem is removed from the faucet base.
    Fig.5 Replace the rubber seal
    Step 6: Fig.6 shows a ceramic cartridge stem with a black rubber seal. Now reverse the rubber seal and put it back in the cartridge. Now return all the pieces back into their original order.
    Fig,6 Place back into faucet
    Step 7: Fig.7 shows the screw being put back into the handle.
    Fig.7 Put screw back
    Step 8: Fig.8 is the finished product. I see Henry from time to time and he has never complained about the faucet. I did finally find the seal at Ferguson Supply, a local plumber's warehouse. Henry seems comfortable with the faucet not leaking.
    Fig.8 Handle ready to use


    DIY Advisor Blogs:
  • Handyman Blog: DIY Advisor
  • Food Blog: From Gary Boutin
  • Artwork Blog: Light in Dark Artwork
  • Class-A Tests: DIY Class-A Drivers License Tests

    • Cookie Alert: European Union laws requires that you know that this blog uses cookies. If you are concerned about this please click here to see how Google uses this information.

    Note: The DIY Advisor assumes no liability for omissions, errors or the outcome of any jobs. The reader must always exercise reasonable caution, follow current codes and regulations that may apply, and is urged to consult with a licensed contractor if in doubt about any steps on these posts. All names were changed to protect client's privacy. DIY Advisor. Reproduction of site content including photos without permission prohibited. All rights reserved. © Copyright 2011-