Thursday, August 31, 2017

How to Change a 500 Watt Halogen Lamp Bulb

500 Watt Floor Lamp
By Gary Boutin


Tools and Supplies:
500 Watt Halogen Bulb 
Extension cord 
GFCI (ground fault circuit interrupter) plug
Halogen Floor Lamp
Halogen Lamp bulb
Nitrile Gloves (one use)
Phillip Screwdriver
Rubber Grommet washer 
Ryobi 18-volt Cordless Drill
Ryobi Phillip Bit


This post shows the twenty four steps on replacing a 500 watt halogen bulb in a work Floor lamp.
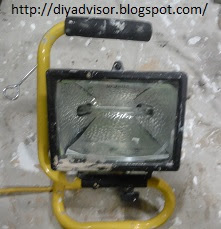
1
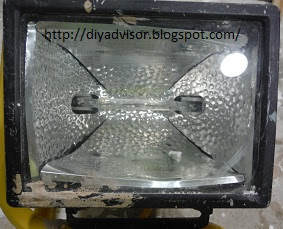
This is a Halogen Floor Lamp used to light up a working area.  The light bulb is damaged and is halogen bulb is foggy meaning its burned out.
2

Use a Phillip Screwdriver to remove the Phillip screw holding down the filtered glass panel of the floor lamp.
3

The nut has a rubber washer on it so make sure you keep it when you open up the filtered glass frame.
4

This is the Phillip screw that hold the Halogen Lamp together.
5

This shows the halogen lamp bulb that needs to be replaced.
6

The halogen lamp bulb was broken, one of the ends had broken off.
7

Here is a new halogen lamp bulb that will be replaced.
8

Notice the Nitrile blue gloves only wear them once and use them to  change the halogen lamp bulb. Do Not Change this bulb when the floor lamp is hot. It will melt the gloves and cause burns on the fingers.
9

Now either choose right or left and insert the halogen lamp bulb. This picture shows the halogen lamp bulb was inserted on the left side first.
10

This is the right side of the halogen lamp bulb.
11

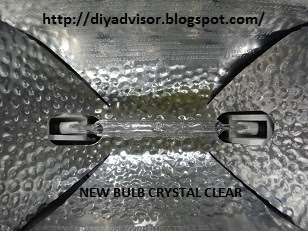
This is the new halogen lamp bulb inserted in the floor lamp.
12

Now plug in your extension cord into a safe GFCI (ground fault circuit interrupter.
13


Great the new halogen lamp bulb worked. Sometimes you need to rotate the bulb to get the lamp to turn on. Before the lamp is closed check it by giving the lamp power.
14

Now the halogen floor lamp is ready to be closed up.
15

It is not that easy. Fold upward the glass frame.
16

If the rubber seal needs to be replaced do so before putting the lamp together.
17

If your seal if fine, thread it into the metal channel frame and push it so it stays there so the glass frame can shut. Here the left side is done first.
18

The right side is next to be placed into the metal channel frame.
19

This is what the rubber seal looks like if replaced. Couple of dollars is all it costs if the halogen floor lamp needs a new seal. 
20

If the rubber seal is not in place then the halogen floor lamp 500 watt bulb will burn the seal and smell badly. Then undo the lamp and reset the seal.
21

This is an twenty-five foot extension cord that needs to be plugged into the halogen floor lamp.
22

Now place the halogen floor lamp were the work needs to be done.
23 Put the end of the extension cord into a working plug to turn on the halogen floor lamp.
24

Notice the halogen floor lamp is doing its job and the area is well lite. Job Done.

  • Cookie Alert: European Union laws requires that you know that this blog uses cookies. If you are concerned about this please click here to see how Google uses this information.
 
Note: This blog assumes no liability for omissions, errors or the outcome of any cooking recipes or cooking tips, and repair instructions. The reader must always exercise reasonable caution, and follow current cooking and safety regulations that may apply for each recipe and or repairs. All rights reserved. © Copyright 2011-

Tuesday, August 29, 2017

Glass Scraper - Part 2 of 2 - Mini Glass Scrapers

Fig.1 Ready to use
By Gary Boutin

Supplies and Tools:
Mini Glass Scraper with Blade
Razor blades

How do you attach a razor blade to a mini paint scrapers? 

This post shows the ten steps about how to install a razor blade inside the Mini Glass Scraper. 

Step 1: Fig.1 shows the Mini Glass Scraper, locks the blade but applying pressure within itself and the single edge razor blade.
Step 2: Fig.2 shows the standard paint scraper.
Fig.2 Standard scraper
Step 3: Purchase the mini glass scraper.
Step 4: Remove the scraper from its packaging.
Step 5: Fig.3 shows the single paint scraper razor blades boxes, the next step is to remove one blade, notice how each blade has a thin piece of cardboard around the blade to protect your fingers.  Remove the cardboard carefully.
Fig.3 Blade packages
Step 6: In fig.4 below, remove the single razor 
Step 7: Fig.5 shows how to install it in the mini glass scraper.
Step 8: Start the blade from the left fig.5, and keep moving the blade until it fits the mini glass scraper completely as fig.6.
Fig.4 Blade
Fig.5 Inserting blade
Fig.6 Finishing inserting
Step 9: Fig.7 shows the blade in place but your fingers away from the razor, flip the paint scraper over.
Fig.7 Ready for the job


Step 10: Above in fig.7 there is a little button on the top part of the paint scraper, push the button down all the way until it snaps into place. This will freeze the blade from moving and the tool is ready to be used. When the blade is dull or when the job is finished, flip the paint scraper over and click the button again to free the razor blade. Dispose of the blade carefully, it is still sharp, but not sharp enough to do the job, but sharp enough to cut your fingers.

Tip: This is not a serious post, but it was fun to write and I hope you enjoy too. The Mini Glass Scraper was purchase from Harbor Freight Tools. I have used this tool several times and I like it.


  • Cookie Alert: European Union laws requires that you know that this blog uses cookies. If you are concerned about this please click here to see how Google uses this information.
 
Note: The Healthy Vegan Living assumes no liability for omissions, errors or the outcome of any cooking recipes or cooking tips, and repair instructions. The reader must always exercise reasonable caution, and follow current cooking and safety regulations that may apply for each recipe and or repairs. All rights reserved. © Copyright 2011-

Monday, August 28, 2017

Glass Scraper - Part 1 of 2 - Large Glass Scrapers Installation

By Gary Boutin

Supplies and Tools:
Razor scraper blade
Glass scraper

This is a tool that uses razor blades. The Glass Scraper is exactly like what is sounds like. Painters have used this tool ever since the razor blade was invented. Use this tool to remove paint on a glass panel, or other hard smooth surface.

This post shows five steps on how to properly install a razor scraper blade on a razor scraper without cutting or losing any fingers.

Step 1: Obtain a razor scraper blade, with a metal lip on the top and in fig.1 shows the glass scraper is upside down for installation of the razor scraper blade.
Step 2: Fig.2 shows the razor is sliding towards the right side of the tool.

Razor blade slowly moving into metal handle
Fig.2 Insert
Step 3: Fig.3 shows the blade is at its resting place. 

Metal razor blade into metal handle
Fig.3 Resting
Step 4: Fig.4 shows the tool can be expanded and retracted.
Metal blade can be moved up or down
Fig.4 Open
Step 5: Fig.5 shows the tool has completely retracted the scraper blade for safety, notice the tool has a push down nub that allows the tool to extracted completely for use.This nub locks into the unit thus providing safety. Now there is no reason to cut up your fingers, use the glass scraper tool with a scraper blade for your repair needs.
Paint scraper in the safe position fully retracted
Fig.5 Closed


  • Cookie Alert: European Union laws requires that you know that this blog uses cookies. If you are concerned about this please click here to see how Google uses this information.

 
Note: The DIY Advisor assumes no liability for omissions, errors or the outcome of any jobs. The reader must always exercise reasonable caution, follow current codes and regulations that may apply, and is urged to consult with a licensed contractor if in doubt about any steps on these posts. All names were changed to protect client's privacy. DIY Advisor. Reproduction of site content including photos without permission prohibited. All rights reserved. © Copyright 2011-

Saturday, August 26, 2017

How Do You Open Caulking Tubes

Manual caulking gun
Manual Calking

By Gary Boutin

Supplies and tools:
Caulking gun
Caulking tube

Step 1: Fig.1 shows you go the the hardware store, and purchase several caulking tubes, those cylinder with the plastic ends. Unless you ask and that means you have to find someone first to ask the question, there is no explanation of how to use or how to open the caulking tubes.

Caulking and adhesives
Fig.1 All type of caulking tubes
Step 2: Fig.2 shows the caulking tube you need to purchase a caulking gun there a three main colors and they all do the same thing, squeeze the stuff out of the tubes so the job can get done.

Two types of caulking gun
Fig.2 Manual caulking guns
Step 3: Fig.3 and fig.4 shows the tip of the caulking tube into the hole of the caulking gun near the handle. Do not put your fingertip it will cut it off.  Pull the handle and the tip will be cut off.
Caulking fun tube opener
Fig.3 Hole in gun 
cuts the tube end
Place tube tip into caulking gun to cut off the tip
Fig.4 Cutting 
tube end
Step 4: Fig.5 shows the tip of the caulking gun and pull out the long needle tip and push the needle tip into the caulking tube. Now the caulking gun is ready to push out its contents. To get the stuff out of the tube, just keep pulling with your fingers the caulking gun until it runs out. Each gun has different ways to get the contents out of it, some have open sides, some have closed side, whatever gun you have the directions are the same.
Caulking metal strip cuts the foil to open the tube
Fig.5 Opening tube
Tip: That not all, there more. When you want to stop the contents from coming out, pull out the long metal stick that is pushing out the contents, and the stuff will stop coming out. Most of the time this works, some glues still keep coming out of the tube, but not as fast as when the metal handle is pushed in. Now you are the pro and you know how to use the caulking gun.


  • Cookie Alert: European Union laws requires that you know that this blog uses cookies. If you are concerned about this please click here to see how Google uses this information.

 
Note: The DIY Advisor assumes no liability for omissions, errors or the outcome of any jobs. The reader must always exercise reasonable caution, follow current codes and regulations that may apply, and is urged to consult with a licensed contractor if in doubt about any steps on these posts. All names were changed to protect client's privacy. DIY Advisor. Reproduction of site content including photos without permission prohibited. All rights reserved. © Copyright 2011-

Monday, August 21, 2017

Plumb-Away®

This is the Plumb Away Toilet kit
Fig.1 Plumb-Away®
By Gary Boutin

Supplies and Tools:

If you have a plugged toilet then use Plumb-Away®.

This post shows the five steps to use the Plumb-Away® product.

Step 1: Fig.1 shows the Plumb-Away® is a aerosol drain opener that claims to open drains up in seconds.  This product works well in an emergency situation. This product is made in the United States.
Step 2: Fig.2 shows what is in the Plumb-Away® box.

This is the parts of the Plumb Away kit
Fig.2 What's in the kit?
Step 3: Fig.3 shows how to use the simple direction on the box to clear your toilet. 
Step 4: Fig.4 shows the Plumb-Away® that will be inserted into your plugged toilet.

The plunger helps the compressed can
Fig.3 Directions
Great tool for everyone who wants it done now
Fig.4 Tube
Step 5: The Plumb-Away® box contains the following. 1-Plumb-Away®canister, power cap and seal, universal adapter, and extension handle. This unit can open toilet very effectively.


  • Cookie Alert: European Union laws requires that you know that this blog uses cookies. If you are concerned about this please click here to see how Google uses this information.

 
Note: The DIY Advisor assumes no liability for omissions, errors or the outcome of any jobs. The reader must always exercise reasonable caution, follow current codes and regulations that may apply, and is urged to consult with a licensed contractor if in doubt about any steps on these posts. All names were changed to protect client's privacy. DIY Advisor. Reproduction of site content including photos without permission prohibited. All rights reserved. © Copyright 2011-