Showing posts with label vacuum cleaner. Show all posts

Saturday, September 3, 2016

Peep Hole - Part 4 of 6 - Drilling the Hole

Fig.1 -3/16 Bit
By Gary Boutin

Tools and Supplies:
Ryobi 12 Volt Cordless Drill
Drill Bit 3/16 
Hole Saw 1-3/4
Prime-Line Products U 9917 Giant Screen Viewer
Vacuum cleaner

Mrs. Black wanted a Giant Screen Viewer peep hole on her front door to be able to see people at her door.

This post shows the six steps that shows the installation of the hole for the U 9917 Giant Screen Viewer. 

Step 1: This was not a new install. The door had an existing peep hole so the guide bit was not needed. Fig.1 shows the 3/16 drill bit and fig.2 shows the drill bit can be placed either at the bottom or the top of this larger hole. Fig.3 shows the bottom of the peep hole was chosen..

Fig.2 Pilot hole 
for hole saw
Fig.3 Pilot hole
finished
Step 2: Fig.4 shows a Ryobi 12 Volt Cordless Drill with a 1-3/4 hole saw and place the hole saw bit in the bottom hole. Next it will take time to get through the door skin. 
Fig.4 Sawing the door
Tip: Let the saw to the work, do not push this will damage the hole saw teeth.

Step 3: Fig.5 shows picture below shows the hole through the door skin (fiberglass) and through the core of the front door. 
Fig.5 Interior side is done
Step 4: Fig.6 shows the use the same drill and the same hole saw and continue to the exterior (outside) to saw the hole completely through the door. 
Fig.6 Saw through the door
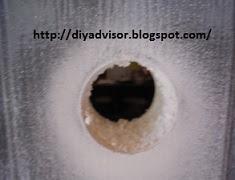
Step 5: Cleanup: Now that the hole is cut and it is time to clean the door. Fig.7 shows the clean the inside of the hole too.
Fig.7 Clean up
Step 6: The easiest way to clean the dust from both sides of the door is to use a vacuum cleanerFig.8 shows the difference between a dusted door and a vacuumed door. Fig.9 shows the new Giant View Screen the area is cleaned and ready for the installation. The next post will show the installation of the U 9917 Giant Screen Viewer.
Fig.8 Dusted door
Fig.9 New clean vacuumed door
Peep Hole Series Below:


  • Cookie Alert: European Union laws requires that you know that this blog uses cookies. If you are concerned about this please click here to see how Google uses this information.

Note: The DIY Advisor assumes no liability for omissions, errors or the outcome of any jobs. The reader must always exercise reasonable caution, follow current codes and regulations that may apply, and is urged to consult with a licensed contractor if in doubt about any steps on these posts. All names were changed to protect client's privacy. DIY Advisor. Reproduction of site content including photos without permission prohibited. All rights reserved. © Copyright 2011-

Friday, October 23, 2015

How to Repair Soap Damaged Shelf - Part 3 of 6 - Vacummed Paint Dust

Fig.1 Fine grip 150
By Gary Boutin

Tools and Supplies:
Sander
Sandpaper
Vacuum cleaner 

Our laundry shelf  was damaged from the liquid detergent and liquid bleach that we used in our washing machine. This is a simple repair and this post shows how this shelf will be repaired. 

This post shows the three steps in repairing this laundry shelf. 

Step 1: Fig.1 show the back and what grade of grit the disc is and fig.2 shows the front were the sanding is done  to sand the shelf smooth. Below is the type of disc used to repair the shelf.
Fig.2 150 grit disc
Step 2: Fig.3 and fig.4 show the Porter-Cable Random Orbit Sander is sanding the damage area as smoothly as possible.
Fig.3 Sand damaged area
Fig.4 Use Fine disk 
to sand smoothly
Step 3: Fig.5 through fig.7 shows the vacuum cleaner used to remove all the dust and paint chips from the shelf.
Fig.5 Vacuum cleaner
Fig.6 Left side
Fig.7 Paint chips
How to Repair Soap Damaged Shelf:

Update: DIY Advisor has New blogs check them today:

  • Cookie Alert: European Union laws requires that you know that this blog uses cookies. If you are concerned about this please click here to see how Google uses this information.

Note: The DIY Advisor assumes no liability for omissions, errors or the outcome of any jobs. The reader must always exercise reasonable caution, follow current codes and regulations that may apply, and is urged to consult with a licensed contractor if in doubt about any steps on these posts. All names were changed to protect client's privacy. DIY Advisor. Reproduction of site content including photos without permission prohibited. All rights reserved. © Copyright 2011-

Monday, April 6, 2015

How to Install Kitchen Nook Wall - Part 4 of 5 - Install New Sheetrock

By Gary Boutin
Fig.1 Dining room walls damages  
Left, middle and right wall repair


Supplies and Tools: 
500 watt Heat lamp
Drywall knife
Cordless screwdriver with many tips
Razor knife and extra blades
Scraper (2 in. 3 in. and 5 in. wall knife)

Screwdriver Phillip bit
Sponge large yellow
Tarps cotton 9 ft. x 12 ft.
Trash  bag or trash can
Tool bag
Vacuum Cleaner
Vice Grip
Wall tape (paper)

Wall saw - rubber handle

A client in Santa Clarita, California was selling their home and moving to Colorado. Their Realtor checked the kitchen nook and noticed that the dining room wallpaper was loose. She also noticed that the kitchen windows had bad rubber seals and leaked when the backyard sprinklers were sprayed on the glass windows. This needed to be repaired immediately. 

This post shows the eight steps showing the damages to this kitchen nook wall. 

Step 1: Fig.1 shows the kitchen nook wall that needs repair, left, middle and right walls.
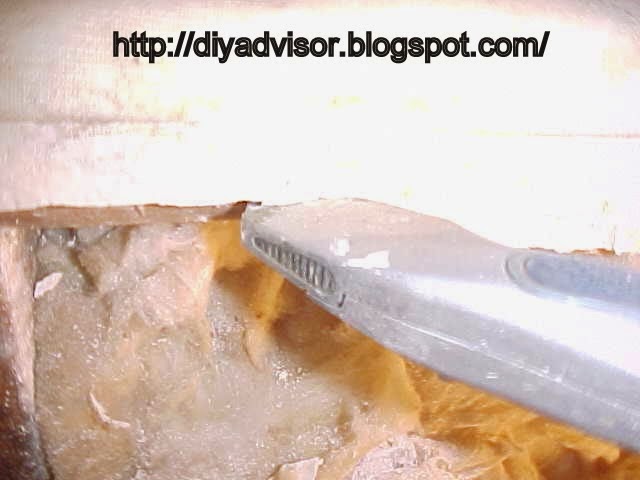
Step 2: Fig.2 shows the drywall knife that will be used to cut the new wall. Fig.3 shows the the new drywall is in place.
Fig.2 Drywall knife
Fig.3 Replacing new sheet rock
Step 3: Fig.4 and fig.5 shows the progression of how to place drywall was placed around a duplex electrical plug.
Fig.4 No wall
Fig.5 Cut hole
Step 4: Fig.6 and fig.7 shows the joint compound being placed on the wall and over the paper tape.
Fig.6 Joint compound
Fig.7 Drywall knife
Step 5: Fig.8 and fig.9 shows the joint compound drying over the paper tape.
Fig.8 Paper tape
Fig.9 Corner
Step 6: Fig.10 and fig.11 shows the wall being sanded by the electrical plug and also the corner area.
Fig.10 Sand plug
Fig.11 Sand corner
Step 7: Fig.12 shows the drywall lime that will need to be vacuumed before painting.
Fig.12 Drywall lime
Step 8: Fig.13 and fig.14 shows the two 500-watt lamps drying the wall for priming and applying the wallpaper. Click the 500-Watt lamp to see how to change the Halogen bulb.
Fig.13 Drying the entire wall
Fig.14 Drying right side


How To Repair a Kitchen Nook Wall:


Update: DIY Advisor has New blogs check them today:
  • Cookie Alert: European Union laws requires that you know that this blog uses cookies. If you are concerned about this please click here to see how Google uses this information.


Note: The DIY Advisor assumes no liability for omissions, errors or the outcome of any jobs. The reader must always exercise reasonable caution, follow current codes and regulations that may apply, and is urged to consult with a licensed contractor if in doubt about any steps on these posts. All names were changed to protect client's privacy. DIY Advisor. Reproduction of site content including photos without permission prohibited. All rights reserved. © Copyright 2011-2016

How to Install Kitchen Nook Wall - Part 3 of 5 - Remove Wet Wall

Fig.1 Dining room walls damages
Left, middle and right wall repair
By Gary Boutin

Supplies and Tools: 
500 watt Heat lamp
Caulking white
Cordless screwdriver with many tips
Razor knife and extra blades
Scraper (2 in. 3 in. and 5 in. wall knife)
Screwdriver Flat (regular and small)
Screwdriver Phillip
Fig.2 Drywall knife
Sponge large yellow
Tarps cotton 9 ft. x 12 ft.
Trash  bag or trash can
Tool bag
Vacuum Cleaner 
Vice Grip 
Wall tape (paper)

A client in Santa Clarita, California was selling their home and moving to Colorado. Their realtor checked the kitchen nook and noticed that the dining room wallpaper was loose. She also noticed that the kitchen windows had bad rubber seals and leaked when the backyard sprinklers were sprayed on the glass windows. This needed to be repaired immediately. 

This post shows the seven steps showing the damages to this kitchen nook wall.

Step 1: Fig.1 shows the kitchen nook wall that needs repair and fig.2 shows a drywall knife used to cut up the wall so it can be square for repairs.
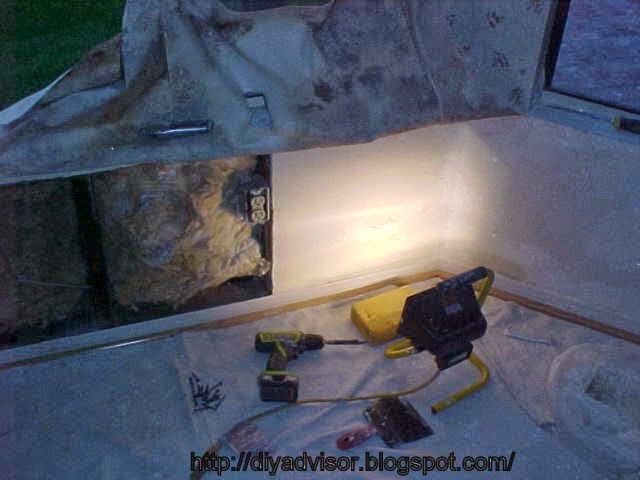
Step 2: Fig.3 through fig.5 shows the removal of the electrical plug that was in the center damaged wall. All the fiberglass was wet and needed to dry out before the new wall panels were replaced. Fig.4 shows that a small flat tipped screwdriver was used to remove the two outlet screws.  Fig.5 shows the outlet completely out of the electrical box.
Fig.3 Wet electrical
Fig.4 Remove outlet screws
Fig.5 Pullout duplex plug
Step 3: Fig.6 shows the use of razor knife to keep the edge straight to make it easier to install the new wallboard.
Fig.6 Cut edges square
Step 4: Fig.7 shows that part of the wall was removed to half of the wood stud. This will give the new piece some support. Fig.8 shows that the middle wall on the left side was completely removed and was not repairable.
Fig.7 Cut to stud
Fig.8 Wallboard removed
Step 5: Fig.9 shows that the more the wall was looked at more of the wall was removed. Almost half the wall was so wet that it was removed and not repairable. Even the fiberglass was damaged from the leak, notice that the right side is a different color than the left side. The water damage was worst on the left side than the right side.
Fig.9 Wallboard removed
Step 6: Fig.10 and fig.11 shows that a use of the vacuum cleaner was used to remove all the loose debris (pieces) that was left inside and outside the wall. Bigger portion of the wall was placed into a trash can. The wallpaper was stripped from the wall and saved for later application.
Fig.10 Cleaning the studs
Fig.11 Vacuuming inside the wall
Step 7: Fig.12 shows the right part of the wall was repaired at the bottom and not entirely replaced. A 500 watt heat lamp was used to dry the insulation and the wall repair. Noticed all the wallpaper was moved upwards away from the repair. Now the wall is ready for its new skin.
Fig.12 Drying insulation

How To Repair a Kitchen Nook Wall:


Update: DIY Advisor has New blogs check them today:
  • Cookie Alert: European Union laws requires that you know that this blog uses cookies. If you are concerned about this please click here to see how Google uses this information.


Note: The DIY Advisor assumes no liability for omissions, errors or the outcome of any jobs. The reader must always exercise reasonable caution, follow current codes and regulations that may apply, and is urged to consult with a licensed contractor if in doubt about any steps on these posts. All names were changed to protect client's privacy. DIY Advisor. Reproduction of site content including photos without permission prohibited. All rights reserved. © Copyright 2011-


Monday, November 24, 2014

How to Install Custom Window Blinds

Fig.1 Tools
By Gary Boutin 

Supplies and Tools:  
Bali® coconut blinds
Cordless drill with Bit extender and Phillip tip
Drill bit 3/16 
Measuring tape 
Vacuum Cleaner 
Wall anchors and brackets (included)

George Morco new home in the city of Highland, California. He wanted to install custom blinds in his office. He had purchased a standard lateral blind from a local drapery store. The blind would not fit correctly so he decided to purchase his blinds at The Home Depot. Bali® blinds were exactly the perfect fit for his office window and were easy to install because of the blind care and well written instructions.  

The Home Depot web site gives information on Bali® 3.5 valance coconut blinds. George wanted "Bali® faux wood blinds that have many advantages including, added privacy, improved room darkening ability and ease of cleaning. A 3.5" valance is upgrade from standard and the durable steel headrail is guaranteed not to sag, and it has hidden valance clips for a cleaner look." A complete Bali® instructions is located here.

This post shows the eleven steps to installing Bali® Coconut Blinds on an office window.

Step 1: Fig.1 above right shows the tool box with drill and anchors for the job.
Step 2: Fig.2 shows the office window surrounded by neighboring bushes.
Fig.2 The office window
Step 3: Fig.3 shows the Bali® box.

Fig.3 Bali® boxed blinds
Step 4: Fig.4 shows written and pictograph instructions on how to install these blinds in any location.
Fig.4 Written pictograph
Step 5: The blinds were wrapped in stretch wrapped. Fig.5 shows that the blinds were wrapped in bubble wrap plastic and small pieces of cardboard in each slat kept the product from being blemished during delivery. Each individual metal piece was package in clear plastic. All additional hardware was encased in clear plastic. A master envelope was on top showing all the parts of the blind and its location. Fig.6 shows the hardware was packaged in a box and fig.7 shows each piece was  individually wrapped.
Fig.5 Bubble wrapped
Fig.6 Boxed hardware
Fig.7 Individually wrapped
Step 6: Fig.8 and fig.9 shows the right and left upper brackets.  
Fig.8 Left Bracket
Fig.9 Upper bracket
Step 7: Fig.10 and fig.11 shows the middle bracket being installed.

Fig.10 Drilling Support
Fig.11 Middle bracket
Step 8: Fig.12 shows the two end bracket with the door opened ready to install the custom blinds.
Fig.12 Two end bracket

Step 9: Fig.13 shows the blind is ready to install. Place each end of the blind into the two upper brackets. Fig.14 shows the blind slats has been opened. Fig.15 shows the cord for the blind that will need to be removed from its packaging.
Fig.13 Ready to install
Fig.14 Hanging blinds
Fig.15 Cords
Step 10: Fig.16 shows the bottom of the blind make sure it fits correctly. This one was already adjusted and it rested neatly on the bottom of the window sill.
Fig.16 Bottom view
Step 11: Fig.17 shows the wood valance is being placed on top of the blind. Fig.18 shows the job is finished and the blind is working correctly. Now George has privacy for his office.
Fig.17 Valance

Fig.18 Job finished
Read other blind post below

Update: DIY Advisor has New blogs check them today:
  • Cookie Alert: European Union laws requires that you know that this blog uses cookies. If you are concerned about this please click here to see how Google uses this information.

Note: The DIY Advisor assumes no liability for omissions, errors or the outcome of any jobs. The reader must always exercise reasonable caution, follow current codes and regulations that may apply, and is urged to consult with a licensed contractor if in doubt about any steps on these posts. All names were changed to protect client's privacy. DIY Advisor. Reproduction of site content including photos without permission prohibited. All rights reserved. © Copyright 2011-