Showing posts with label razor knife. Show all posts

Sunday, September 25, 2016

How to Repair FILA® Beyond Orange/Gray Men's Running Shoes

The tools are spring clamp, scissors and razor knife
Fig.1 The tools
By Gary Boutin

Tools and Supplies:
Adhesive spray (Loctite® spray adhesive)
Fabric (fuzzy)
Razor knife 
Spring clamp

This blog is another post on repairing shoes. This post will address how the shoe was repair and whether it was worth the time. In a hurry to slide on the orange running shoes, the back plastic heal plate bent and creased over thus making uncomfortable to wear. 

This post shows the fifteen steps on repairing these FILA® Beyond Men's running shoes. 

Step 1: Fig.1 shows the tools needed to repair these shoes. Fig.2 shows the orange shoes that need repair.
The repair is on Fila Beyond Men's running shoes
Fig.2 Orange running shoes
Step 2: Fig.3 shows the inside of the running shoe.
This shows the running inside collar is damaged
Fig.3 Hole in shoe heel
Step 3: Fig.4 shows the plastic heel plate that was cutting my foot. This plastic heel plate holds the back of the running shoe up. For this repair the heel plate needs to be removed or cut down so it does not extend outwards. 
This is the plastic heel plate damaging my feet
Fig.4 Plastic heel plate
Step 4: Fig.5 shows the first cut is in the middle of the upper collar lining of the shoe. Cut the center foam until you see the plastic heel plate. On this shoe the heal plate was white in color. 
Cut down the middle of the heel collar
Fig.5 Shoe foam
Step 5: Now remove the black nylon inserts from damaged shoe.  
Step 6: The laces must be removed from the eyelets of the running shoe. The tongue must be pulled back all the way to the toe box if possible. The tongue needs to be pulled back to get the razor knife in the repair area. Click here to see the parts of the running shoe. 
Step 7: Fig.6 shows that the side of the shoe must be 1/8 inch (3.175000 millimeters) cut above the middle stitching (middle arrow). Cut the bottom using a sharp razor knife from the middle arrow to the last arrow which will be the middle of the foam collar. Fig.7 shows another view of the cut needed above the shoe stitches.
Cut just above the sole stiches
Fig.6 Back top view
This view shows to cut from the bottom arrow to the top arrow
Fig.7 Side top view
Step 8: Fig.8 shows that on the right shoe only and two little piece of heel plastic was cut off. Fig.9 shows that the left shoe the heel collar plate was completely removed.
These two small plastic heel colar plate was cut out
Fig.8 Heel plastic
On top of the fabric is the white plastic heel plate
Fig.9 Complete heel plate
Step 9: Fig.10 shows that the shoe lining and foam was cut to get to the plastic heel plate.
Fig.10
Step 10: Fig.11 shows that scissors were used to cut this soft fabric.
Fig.11

Step 11: Fig.12 shows the Loctite spray adhesive. Fig.13 shows the adhesive is sprayed on the back of the soft fabric.
Fig.12
Fig.13
Step 12: Fig.14 shows the white fabric was place with the fuzzy forward and the back against the inside of the shoe. Fig.15 shows the spring clamp braced on the top edge of the shoe edge. This clamp was placed all over the fabric edges.
Fig.14 White fabric
Fig.15 Spring clamp
Step 13: Fig.16 shows that the repaired area has dried the black shoe insert needs to be placed back into the shoe prior to wearing it.
Fig.16 Inserts
Step 14: Fig.17 shows the white fabric is now dried in the shoe and is part of the shoe. Fig.18 shows a side view of the shoe.
Fig.17 Ready to wear
Fig.18 Side view
Step 15: Fig.19 shows the shoes are wearable.
Fig.19 This was
a 30-day repair

This job was not worth doing again if the shoes were in the same conditions. Checking the shoes there were cracks in the soles of the shoes. If this happens to your shoes, and depending on your finances, it might be better to just purchase new shoes. This patch lasted for 30-days then it fell off and the shoes were no longer comfortable.

  • Cookie Alert: European Union laws requires that you know that this blog uses cookies. If you are concerned about this please click here to see how Google uses this information.

Note: The DIY Advisor assumes no liability for omissions, errors or the outcome of any jobs. The reader must always exercise reasonable caution, follow current codes and regulations that may apply, and is urged to consult with a licensed contractor if in doubt about any steps on these posts. All names were changed to protect client's privacy. DIY Advisor. Reproduction of site content including photos without permission prohibited. All rights reserved. © Copyright 2011-

Monday, April 6, 2015

How to Repair Kitchen Nook Wall - Part 5 of 5 - Applying Wallpaper

Fig.1 Dining room walls damages
Left, middle and right wall repair
By Gary Boutin
 
Supplies and Tools: 
Gloves
Razor knife and extra blades
Sponge yellow
Tarps cotton 9 ft. x 12 ft.
Wallpaper adhesive (Kitchen and bath)

A client in Santa Clarita, California were selling their home and moving to Colorado. Their Realtor checked each room of their home and noticed a repair that needed  to be addressed immediately. This job was to repair the kitchen nook dining room wallpaper. Two kitchen windows had bad rubber seals and had completely dried up. Sprinkler water had passed the rubber seal creating the damages on the kitchen walls. The windows were replaced by the time the wall was finished.

This post shows the four steps showing the damages to this kitchen nook wall.

Step 1: Fig.1 shows the kitchen nook walls that needed repair. 
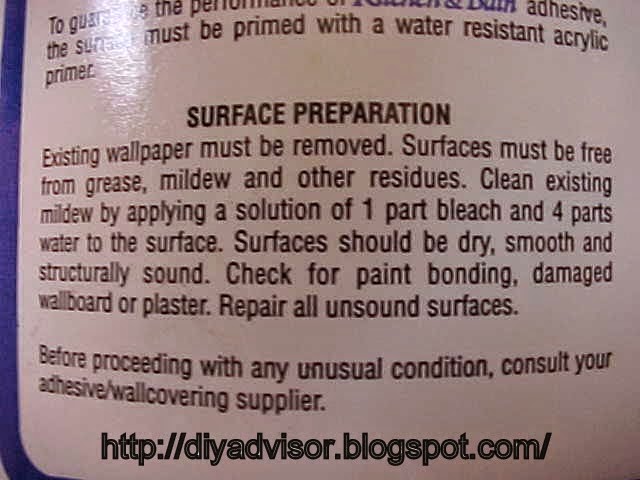
Step 2: Fig.2 and fig.3 shows Kitchen & Bath Wallpaper Adhesive to reapply the kitchen nook wallpaper to the wall.
Fig.2 Wallpaper adhesive

Fig.3 Wallpaper instructions
Step 2: Fig.4 and fig.5 shows the application of wallpaper adhesive so the old wallpaper can be reapplied to the wall.
Fig.4 Apply water to wall
Fig.5 Paste can be seen on wall
Step 3: Fig.6 shows the right side of the wall all repaired including applying wallpaper.

Fig.6 Right side paper
Step 4: Fig.7 shows the left side of the room now finished. 
Fig.7 Job done
How To Repair a Kitchen Nook Wall:

Update: DIY Advisor has New blogs check them today:
  • Cookie Alert: European Union laws requires that you know that this blog uses cookies. If you are concerned about this please click here to see how Google uses this information.


Note: The DIY Advisor assumes no liability for omissions, errors or the outcome of any jobs. The reader must always exercise reasonable caution, follow current codes and regulations that may apply, and is urged to consult with a licensed contractor if in doubt about any steps on these posts. All names were changed to protect client's privacy. DIY Advisor. Reproduction of site content including photos without permission prohibited. All rights reserved. © Copyright 2011-

How to Install Kitchen Nook Wall - Part 3 of 5 - Remove Wet Wall

Fig.1 Dining room walls damages
Left, middle and right wall repair
By Gary Boutin

Supplies and Tools: 
500 watt Heat lamp
Caulking white
Cordless screwdriver with many tips
Razor knife and extra blades
Scraper (2 in. 3 in. and 5 in. wall knife)
Screwdriver Flat (regular and small)
Screwdriver Phillip
Fig.2 Drywall knife
Sponge large yellow
Tarps cotton 9 ft. x 12 ft.
Trash  bag or trash can
Tool bag
Vacuum Cleaner 
Vice Grip 
Wall tape (paper)

A client in Santa Clarita, California was selling their home and moving to Colorado. Their realtor checked the kitchen nook and noticed that the dining room wallpaper was loose. She also noticed that the kitchen windows had bad rubber seals and leaked when the backyard sprinklers were sprayed on the glass windows. This needed to be repaired immediately. 

This post shows the seven steps showing the damages to this kitchen nook wall.

Step 1: Fig.1 shows the kitchen nook wall that needs repair and fig.2 shows a drywall knife used to cut up the wall so it can be square for repairs.
Step 2: Fig.3 through fig.5 shows the removal of the electrical plug that was in the center damaged wall. All the fiberglass was wet and needed to dry out before the new wall panels were replaced. Fig.4 shows that a small flat tipped screwdriver was used to remove the two outlet screws.  Fig.5 shows the outlet completely out of the electrical box.
Fig.3 Wet electrical
Fig.4 Remove outlet screws
Fig.5 Pullout duplex plug
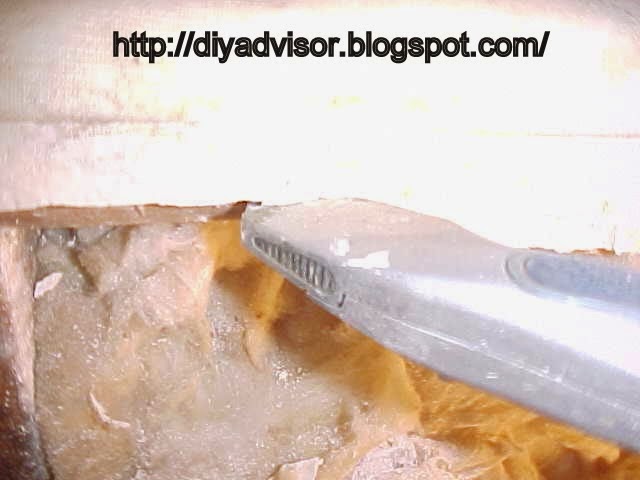
Step 3: Fig.6 shows the use of razor knife to keep the edge straight to make it easier to install the new wallboard.
Fig.6 Cut edges square
Step 4: Fig.7 shows that part of the wall was removed to half of the wood stud. This will give the new piece some support. Fig.8 shows that the middle wall on the left side was completely removed and was not repairable.
Fig.7 Cut to stud
Fig.8 Wallboard removed
Step 5: Fig.9 shows that the more the wall was looked at more of the wall was removed. Almost half the wall was so wet that it was removed and not repairable. Even the fiberglass was damaged from the leak, notice that the right side is a different color than the left side. The water damage was worst on the left side than the right side.
Fig.9 Wallboard removed
Step 6: Fig.10 and fig.11 shows that a use of the vacuum cleaner was used to remove all the loose debris (pieces) that was left inside and outside the wall. Bigger portion of the wall was placed into a trash can. The wallpaper was stripped from the wall and saved for later application.
Fig.10 Cleaning the studs
Fig.11 Vacuuming inside the wall
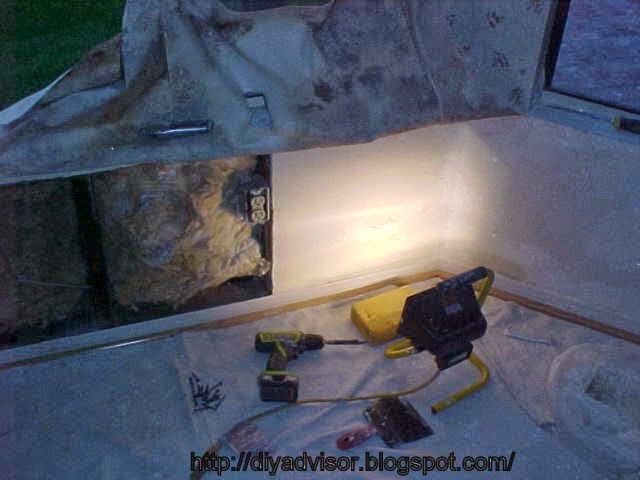
Step 7: Fig.12 shows the right part of the wall was repaired at the bottom and not entirely replaced. A 500 watt heat lamp was used to dry the insulation and the wall repair. Noticed all the wallpaper was moved upwards away from the repair. Now the wall is ready for its new skin.
Fig.12 Drying insulation

How To Repair a Kitchen Nook Wall:


Update: DIY Advisor has New blogs check them today:
  • Cookie Alert: European Union laws requires that you know that this blog uses cookies. If you are concerned about this please click here to see how Google uses this information.


Note: The DIY Advisor assumes no liability for omissions, errors or the outcome of any jobs. The reader must always exercise reasonable caution, follow current codes and regulations that may apply, and is urged to consult with a licensed contractor if in doubt about any steps on these posts. All names were changed to protect client's privacy. DIY Advisor. Reproduction of site content including photos without permission prohibited. All rights reserved. © Copyright 2011-


How to Repair Kitchen Nook Wall - Part 1 of 5 - Wallpaper Damages

Razor knife + extra blades
By Gary Boutin
 

Supplies and Tools: 
Razor knife and extra blades
Tarps cotton 9 ft. x 12 ft.

I was called by a client in Santa Clarita, California. They were selling their home and moving to Colorado. After the Realtor checked each room of their beautiful home, she requested a huge laundry list of repairs that needed to be addressed immediately. One job was to repair the kitchen nook dining room wallpaper. Two kitchen windows had bad rubber seals and had completely dried up. Sprinkler water had passed the rubber seal creating the damages on the kitchen walls.

This post shows the four steps showing the damages to this kitchen nook wall.

Step 1: Fig.1 shows that all these walls have damages. Windows were not closed and water seeped inside the wall.
Fig.1 Dining room walls damages
left, middle and right wall repair
Step 2: Fig.2 shows that the right side of the wallpaper had huge bubble were the paper was free from the walls.
Fig.2 Right side bubbling wallpaper
Step 3: Fig.3 shows that most of the wallpaper by the baseboards were also moldy and had a black trace coming to the surface of the wallpaper.
Fig.3 Right side moldy wallpaper
  Step 4: Fig.4 shows how this section was cut and pulled away from the wall.
Fig.4 Right side ripped and cut wallpaper

How To Repair a Kitchen Nook Wall:


Update: DIY Advisor has New blogs check them today:
  • Cookie Alert: European Union laws requires that you know that this blog uses cookies. If you are concerned about this please click here to see how Google uses this information.


Note: The DIY Advisor assumes no liability for omissions, errors or the outcome of any jobs. The reader must always exercise reasonable caution, follow current codes and regulations that may apply, and is urged to consult with a licensed contractor if in doubt about any steps on these posts. All names were changed to protect client's privacy. DIY Advisor. Reproduction of site content including photos without permission prohibited. All rights reserved. © Copyright 2011-

Saturday, April 4, 2015

How to Install Custom White Aluminum Door - Part 1 of 3 - The Manual

Required Tools
By Gary Boutin

Supplies and Tools: 
Door manual 
Razor Knife (to open cardboard box) 
Tape measure
Tools required 


Mr. Gonzales was a truck driver for a local dairy company for over thirty years. He had lived in a five bedroom home with a huge back yard. Now that he was retired he wanted a smaller home with some amenities. His family found The Chino Valley Senior Condo Complex near his children homes. The apartment was a one bedroom apartment with no backyard and very little outside personal space. His apartment had a cheap aluminum screen door which they removed. He wanted a custom high quality screen door installed on his front door. 

This post shows the eight steps of how to read the manual and learning the parts on your new screen door. 
Fig.1
Fig.2


 Step 1: Fig.1 through fig.3 below shows what the your manual might look like to identify the parts of the screen door. Your parts may be called something different. 
Fig.3
Step 2: Read your manual and identify the parts with the pictures in your manual, so when the directions says to hold part A to part B you know its the correct part. Otherwise hire a handyman to install your custom door.
Step 3: Fig.4 shows below middle a cut-out cardboard of some of the custom door information that this custom screen components. Below for example the screen is "Heavy duty 1 7/8" x 1" frame with rust-resistant fasteners".
Fig.4 Door Information
Step 4: Fig.5 shows above right the front door of the unit that needs a new bug screen.
Fig.5 Apartment Complex
Step 5: Fig.6 shows the front door of the unit that needs a new bug screen.
Fig.6 Apartment  
redesigned condo 
front door
Step 6: Fig.7 and fig.8 shows the existing door jamb were the custom door screen will be installed. There is plenty of wood jamb to install this screen door. Check that the aluminum weatherstrip so it does not interfere with the door installation, if it does remove it and re-install against the door edge.  
Fig.7 Left side 
door jamb
Step 7: Fig.8 middle of door jamb shows prior marks (hole) of an earlier aluminum screen installation. 
Fig.8 Right side door jamb
Step 8: Fig.9 shows the new screen that will be placed on the door. The screen came in a large box and each piece was packaged separately in many cardboard boxes. For example the door closer and door hardware were in one box. The door hinge leg and door handle were in another box. The screen was meshed in the middle of the box. On the outside of the box, the directions were printed and had pictograph pictures of how to install this custom screen. For example look at the top right of this page and see what tools are required to install this screen door.
Fig.9 New screen 
unpacked
How To Install a Custom White Aluminum Door?


Update: DIY Advisor has New blogs check them today:
  • Cookie Alert: European Union laws requires that you know that this blog uses cookies. If you are concerned about this please click here to see how Google uses this information.


Note: The DIY Advisor assumes no liability for omissions, errors or the outcome of any jobs. The reader must always exercise reasonable caution, follow current codes and regulations that may apply, and is urged to consult with a licensed contractor if in doubt about any steps on these posts. All names were changed to protect client's privacy. DIY Advisor. Reproduction of site content including photos without permission prohibited. All rights reserved. © Copyright 2011-