 |
| Electric drill 120-volt |
Supplies and Tools:
Complete door hardware directions
Handle guard template (Black with 3-holes)
Drill bits 1/8 inch, 3/32 inch
Electric drill cordless and 120 Volt
Glasses safety
Pencil #2
Screwdriver flat tipped
Screwdriver Phillip tip
Tape measure
On Easter Sunday, we celebrate the resurrection of the Lord, Jesus Christ. This Easter it seams appropriate to show how to finish the installation a custom entomology (insects) screen. Easter in many regions of our valley is were the no see-em bugs come out. We are all looking forward to our local insects that will stalked us in April. Mr. Gonzales was a truck driver for a local dairy company and he was moving to Chino Valley Senior Apartment Complex. He needed this job done since he could no longer handle any tools.
This post shows the eleven steps on how to install the door hardware on a screen door.
Step 1: Fig.1 shows the complete directions for installing a new hardware for this screen door.
 |
| Fig.1 The hardware plans |
 |
| Fig.2 Door template is located just above the door handle |
 |
| Fig.3 Template |
 |
| Fig.4 Top hole |
 |
| Fig.5 Bottom hole |
 |
| Fig.6 Removing sharp edges |
 |
| Fig.7 Plastic handle ready to install |
 |
| Fig.8 Door handle |
 |
| Fig.9 Handle ready |
 |
| Fig.10 Fine tuning |
 |
| Fig.11 Outside handle |
 |
| Fig.12 Paper template |
 |
| Fig.13 Template on wood frame |
 |
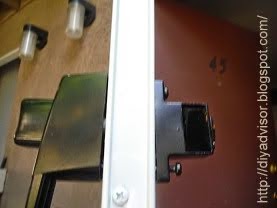
| Fig.14 Latch done |
 |
| Fig.15 Door closer plans |
 |
| Fig.16 Door closer |
This job is done and Mr. Gonzales can invite his family for the holidays.
 |
| Fig.17 Job done |
- Part 1 of 3 - The Manual
- Part 2 of 3 - Door Screen Alignment
- Part 3 of 3 - Hardware Installation
Update: DIY Advisor has New blogs check them today:
- Handyman Blog: DIY Advisor
- DIY Advisor Sitemap
- Food Blog: From Kiwis To Pistachios
- Food Blog Sitemap
- Tool Blog: DIY Advisor Toolbox
- Tool Blog Sitemap
- Artwork Blog: Light in Dark Artwork
- Artwork Blog Sitemap
- Class-A Tests: DIY Class-A Drivers License Tests
- Class-A Tests Sitemap: Class-A Sitemap
- DIY Poem: DIY Poem Meter Blog
- DIY Poem Sitemap: DIY Sitemap
- Cookie Alert: European Union laws requires that you know that this blog uses cookies. If you are concerned about this please click here to see how Google uses this information.
Note: The DIY Advisor assumes no liability for omissions, errors or the outcome of any jobs. The reader must always exercise reasonable caution, follow current codes and regulations that may apply, and is urged to consult with a licensed contractor if in doubt about any steps on these posts. All names were changed to protect client's privacy. DIY Advisor. Reproduction of site content including photos without permission prohibited. All rights reserved. © Copyright 2011-

No comments:
Post a Comment