 |
| Fig.1 -3/16 Bit |
Tools and Supplies:
Ryobi 12 Volt Cordless Drill
Drill Bit 3/16
Hole Saw 1-3/4
Prime-Line Products U 9917 Giant Screen Viewer
Vacuum cleaner
Mrs. Black wanted a Giant Screen Viewer peep hole on her front door to be able to see people at her door.
This post shows the six steps that shows the installation of the hole for the U 9917 Giant Screen Viewer.
Step 1: This was not a new install. The door had an existing peep hole so the guide bit was not needed. Fig.1 shows the 3/16 drill bit and fig.2 shows the drill bit can be placed either at the bottom or the top of this larger hole. Fig.3 shows the bottom of the peep hole was chosen..
 |
| Fig.2 Pilot hole for hole saw |
 |
| Fig.3 Pilot hole finished |
 |
| Fig.4 Sawing the door |
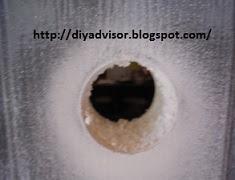
Step 3: Fig.5 shows picture below shows the hole through the door skin (fiberglass) and through the core of the front door.
 |
| Fig.5 Interior side is done |
 |
| Fig.6 Saw through the door |
 |
| Fig.7 Clean up |
 |
| Fig.8 Dusted door |
 |
| Fig.9 New clean vacuumed door |
- Part 1 of 6 - Removal
- Part 2 of 6 - The Tools
- Part 3 of 6 - Giant Screen
- Part 4 of 6 - Drilling the Hole
- Part 5 of 6 - Installing
- Part 6 of 6 - Matching
- Handyman Blog: DIY Advisor
- Food Blog: From Kiwis To Pistachios!
- Artwork Blog: Light in Dark Artwork
- Artwork Blog Sitemap
- Class-A Tests: DIY Class-A Drivers License Tests
- Cookie Alert: European Union laws requires that you know that this blog uses cookies. If you are concerned about this please click here to see how Google uses this information.
Note: The DIY Advisor assumes no liability for omissions, errors or the outcome of any jobs. The reader must always exercise reasonable caution, follow current codes and regulations that may apply, and is urged to consult with a licensed contractor if in doubt about any steps on these posts. All names were changed to protect client's privacy. DIY Advisor. Reproduction of site content including photos without permission prohibited. All rights reserved. © Copyright 2011-

No comments:
Post a Comment