 |
| Fig.1 30# roofing felt |
Supplies and Tools:
Exterior caulking
30# Roofing felt
Razor Knife
Saw horses with table
Tom J. lives in Wrightwood, California where the weather can be quite severe. He called my repair service to investigate why his bedroom window was always drafty. This job was done with my good friend, Carl, who helped me do this project.
This post shows the five steps to installing roofing felt in the window's open spaces.
Step 1: Fig.1 shows the felt cut to size before applying to the window.
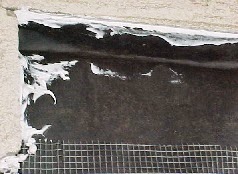
Step 2: Fig.2 shows the upper left corner of the window. A lining of 30# roofing felt was placed in the window gaps to seal it against water leakage.
 |
| Fig.2 Top roofing felt |
 |
| Fig.3 Felt filling cracks |
 |
| Fig.4 Right side gap fixed |
 |
| Fig.5 Vent covered and caulked |
- Part 1 of 5 - Troubleshooting the Leaks
- Part 2 of 5 - Felt and Caulking
- Part 3 of 5 - Installing Stucco Wire
- Part 4 of 5 - Stucco Patch
- Part 5 of 5 - Stucco Primed
Update: DIY Advisor has New blogs check them today:
- Handyman Blog: DIY Advisor
- DIY Advisor Sitemap
- Food Blog: From Kiwis To Pistachios
- Food Blog Sitemap
- Tool Blog: DIY Advisor Toolbox
- Tool Blog Sitemap
- Artwork Blog: Light in Dark Artwork
- Artwork Blog Sitemap
- Class-A Tests: DIY Class-A Drivers License Tests
- Class-A Tests Sitemap: Class-A Sitemap
- DIY Poem: DIY Poem Meter Blog
- DIY Poem Sitemap: DIY Sitemap
- Cookie Alert: European Union laws requires that you know that this blog uses cookies. If you are concerned about this please click here to see how Google uses this information.
Note: The DIY Advisor assumes no liability for omissions, errors or the outcome of any jobs. The reader must always exercise reasonable caution, follow current codes and regulations that may apply, and is urged to consult with a licensed contractor if in doubt about any steps on these posts. All names were changed to protect client's privacy. DIY Advisor. Reproduction of site content including photos without permission prohibited. All rights reserved. © Copyright 2011-

No comments:
Post a Comment