 |
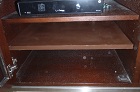
| Fig.1 Entertainment Center |
Supplies and Tools:
Duster
Paper tarp
Melamine shelves enough for 4 shelves
Rust-OleumⓇ 12 oz Painter's Touch 2X Ultra Cover Spray paint
Shelf pins (pegs)
Mrs. Black is a famous chef and had purchase an old dusty cherry entertainment center. The piece had one problem, not enough shelves. She had thought of putting her cooking books into these shelves, but she needed more space.
This post shows the fifteen steps on how to add more shelves to any piece of furniture especially this cherry entertainment center.
Step 1: Measure the shelves needed in entertainment center. Fig.1 shows there is only one shelf that needs replacing. Each shelf was exactly the same in all 3 tiers.
Step 2: Fig.2 shows The Home DepotⓇ orange cart and its shop magazine, shelves and parts for the job. The Home DepotⓇ customer service center cut all the shelves for the job for free. This made this job easier and we now had clean cut shelves.
 |
| Fig.2 New Shelves purchased at The Home DepotⓇ |
 |
| Fig.3 Rust-Oleum |
Step 5: The paint top cover had to be pressed from both sides to remove the cover. A security measure to prevent kids from spray painting.
Step 6: Fig.4 shows the second coat of spray paint that will be sprayed over the melamine shelf.
 |
| Fig.4 Second coat |
 |
| Fig.5 First coat |
 |
| Fig.6 Ready |
 |
| Fig.7 Stick pegs |
 |
| Fig.8 L Metal shelf pegs |
 |
| Fig.9 Placing the shelf |
|
| Bottom hinge |
 |
| Fig.10 Shelf unit |
 |
| Fig.11 Bottom of shelf |
 |
| Fig.12 Duster |
 |
| Fig.13 Cherry entertainment center |
Update: DIY Advisor has New blogs check them today:
- Handyman Blog: DIY Advisor
- DIY Advisor Sitemap
- Food Blog: From Kiwis To Pistachios
- Food Blog Sitemap
- Tool Blog: DIY Advisor Toolbox
- Tool Blog Sitemap
- Artwork Blog: Light in Dark Artwork
- Artwork Blog Sitemap
- Class-A Tests: DIY Class-A Drivers License Tests
- Class-A Tests Sitemap: Class-A Sitemap
- DIY Poem: DIY Poem Meter Blog
- DIY Poem Sitemap: DIY Poem Sitemap
- Cookie Alert: European Union laws requires that you know that this blog uses cookies. If you are concerned about this please click here to see how Google uses this information.
Note: The DIY Advisor assumes no liability for omissions, errors or the outcome of any jobs. The reader must always exercise reasonable caution, follow current codes and regulations that may apply, and is urged to consult with a licensed contractor if in doubt about any steps on these posts. All names were changed to protect client's privacy. DIY Advisor. Reproduction of site content including photos without permission prohibited. All rights reserved. © Copyright 2011-

No comments:
Post a Comment