 |
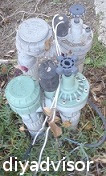
| Fig.1 Sprinkler main valves |
Supplies and Tools:
Rock or fiberglass irrigation covers
Jim had a huge laundry list in Santa Clara, California. He needed to get his house on the market since his job had moved to Colorado. Today we are addressing his irrigation sprinkler valves because they were unsafe and needed to be protected from children. One set of the valves were located in the playground area, one set by the pool area and the final set by the front side of Jim's house.
This post shows the two steps to cover the irrigation valves with fake rock covers.
Step 1: Go to your local hardware store and purchase an irrigation cover. Or a fancy rock cover, rock covers are usually made of fiberglass and are very light.
Step 2: Fig.1 and fig.2 shows the irrigation valves. Pick up the cover and place it over the existing irrigation valves.
 |
| Fig.2 Side view |
Step 4: Fig.4 shows the side of the cover, notice no irrigation pipes can be seen, completely covered by the cover Now each area of Jim's home has irrigation covers thus protecting the valves and the children. This job is finished.
 |
| Fig.3 Top view |
 |
| Fig.4 Side view |
Update: DIY Advisor has New blogs check them today:
- Handyman Blog: DIY Advisor
- DIY Advisor Sitemap
- Food Blog: From Kiwis To Pistachios
- Food Blog Sitemap
- Tool Blog: DIY Advisor Toolbox
- Tool Blog Sitemap
- Artwork Blog: Light in Dark Artwork
- Artwork Blog Sitemap
- Class-A Tests: DIY Class-A Drivers License Tests
- Class-A Tests Sitemap: Class-A Sitemap
- DIY Poem: DIY Poem Meter Blog
- DIY Poem Sitemap: DIY Poem Sitemap
- Cookie Alert: European Union laws requires that you know that this blog uses cookies. If you are concerned about this please click here to see how Google uses this information.
Note: The DIY Advisor assumes no liability for omissions, errors or the outcome of any jobs. The reader must always exercise reasonable caution, follow current codes and regulations that may apply, and is urged to consult with a licensed contractor if in doubt about any steps on these posts. All names were changed to protect client's privacy. DIY Advisor. Reproduction of site content including photos without permission prohibited. All rights reserved. © Copyright 2011-

No comments:
Post a Comment