 |
| Fig.1 Power supply |
Supplies and Tools:
Angle grinder with power cord with grinder wrenches
Electric power with extension cords
Cut off wheel 4-inch
Safety gloves (protect the hands)
Safety goggles (protect the eyes)
Long sleeve work shirt (protect the arms)
A good friend hired my services to remove his aging patio cover in his backyard and he wanted to install a new garage kit.
This post shows twelve steps on how to remove galvanized patio poles.
Step 1: Fig.1 shows the electrical extension cord is plugged into a home power supply.
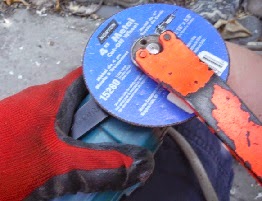
Step 2: Fig.2 shows the used to tighten the new cut off wheel. The black wrench hold the spindle from moving and the orange wrench tightens the last nut to the cut-off wheel.
 |
| Fig.2 Grinder wrenches |
 |
| Fig.3 Grinder with spindle wrench |
 |
| Fig.4 Cut off wheel |
 |
| Fig.5 Washer before final lock nut |
 |
| Fig.6 Final lock nut |
 |
| Fig.7 Tightened lock nut |
 |
| Fig.8 Ready to use |
Step 8: Fig.9 shows grinder cutting metal pipe near the cement. This was used on all six metal post used to re-enforce the patio cover.
 |
| Fig.9 Starting to cut the pole |
 |
| Fig.10 Cutting center pole |
 |
| Fig.11 Cutting top support pole |
 |
| Fig.12 Changing wheel |
 |
| Fig.13 Final cut job done |
How to Remove an Aging Patio Cover:
- Part 1 of 6 - Trash Pickup
- Part 2 of 6 - Removed Wood Rafters Supports
- Part 3 of 6 - Removed Wood Beams
- Part 4 of 6 - Cut Painted Metal Pipes Frames
- Part 5 of 6 - Sawall Saw
- Part 6 of 6 - Radial Cutting Wheel
Update: DIY Advisor has New blogs check them today:
- Handyman Blog: DIY Advisor
- DIY Advisor Sitemap
- Food Blog: From Kiwis To Pistachios
- Food Blog Sitemap
- Tool Blog: DIY Advisor Toolbox
- Tool Blog Sitemap
- Artwork Blog: Light in Dark Artwork
- Artwork Blog Sitemap
- Class-A Tests: DIY Class-A Drivers License Tests
- Class-A Tests Sitemap: Class-A Sitemap
- DIY Poem: DIY Poem Meter Blog
- DIY Poem Sitemap: DIY Sitemap
- Cookie Alert: European Union laws requires that you know that this blog uses cookies. If you are concerned about this please click here to see how Google uses this information.
Note: The DIY Advisor assumes no liability for omissions, errors or the outcome of any jobs. The reader must always exercise reasonable caution, follow current codes and regulations that may apply, and is urged to consult with a licensed contractor if in doubt about any steps on these posts. All names were changed to protect client's privacy. DIY Advisor. Reproduction of site content including photos without permission prohibited. © Copyright 2011-

No comments:
Post a Comment