 |
| Elite metal mailboxes |
Supplies and Tools:
Carpentry pencil
Deck screws 1 1/2 inch box
Electrical cord 100 foot
Electrical cord 25 feet
Gloves heavy-duty
Magnetic extension
Mail boxes, vintage series, black
Phillip tip
Square yellow 2-foot
Tape measure large print
Mrs. Escarole wanted her mailbox repaired, it has fallen over and the Post Office would not deliver the mail. She lives in a rural town called Creekside, California. The mailbox was made of two 4x4 posts at a horizontal angle and another 4x4 post held it in place.
This post shows the ten steps to installing a two standard mailboxes.
Step 1: Fig.1 shows the old mail box that needs to be repaired.
 |
| Fig.1: Mailbox repair |
 |
| Fig.2 Mailbox |
 |
| Fig.4 Yellow square |
 |
| Fig.5 Magnetic extension with a Phillip tip |
 |
| Fig.6 Deck screws |
 |
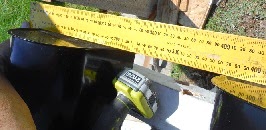
| Fig.7 Measuring mailbox |
 |
| Fig.8 installing 1x2s |
 |
| Fig.9 More deck screws |
 |
| Fig.10 1/2 done |
 |
| Fig.11 Squaring mailboxes |
 |
| Fig.12 Cordless driver |
 |
| Fig.13 Angle 45 degree |
 |
| Fig.14 Mail Latch |
- Part 1 of 16 - The Estimate
- Part 2 of 16 - Wood Set Up
- Part 3 of 16 - Mailbox Hole Dug
- Part 4 of 16 - Priming Post and Old Wood Trim
- Part 5 of 16 - Mailbox Rails Painted
- Part 6 of 16 - Beveling Post Ends
- Part 7 of 16 - Holes Template
- Part 8 of 16 - Priming Posts
- Part 9 of 16 - Washer Preparation
- Part 10 of 16 - Carriage Bolts
- Part 11 of 16 - Post Installation
- Part 12 of 16 - Mailbox Installation
- Part 13 of 16 - Mailbox Trim New Installation
- Part 14 of 16 - Mailbox Trim Painted
- Part 15 of 16 - Mailbox Bottom Address Trim Rebuilt
- Part 16 of 16 - Mailbox Post And Trim Painted
Update: DIY Advisor has New blogs check them today:
- Handyman Blog: DIY Advisor
- DIY Advisor Sitemap
- Food Blog: From Kiwis To Pistachios!
- Food Blog Sitemap
- Tool Blog: DIY Advisor Toolbox
- Tool Blog Sitemap
- Artwork Blog: Light in Dark Artwork
- Artwork Blog Sitemap
- Class-A Tests: DIY Class-A Drivers License Tests
- Class-A Tests Sitemap: Class-A Sitemap
- DIY Poem: DIY Poem Meter Blog
- DIY Poem Sitemap: DIY Sitemap
- Cookie Alert: European Union laws requires that you know that this blog uses cookies. If you are concerned about this please click here to see how Google uses this information.
Note: The DIY Advisor assumes no liability for omissions, errors or the outcome of any jobs. The reader must always exercise reasonable caution, follow current codes and regulations that may apply, and is urged to consult with a licensed contractor if in doubt about any steps on these posts. All names were changed to protect client's privacy. DIY Advisor. Reproduction of site content including photos without permission prohibited. All rights reserved. © Copyright 2011-

No comments:
Post a Comment