 |
| Fig.1 Pruning shears |
By Gary Boutin
Supplies and Tools:
Clean water
Miracle-Gro® -
Moisture Control® Potting Mix
Potting spade
Potting rake
Plastic tarp
It's time to replant around my front patio. This post address how to plant Hydrangea plant.
This post shows the fifteenth steps on how to plant a patio Hydrangea.
Step 1: Fig.1 shows a healthy
Hydrangea plant in nicely potted soil. Hydrangea can get root bound this is were the plant roots wraps itself around the bottom of the pot. If it was in the soil the roots would just continue to grow longer in search of water and nutrients.
Step 2: Fig.2 shows that Miracle-Gro® Moisture Control® Potting Mix. To check information about the Miracle-Gro® Moisture Control® Potting Mix click on the United States Material Safety Data Sheet.
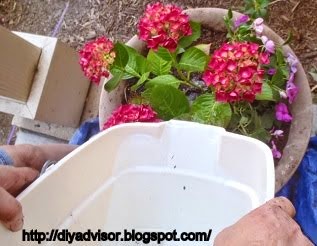
Step 3: Fig.3 shows that the removal of the
Miracle-Gro® Moisture Control® Potting Mix is done by using a small plastic pot. Pouring the soil from the bag is difficult without it going all over the plastic tarp and not in the pot
.
 |
| Fig.3 Removal process |
Step 4: Fig.4 shows
potting spade with black Plastic Handle.
 |
| Fig.4 Potting Spade |
Step 5: Fig.5 shows the plant is being removed of the existing pot.
 |
| Fig.5 Removal |
Step 6: Fig.6 shows the
root bound plant. This one is not as bad but this plant has been replanted several time.
 |
| Fig.6 Root bound |
Step 7: Once the new pot decided place some plant roots, or dried leaves in the bottom of the pot so the new plant can have something to feed on while its growing. This part is optional because the soil that is being used comes with
soil amendment and
water inhibitors.
 |
| Fig.7 Soil food |
Step 8: Remove the new soil from the potting soil bag and place the
soil loosely into the pot to be used.
Fig.8 through
fig.10 shows the soil is being placed into the new pot.
 |
| Fig.8 Loose soil |
 |
| Fig.9 Spade to smooth the soil |
 |
| Fig.10 Last potful |
Step 9: Fig.11 shows a perfect environment for the new
Hydrangea.
 |
| Fig.11 loose dirt |
Step 10: Fig.12 shows the plant removal from its existing pot.
 |
| Fig.11 Plant removed |
Step 11: Fig.13 shows the
Hydrangea plant is on the black tarp and is ready for transplanting.
Fig.14 shows the Hydrangea plant is in its new home.
 |
| Fig.13 Plant without a home |
 |
| Fig.14 New condo |
Step 12: Making a hole with both of my hands and placing the pulled apart bounded plant into this new pot.
Fig.15 shows that the the soil was placed around the plant leaving about
1-inch to the top edge of the new pot.
 |
| Fig.15 Plant Time |
Step 13: Fig.16 shows that the last step was to place
clean water around the plant. Thoroughly saturate the soil and the plant into its new home.
 |
| Fig.16 water soil |
Step 14: Fig.17 to
fig.18 shows the plant is fully transplanted and is now on the front patio.
 |
| Fig.17 Hydrangea |
 |
| Fig.18 Flowers |
Step 15: Fig.19 and fig.20 shows a month later and all the plants including the Hydrangea are blooming.
 |
| Fig.19 Blooming flowers |
 |
| Fig.20 Happy flowers |
Update: DIY Advisor has New blogs check them today:
- Cookie Alert: European Union laws requires that you know that this blog uses cookies. If you are concerned about this please click here to see how Google uses this information.
Note: The DIY Advisor assumes no liability for omissions, errors or the outcome of any jobs. The reader must always exercise reasonable caution, follow Current codes and regulations that may apply, and is urged to consult with a licensed contractor if in doubt about any steps on these posts. All names were changed to protect client's privacy. DIY Advisor. Reproduction of site content including photos without permission prohibited. All rights reserved. © Copyright 2011-


No comments:
Post a Comment