 |
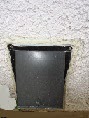
| Fig.1 Old vent |
Supplies and Tools:
Cordless screwdriver with a Phillip bit
Dryer metal duct pipe and vent kit
Silicone - clear
Mr. Georgianna had seen my truck in the neighborhood. He left a message on my wiper blade to help him out on a small dryer duct job.
This post shows the seven steps to complete the dryer vent assembly.
Step 1: Fig.1 shows above right is the old dryer vent cover, all bent inside and outside.
Step 2: Fig.2 shows below is the inside view of the vent that will be attached to the dryer exhaust pipe. This one below has little room to attach any pipe extension.
 |
| Fig.2 Inside laundry |
 |
| Fig.3 Metal coupler |
 |
| Fig.4 New cover |
Step 6: After the pipe is in the wall use a cordless screwdriver with a Phillip bit to drive the 4-sheet metal screws into the stucco.
Step 7: Read my post "How Do You Open Caulking Tubes" and then apply clear silicone using a manual caulking or a battery operated caulking gun to release the silicone to the entire exterior edge of the dryer vent. When the silicone is added to the interior it will seal any gaps between the metal vent and the stucco. This wall hole was the perfect size for this pipe, caulking was used on the inside and the outside. Some kits come with a interior flange to hide any gaps in the wall, this is a good to reduce any air leaking out of the home.
Step 8: The warehouse store that Mr. Georgianna purchased the vent cap/pipe gave him another new one at no charge, customer staff person stated that the piece was defective. This job is finished.
Update: DIY Advisor has New blogs check them today:
- Handyman Blog: DIY Advisor
- DIY Advisor Sitemap
- Food Blog: From Kiwis To Pistachios!
- Food Blog Sitemap
- Tool Blog: DIY Advisor Toolbox
- Tool Blog Sitemap
- Artwork Blog: Light in Dark Artwork
- Artwork Blog Sitemap
- Class-A Tests: DIY Class-A Drivers License Tests
- Class-A Tests Sitemap: Class-A Sitemap
- DIY Poem: DIY Poem Meter Blog
- DIY Poem Sitemap: DIY Sitemap
- Cookie Alert: European Union laws requires that you know that this blog uses cookies. If you are concerned about this please click here to see how Google uses this information.
Note: The DIY Advisor assumes no liability for omissions, errors or the outcome of any jobs. The reader must always exercise reasonable caution, follow current codes and regulations that may apply, and is urged to consult with a licensed contractor if in doubt about any steps on these posts. All names were changed to protect client's privacy. DIY Advisor. Reproduction of site content including photos without permission prohibited. All rights reserved. © Copyright 2011-

No comments:
Post a Comment