 |
| Angel Fish |
Supplies and Tools:
A love for aquarium Angelfish
Manual caulking gun
Nitrile gloves (blue)
White silicone tube
Mrs. Angelfish had the largest aquarium on the block. According to Wikipedia, the free encyclopedia the Fresh Water Angelfish is scientifically named Pterophyllum scalare. Her aquarium was filled with many varieties, such as the Altum Angelfish or Deep Angelfish, teardrop angelfish, leopold's angelfish, dwarf angelfish, or Roman-nosed angelfish. For more information on fresh water angelfish please click the scientific name above. Mrs. Angelfish is an environmentalist so when she purchased s used sink, she had a plumber replace the faucet. What she needed was someone to caulk her sink.
This post shows the six steps on how to caulk a used bathroom sink.
Step 1: Fig.1 shows a caulking gun. Place a new silicone tube into the caulking gun. Fig.2 shows the silicone tubes available at your local hardware store.
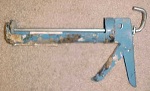 |
| Fig.1 Caulk Gun |
 |
| Fig.2 Tubes |
Step 3: Fig.4 below shows that there are gaps in the caulking. To fix this the caulking tube tip needs to be moved around the entire perimeter of the sink thus filling the gaps.
Step 4: Next push the silicone with your fingers into the cracks thus sealing the area.
Note: Use white silicone instead of latex caulking because it lasts longer and will not crack like latex caulking. It is much harder to use the silicone caulking than latex but the overall effect is better for areas that are used everyday.
 |
| Fig.3 Calking tip releasing caulking |
 |
| Fig.4 push silicone bead |
 |
| Fig.5 Remove all gaps |
 |
| Fig.6 Use mirror to make sure all gaps are filled with silicone caulking |
 |
| Fig.7 Job done |
Update: DIY Advisor has New blogs check them today:
- Handyman Blog: DIY Advisor
- DIY Advisor Sitemap
- Food Blog: From Kiwis To Pistachios
- Food Blog Sitemap
- Tool Blog: DIY Advisor Toolbox
- Tool Blog Sitemap
- Artwork Blog: Light in Dark Artwork
- Artwork Blog Sitemap
- Class-A Tests: DIY Class-A Drivers License Tests
- Class-A Tests Sitemap: Class-A Sitemap
- DIY Poem: DIY Poem Meter Blog
- DIY Poem Sitemap: DIY Poem Sitemap
- Cookie Alert: European Union laws requires that you know that this blog uses cookies. If you are concerned about this please click here to see how Google uses this information.
Note: The DIY Advisor assumes no liability for omissions, errors or the outcome of any jobs. The reader must always exercise reasonable caution, follow current codes and regulations that may apply, and is urged to consult with a licensed contractor if in doubt about any steps on these posts. All names were changed to protect client's privacy. DIY Advisor. Reproduction of site content including photos without permission prohibited. All rights reserved. © Copyright 2011-

No comments:
Post a Comment