Showing posts with label hammer claw. Show all posts

Saturday, March 7, 2015

How to Replace Kitchen Cabinet Sink Base - Part 1 of 2 - Removal

Fig.1 Wood base under kitchen sink
By Gary Boutin
 
Supplies and Tools:  
Broom
Bucket 
Dust pan
Hammer claw
Scrape
Vicegrip® Pliers

Dr. Jorge Valvus a former client called about replacing his kitchen sink base cabinet shelf. He had purchased the parts but was unable to see how to replace the damage shelf. He had called several local handyman to bid the job since he was renting the home, but none would come for his price. 

There are two post for this job. This is the first post of two, that shows the seven steps and fourteen pictures on how to solve this problem.  

Step 1: Fig.1 through fig.3 above and below shows the kitchen cabinet tile and shelf damages.
Fig.2 Damaged shelf
Fig.3 Plug light shows damages
Step 2: Fig.4 shows the damages that occurred after a year of not repairing a sink leak. 
Fig.4 Pulling tile floor tiles
Step 3: Fig.5 and fig.6 show that both sides of the shelf are wet and completely rotten from lack of maintenance.
Fig.5 Garbage disposal side
Fig.6 Right side of sink
Step 4: Fig.7 shows that the removal of the kitchen base is being removed and placed into a bucket to easy removal. Fig.8 shows that small edges of the original shelf needed to be removed.
Fig.7 Remove wet boards
Fig.8 Removal process
Step 5: Fig.9 and shows the shelf has been removed but some pieces are left behind and need to be scraped off before applying the new shelf. Fig.10 shows the old nails need to be removed too before the new shelf is placed inside the cabinet.
Fig.9 Hammer the pieces off
Fig.10 Scrape the middle
Step 6: Fig.11 and fig.12 shows that all the rusted nails need to be removed from the base of the cabinet otherwise the new shelf may not be level and lay flat on the wooden base.
Fig.11 Vicegrip® pliers pulls out nails
Fig.12 Remove cabinet nails
Step 7: Fig.13 and fig.14 shows only saw dust is left and a dustpan with a wide scraper will help remove the saw dust from the kitchen floor. The next post will show the steps to place the new base cabinet shelf.
Fig.13 Dustpan and scraper
picked up mess
Fig.14 Saw dust to be removed
How to Replace a Kitchen Cabinet Sink Base:

Update: DIY Advisor has New blogs check them today:
  • Cookie Alert: European Union laws requires that you know that this blog uses cookies. If you are concerned about this please click here to see how Google uses this information.

Note: The DIY Advisor assumes no liability for omissions, errors or the outcome of any jobs. The reader must always exercise reasonable caution, follow current codes and regulations that may apply, and is urged to consult with a licensed contractor if in doubt about any steps on these posts. All names were changed to protect client's privacy. DIY Advisor. Reproduction of site content including photos without permission prohibited. All rights reserved.© Copyright 2011-

Thursday, September 4, 2014

How to Remove Aging Patio Cover - Part 3 of 6 - Removed Wood Beams Hexagonal Bolts

Claw Hammer
By Gary Boutin

Supplies and Tools:
Adjustable Crescent Wrench 8-inch
Gloves with rubber fingers
Hammer Claw
Metal punch 
Pipe wrench
Socket wrench 1/2-inch pry bar
Trash cans
Local recycle yard

A good friend hired my services to remove his aging patio cover in his backyard and he wanted to install a new garage kit.

This post shows ten steps on how to remove 10-inch bolts from the wooden beams. 

Step 1: Fig.1 shows the tools needed to remove six 10-inch bolts. Pipe wrench and crescent wrench will be needed to pry the rusted nuts from the bolts. These bolts have been securing the patio cover to the metal pipes for over thirty years.
Fig.1 Crescent and  
pipe wrench
Step 2: Fig.2 shows the bolt drilled through the 4 by 8 wood beam.
Fig.2 Bolts that need 
to be removed

Step 3: Fig.3 shows the crescent wrench being used on the left in combination with a 1/2 inch socket wrench pry bar. Noticed the handyman wore gloves to protect his hands from wood splinters and rust metal chards from metal posts.

Fig.3 First bolt 
to be removed
Step 4: Fig.4 shows the crescent wrench in vertical position removing the nut from the bolt.
Fig.4 Pipe wrench
on bolt
Step 5: Fig.5 shows a crescent wrench in the horizontal position removing the nut.
Fig.5 Crescent 
wrench on nut

Step 6: Fig.6 shows the nut has been removed and fig.7 shows a claw hammer hitting the metal punch against the end of the bolt to push it out of the wood beam.
Fig.6 Nut is gone
Fig.7 Metal punch hammered 
bolt out of the slot
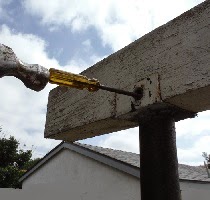
Step 7: Fig.8 shows the bolt being pushed out by the screwdriver and now can be removed.
Fig.8 bolt coming out
Step 8: Fig.9 shows the wood beam being released from the metal framework. Fig.10 shows the wood beam is removed from its base.
Fig.9 bolt removed 
and beam pulled out
Fig.10 Wood beam removed
Step 9: Fig.11 shows the removed wood beam now laying on cement patio.
Fig.11 Wood beam 
ready to be cut

Step 10: Fig.12 shows the wood support removed ready for disposal. All the metal bolts, washers and nuts were sold at a local recycle shop.
Fig.12 wood beam 
ready for disposal


How to Remove an Aging Patio Cover:

Update: DIY Advisor has New blogs check them today:
  • Cookie Alert: European Union laws requires that you know that this blog uses cookies. If you are concerned about this please click here to see how Google uses this information.

Note: The DIY Advisor assumes no liability for omissions, errors or the outcome of any jobs. The reader must always exercise reasonable caution, follow current codes and regulations that may apply, and is urged to consult with a licensed contractor if in doubt about any steps on these posts. All names were changed to protect client's privacy. DIY Advisor, Reproduction of site content including photos without permission prohibited. All rights reserved. © Copyright 2011-

Wednesday, March 27, 2013

How to Paint Shed Wall

Fig.1 Shed wall reflects 
light into living room
By Gary Boutin

Supplies and Tools:
Gloves nitrile disposable
Hammer claw 
Paint stirring stick
Masking tape 
Paint tarps
Paint tray
Paint brush 1 inch, 2 inch
Paint (supplied by customer)
Paint frame
Paint roller cover
Primer latex

Mrs. Appleton noticed my work building a retaining wall. She stopped by and asked if I could paint her shed.  

This post shows the six steps to painting an exterior shed wall. 

Step 1: Fig.1 shows the shed wall was facing her living room and was reflecting the sun light into her living room. 
Step 2: Fig.2
shows the tools needed for this job. 
Fig.2 All 
tools needed
Step 3: Fig.3 shows that a painters tarp was used to protect the cement and the grass area near the shed wall. One coat of exterior white primer was painted over the white semi gloss paint before applying the light brown exterior paint provided by Mrs. Appleton.
Fig.3 
painter's tarp
Step 4: Fig.4 and fig.5 shows the edge cutting. Edge cutting is painting the edges of the shed wall because the paint roller can not do a good job or rolling near the edge.

Fig.4 Paint edges
Fig.5 Paint shed wall 
perimeter first
Step 5: Fig.6 and fig.7 shows the wall has been rolled and now a simple touch up.
Fig.6 Touch ups
Fig.7 Fill-up
Step 6: Fig.8 shows the paint can lids being hammered down to secure the paint cans. Fig.9 shows the job is finished and now the wall will not reflect as much light in her living room again.
Fig.8 Paint cans
Fig.9 Shed 
wall painted


Update: DIY Advisor has New blogs check them today:

  • Cookie Alert: European Union laws requires that you know that this blog uses cookies. If you are concerned about this please click here to see how Google uses this information.

Note: The DIY Advisor assumes no liability for omissions, errors or the outcome of any jobs. The reader must always exercise reasonable caution, follow current codes and regulations that may apply, and is urged to consult with a licensed contractor if in doubt about any steps on these posts. All names were changed to protect client's privacy. DIY Advisor. Reproduction of site content including photos without permission prohibited. All rights reserved. © Copyright 2011-