 |
| Spiral Light Trees |
Supplies and Tools:
Aluminum metal stakes
Cable tie 8-inch set
Compression Tee OD 1/2 inch
Diameter of a circle formula
Pole Driver (manual)
Lodge Pole Stakes 8 ft. (1 pole per tree)
Metal stakes or Large Nails 6 to 8 inches
Mini Christmas LED Warm White 150-Count
PVC Pipe Cutter
Christy's Red Hot Blue Glue PVC Pipe Cement
Schedule-40 Ten feet water pipe
Sledge Hammer
Have you ever wondered how to make a simple Spiral Christmas tree with Christmas lights?
This post shows the thirteen steps on how to finish placing the lights on the frame of the Christmas tree.
Step 1: Fig.1 shows a drip hose 1/2 inside diameter by 5/8 outside diameter. After the base is placed on the ground, attach several metal stakes about two feet apart on the perimeter of the PVC drip hose base. Place the hook side on the pipe edge. These stakes will hold the base in place and act like an anchor for the tree. If the stakes are to small for the pipe use cable tie at least 8-inch long.
 |
| Fig.1 Drip Hose |
 |
| Walmart prices |
d=Diameter
d = 2r
d = 2(5)
d = 10
1/2 of D=5
Step 3: Place the lodge pole in the middle of the circle with a pole hammer. Fig.2 shows the lodge pole ready to use. Below Fig.3 and fig.4 shows a pole hammer and a metal sledge that could be used to hammer the lodge pole into the ground. Its a manual device, place the pole hammer over the top of the lodge pole and move up and down with a little force. This will drive the lodge pole into the ground.
 |
| Fig,2 Lodge pole |
 | |||
| Fig.3 Pole Hammer |
 |
| Fig.4 Sledge Hammer |
Step 5: Fig.5 shows that you can place two or three long decks screws on top of the pole. This set had its own top that held the tree lights in place.
 |
| Fig.5 Long deck screws |
Step 6: Fig.6 shows a tree cup with the ends that holds all the wires in place.
 |
| Fig.6 Tree top |
Step 8: Fig.8 shows the use of Mini Christmas LED Warm White 150-Count Christmas lights. The top of the pole needs to managed all the light strands.
 |
| Fig.8 Mini lamps |
 |
| Fig.9 Drip base and first light strands |
 |
| Fig.10 Start the loop of lights |
Step 11: Fig.11 shows what the top of the cap should look like and fig.12 shows that the strands are coming together. Short trees about 20 strands, large trees about 40 strands.
 |
| Fig.12 Tree top with lights |
 |
| Fig.13 Finished |
 |
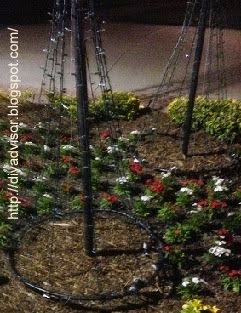
| Fig.14 Two trees |
Update: DIY Advisor has New blogs check them today:
- Handyman Blog: DIY Advisor
- DIY Advisor Sitemap
- Food Blog: From Kiwis To Pistachios
- Food Blog Sitemap
- Tool Blog: DIY Advisor Toolbox
- Tool Blog Sitemap
- Artwork Blog: Light in Dark Artwork
- Artwork Blog Sitemap
- Class-A Tests: DIY Class-A Drivers License Tests
- Class-A Tests Sitemap: Class-A Sitemap
- DIY Poem: DIY Poem Meter Blog
- DIY Poem Sitemap: DIY Sitemap
- Cookie Alert: European Union laws requires that you know that this blog uses cookies. If you are concerned about this please click here to see how Google uses this information.

No comments:
Post a Comment