Showing posts with label rubber gloves. Show all posts

Monday, February 23, 2015

How to Seal Red Brick

Fig.1 Red brick damage
By Gary Boutin 

Supplies and Tools: 
Brush paint 2-1/2 in.
Bug spray 1.5 gallon
Caulking gun
Jasco® brick sealer
Mortar repair caulking tube
Safety gear: Glasses, rubber gloves, paper mask
White vinegar


Mr. Suez along his kitchen nook had only one section of backyard brick wall that needed to be repaired. He wanted a quick fix because he had sold the house. It appeared that two of his sprinklers were facing the bricks. The middle bricks had started to deteriorate. Part of the repair was to insert new repair patch within the brick wall and the other part was to apply a sealer coat to the brick area.   

This post shows the six steps to repair this problem. 

Step 1: Fig.1 shows the removal of all debris, plant and garbage near the wall area. Scrape out loose bricks and loose mortar.
Step 2: Fig.2 shows a manual caulking gun that will be used to apply missing mortar on the seams of the brick wall. Fig.3 shows a 2-inch brush that will be used to cut around the red brick area.
Fig.2 Caulking gun
Fig.3 Brush 2-inch
Step 3: Apply to the entire area. This area is 3 foot high by 4 foot wide. Fig.4 and fig.5 shows the  Jasco® sealer below for the best result of red bricks. Click here to learn more abut Jasco sealer.
Fig.4 Jasco Cure-Seal
Fig.5 Jasco Cures all
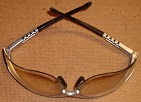
Step 4. Fig.6 shows the white vinegar to remove any stains on the red brick then let dry. Fig.7 through fig.9 shows the safety equipment should include gloves for the hands, fig.8 shows a mask for the odor, and glasses for protect the eyes.
Fig.6 White Vinegar
Fig.7 Gloves
Fig.8 Mask
Fig.9 Eye protection
Step 5: Fig.10 and fig.11 shows the use of a bug sprayer to spray the sealer on the brick. If by chance the trim is sprayed it will not damage the wood. 
Fig.10 Vinegar spray
Fig.11 Spray sealer
Step 6. Watch U-tube to see how easy it is to apply brick sealer.

Update: DIY Advisor has New blogs check them today:
  • Cookie Alert: European Union laws requires that you know that this blog uses cookies. If you are concerned about this please click here to see how Google uses this information.

Note: The DIY Advisor assumes no liability for omissions, errors or the outcome of any jobs. The reader must always exercise reasonable caution, follow current codes and regulations that may apply, and is urged to consult with a licensed contractor if in doubt about any steps on these posts. All names were changed to protect client's privacy. DIY Advisor. Reproduction of site content including photos without permission prohibited. All rights reserved. © Copyright 2011-

Tuesday, January 6, 2015

How to Replace Toilet Quarter Flange

Fig.1 Fernco(™) Quarter Flange
By Gary Boutin

Supplies and Tools:
Cement bits
Channellocks® pliers
Heavy duty rotary hammer
Cotton painter's tarp
Crescent wrench
Fernco(™) PSF100 spanner flange 
Metal Saw
Plastic anchors 
Rubber gloves
Scraper (removing wax)
Toilet bowl hardware
Towels and sponge (remove water)
Wax seal 2-inch

A client in Santa Clarita was doing her final home check list received from a local Realtor. She noticed that the master bathroom toilet was leaking at the base of the toilet. This job needed to be repaired immediately because this home was sold. There had been a recent earthquake in the area and the toilet had jump upwards and was not seating correctly on the bathroom floor.

This post shows the eleven steps needed to repair a damaged toilet flange with a quarter flange on a metal flange. 

Step 1: Above right purchase fig.1 shows a Fernco(™) Quarter Flange that will replace the damaged half of the broken toilet flange.   
Step 2: Fig.2 shows Turn off the water stop usually located on the left side if facing the toilet. But it doesn't matter what side it on, the valve must be turned off.

Fig.2 Toilet stop valve
Step 3: Remove from the toilet the water feed line from the bottom of the toilet bowl. Fig.3 and fig.4 shows a white curled tubing coming from the stop valve follow the fill line to the bottom of the toilet bowl. Remove the plastic nut using a Channellocks® pliers
Fig.3 Toilet Fill Line
Fig.4 Fill valve connector
and
Channellocks® pliers
Step 4: Fig.5 and fig.6 shows the toilet screws on each side from the toilet base, now use a Crescent Wrench to twist off the nuts. Some models have two nuts to be removed per side.

Fig.6 Toilet screws
Step 5: Fig.7 shows the rubber gloves that needs to be used to protect the hands. The use of rubber glove will give the grip necessary to handle the toilet. Now remove as much water from the toilet bowl and the trap of the toilet and empty the water into the sink. When the toilet is laid flat it will leak all over the floor so removing as much water as possible makes the job safe. 
Fig.7 Rubber gloves
Step 6: Fig.8 shows that placing a tarp on the floor where the toilet will be turned over. This will protect the toilet and the floor from the wax seal on the bottom of the toilet.
Fig.8 Cotton painter's tarp
Step 7: Fig.9 shows a new ABS black flange not hooked up to its metal piping. Fig.10 Shows another metal flange that needs to twist on and welded to its piping. The homeowner wanted a simpler repair. Fig.1 and fig.14 shows the quarter flange that will be used in this repair. All three flanges can be purchased at warehouse store (The Home Depot) or a Plumbing store.
Step 8: Fig.11 and fig.12 shows the toilet on its side and shows a heavy duty variable speed Rotary hammer drilling around the cement near the metal flange. Click here to get information on how to drill into cement with rotary hammer.
Fig.11 Flange holes drilled
Fig.12 Drilling holes
Step 9: Fig.13 and fig.14 shows the silver metal flange has been screwed on top of the metal flange so when the toilet bolt is in position it would hold the toilet on the right side of the tile. Plastic anchors were inserted into the newly drilled holes attaching the flange. Click here for a simple and quick installation of the toilet bolts by Fluidmaster.
Fig.13
Fig.14 Flange
 Step 10: Fig.15 shows a metal saw (hacksaw) that was used to cut the toilet bolts down to the stainless steel nuts.
Fig.15 Metal saw
Step 11: Fig.16 shows the toilet is in use again and the new owners are happy that this was a quick repair. The tile had to be replaced but that was done by someone else. Turned out the tile underneath the toilet was stable and did not need replacing.

Fig.16 Toilet Finished


Update: DIY Advisor has New blogs check them today:
  • Cookie Alert: European Union laws requires that you know that this blog uses cookies. If you are concerned about this please click here to see how Google uses this information.

Note: The DIY Advisor assumes no liability for omissions, errors or the outcome of any jobs. The reader must always exercise reasonable caution, follow current codes and regulations that may apply, and is urged to consult with a licensed contractor if in doubt about any steps on these posts. All names were changed to protect client's privacy. DIY Advisor. Reproduction of site content including photos without permission prohibited. All rights reserved. © Copyright 2011-