Showing posts with label brads. Show all posts

Saturday, March 15, 2014

How to Paint Garage Bedroom - Part 15 of 19 - Molding - Cut to size and Nail To Wall - 2

Fig.1 Wall measurement
By Gary Boutin

Supplies and Tools:
Air compressor
Brads
Brad nailer
Compound miter saw 
Compressor hose 25-foot
MDF molding (Medium Density Fiberboard)
Pencil mark
Tape measure

Mrs. Dee wanted to upgrade her bedroom wall fixed, new baseboards needed to be replaced and her new tenet would arrive in three days.

This post the six steps to finishing the installing of the MDF molding into the bedroom/office.

Step 1: Fig.1 shows the wall being measured. This is the window wall, it has one piece of molding in  the middle and missing both ends. Below this end is on the left side near the A/C vent. One side of the molding will be at zero degrees and the other side will be at 45 degrees. The existing molding had to be removed and cut twice on each side to match the new MDF (Medium Density Fiberboard) molding.
Step 2: Fig.2 shows a compound saw cutting the first 45 degree cut to match the new molding on the right side of the room.
Fig.2 Compound saw
Step 3: Fig.3 shows a compound saw cut for the zero degree cut, notice the pencil mark showing where to cut a 1/16 of an inch too long. This piece of molding will complete the right side.
Fig.3 Second molding cut

Step 4: Fig.4 shows the first piece of molding is in place and settled into the corner. Notice the black marks on the top and bottom of both pieces. Each molding was shot with a brad nailer to hold it against the wall. Later the molding will be caulked to smooth out the molding and keep it more secured against the wall.
Fig.4 Molding settled
Step 5:Fig.5 shows a close up of the metal brad against the molding.
Fig.5 Nailing the seams

Step 6: Fig.6 shows the brad nailer nailing the last piece of molding on the wall.
Fig.6 Brad nailer

How to Paint a Garage Bedroom:

Update: DIY Advisor has New blogs check them today:

  • Cookie Alert: European Union laws requires that you know that this blog uses cookies. If you are concerned about this please click here to see how Google uses this information.

Note: The DIY Advisor assumes no liability for omissions, errors or the outcome of any jobs. The reader must always exercise reasonable caution, follow current codes and regulations that may apply, and is urged to consult with a licensed contractor if in doubt about any steps on these posts. All names were changed to protect client's privacy. DIY Advisor. Reproduction of site content including photos without permission prohibited. All rights reserved. © Copyright 2011-

Tuesday, April 30, 2013

How to Hang Pre-hung Door - Part 14 of 15 - Exterior Door Molding

Fig.1 Air compressor 
and wood molding
By Gary Boutin

Supplies and Tools:
Brads
Brad nailer 
Compound saw or miter saw
Compressor and air hose 
DAP® wood filler 
Electrical cords 
Hack Saw   
Wood molding

Mr. Victor Longpont hired my services to remove his garage door that had become damaged after a bad rain storm. The door had not been painted for over 30 years, the bottom of the door was damaged by a badly worn door sweep that allowed water into the bottom of the door. 

This post shows the twelve steps to installing exterior wood molding on a pre-hung door.

Step 1: The first step after the door is sound is to replaced the stucco molding with standard wood molding. Fig.1 shows the air compressor that will be used to provide air pressure for the brad nailer that will be used in this job. Also shown is the wood molding that will be applied around the door. Fig.2 shows the wood molding that will cover the stucco patch and finish the exterior of the door. Stucco molding should have been used for this door, the edge of the door matched up with the edge of the stucco wall, so the molding could not be used and an alternative solution was used instead of stucco molding.
Fig.2 wood molding
left side
Stucco molding
Step 2: Fig.3 shows the two wood molding placed at each side of the door. The door is approximately 80 inches long. 
Fig.3 pre-hung door metal 
threshold plate
Step 3: Fig.4 shows the bottom of the molding is being cut to accommodate the bottom of the metal threshold plate. Use a mini hack saw to cut the molding.
Fig.4 cutting for 
threshold plate
Step 3: Below fig.5 shows the handyman using a brad nailer to staple the wood molding to the outside of the door. Fig.6 shows the handyman staple the bottom of the door molding.
Fig.5 Nailing wood molding
Fig.6 Applying brads 
to door molding
Step 4: Fig.7 shows that both vertical parts of the door have been cut and have been stapled to the door edge. Only the last piece needs to be added to the top of the door frame. 
Fig.7 Preparing top molding
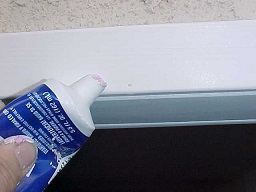
Step 5: Use DAP® wood filler that is pink when wet and dries white
DAP® Wood filler
Step 6: Fig.9, fig.10 and fig.11 shows that after the wood molding has been stapled to the door, the edges need to be caulked and so does the wood molding corners. Apply the wood filler in the corners and on the door side of the molding. 
Fig.8 Wood filler on corners
Fig.9 Wood filler dried
Fig.10 Dried wood filler


How to Hang a Pre-hung Door:


  • Part 1 of 15 Introduction Why Replace This Garage Door
  • Part 2 of 15 Removing The Damaged Door
  • Part 3 of 15 Door Hardware Removed
  • Part 4 of 15 Door Threshold Removal
  • Part 5 of 15 Installing Door
  • Part 6 of 15 Recycled Metal Removed
  • Part 7 of 15 Caulking Outside Door Edges
  • Part 8 of 15 New Door Hardware Installed
  • Part 9 of 15 Caulking Door Screws Holes
  • Part 10 of 15 Inside Door Mud
  • Part 11 of 15 Inside Door Taping
  • Part 12 of 15 Inside Door Painted
  • Part 13 of 15 Applying Stucco To Door Edge
  • Part 14 of 15 Exterior Door Molding
  • Part 15 of 15 Old Door Cut to Trash


  • Update: DIY Advisor has New blogs check them today:

    • Cookie Alert: European Union laws requires that you know that this blog uses cookies. If you are concerned about this please click here to see how Google uses this information.

    Note: The DIY Advisor assumes no liability for omissions, errors or the outcome of any jobs. The reader must always exercise reasonable caution, follow current codes and regulations that may apply, and is urged to consult with a licensed contractor if in doubt about any steps on these posts. All names were changed to protect client's privacy. DIY Advisor. Reproduction of site content including photos without permission prohibited. All rights reserved. © Copyright 2011-

    Sunday, March 27, 2011

    How to Replace Bathroom Resin Cove Base Molding

    This is the best molding for wet areas like bathroom
    Fig.1 Resin molding
    By Gary Boutin 
     
    Supplies and Tools: 

    Brads 
    Delta compound saw 12-inch
    Dust mask 
    Latex caulking
    Measuring tape  
    Resin base molding
    Safety goggles
    White semi-gloss paint

    Willie is a postal employee that travels 360 days a year, and has little time to work on his century old studio cottage in downtown Chino, California. The problem Willie had was his bathroom floor had a large gap in the tile and the wall area. The area needed a cove base molding, a product that would not produce mold and could be used near a shower. Resin molding comes in white and looks like plastic in case it gets wet.

    This post shows the eight steps to replacing the resin cove base molding and caulking it to the wall and floor. 

    Step 1. The Home Depot molding had several choices, but the resin cove base molding stood out. The dimensions of the molding were two and half inches in height by eight feet in length. It was the perfect application because the molding would never produce mold, and it was priced right at eight dollars.
    Step 2. Fig.1 shows the resin molding and adhesive glue. 

    Step 3. Fig.2 shows the first piece of molding, the first cut is for the first corner and was cut at 45 degrees.


    Use a tape measure for the right fit
    Fig.2 Measuring
    Step 4. Fig.3 Delta® compound saw.
    This is a Delta Compound Saw used to cut molding
    Fig.3 Measure on saw

    Step 5. Fig.4 shows a top view of both corners, in preparation for caulking.

    This is the bathroom corner that needed to be replaced
    Fig.4 Nice clean corner
    Step 6. Fig.5 shows the Delta saw teeth on the resin molding. As a precaution the person using the saw should use adjust mask and safety goggles.

    Be careful to wear the proper gear before using this Delta saw
    Fig.5 Delta ® teeth
    Step 7. Fig.6 and fig.7 shows that latex caulking was used on wall and the edge of the molding and on the floor.
    Use caulking to prevent water moisture from getting into the home
    Fig.6 Caulk molding
    Use silicone caulking on the top and the bottom of the resin molding
    Fig.7 Caulk top
    Step 8. Fig.8 shows both sides of the corner molding. The job is finished. See the two different angles to get this job done. The new resin molding added to the floor and all the trim had been caulked for a clean new look. Now Willie can enjoy his bathroom without the worry of mold damaging the new trim.

    This moisture resistant bathroom corner is finished
    Fig.8 Job finished

    Update: DIY Advisor has New blogs check them today:

    • Cookie Alert: European Union laws requires that you know that this blog uses cookies. If you are concerned about this please click here to see how Google uses this information.

    Note: The DIY Advisor assumes no liability for omissions, errors or the outcome of any jobs. The reader must always exercise reasonable caution, follow current codes and regulations that may apply, and is urged to consult with a licensed contractor if in doubt about any steps on these posts. All names were changed to protect client's privacy. DIY Advisor. Reproduction of site content including photos without permission prohibited. All rights reserved. © Copyright 2011-