Showing posts with label nitrile gloves. Show all posts

Wednesday, May 4, 2016

How to Repair Fireplace Back Up Switch - Part 2 of 2 - The Repair

Battery leaking acid
By Gary Boutin

Tools and Supplies:
Baking soda box 
Dust pan and brush 
Duracell® Batteries
Drywall rags or towels
Mr. Clean Magic Eraser®
Paper towels
Toothbrush (one time use)

We placed a fireplace backup switch on this fireplace because the area seemed to have power failures. The purpose of the backup switch is to provide electrical power to the gas igniter to produce a flame if there was a power failure.  

This post shows the fifteen steps on the process to repair the back up switch for the fireplace.

1
Upper right shows a battery that has exploded.

The picture on the left shows that gloves must be worn on the hands, eye glass to cover the eyes.
2
The picture on the left shows that Baking Soda will be used to neutralize the acid from the batteries. The dust pan and brush to to get as much dry acid out of the fireplace. Before the acid get wet from the base solution.
3
The picture on the left shows that the base solution of water and Baking Soda was applied to  the fireplace shelf.
4

The picture on the left shows scraping of the acid from the metal shelf.
5
The picture on the left shows that most of the acid was removed from the metal shelf. A toothbrush with the past base solution was used to scrape the acid loose.
6
The picture on the left shows the toothbrush removing the acid from the battery compartment. Several applications of the base solution was placed into the battery case to remove the acid. Later the case was dried using white paper towels.
7
The picture on the left displays the Baking Soda, the battery case with acid inside a trash can. The white fireplace frame can be seen in the background.
8
The picture on the left shows the battery case is completely wipe clean of battery acid. The battery springs, electrical wires and case  were wiped clean.
9
The picture on the left shows the metal shelf that once had battery acid now is cleaned and ready for use.
10
The picture on the left shows the battery case hanging from the fireplace ready for the next battery.
11
The picture on the left shows two new Duracell® Batteries placed into the back up switch.
1. Turn off the power using the panel switch to the fireplace.     2. Test the back up unit and see if power is turn on the flame igniter. 
3. If the flame starts then the job is finished. 
12
These two picture on the left show where the fireplace glass cover is located so the flame cover can be place correctly in the metal frame.
13
The picture on the left shows the fireplace certificate is not surrounded by acid and is in plain site for fireplace safety.
14

The picture on the left shows the damage the  acid did to the metal shelf.
15
The picture on the left is the fireplace turned on and useful again. To see how to clean the fireplace when battery acid touched the white frame click below.

Magic Eraser - Cleaning a White Fireplace Mantel


How To Repair a Fireplace Back Up Switch:

Update: DIY Advisor has New blogs check them today:

  • Cookie Alert: European Union laws requires that you know that this blog uses cookies. If you are concerned about this please click here to see how Google uses this information.

Note: The DIY Advisor assumes no liability for omissions, errors or the outcome of any jobs. The reader must always exercise reasonable caution, follow current codes and regulations that may apply, and is urged to consult with a licensed contractor if in doubt about any steps on these posts. All names were changed to protect client's privacy. DIY Advisor. Reproduction of site content including photos without permission prohibited. All rights reserved. © Copyright 2011-

Tuesday, March 5, 2013

Garage Epoxy - Part 8 of 10 - Use Of Degreaser

Fig.1 Leaf blower
By Gary Boutin

Supplies and Tools:
BEHR Premium 1 gal. Concrete/Masonry Cleaner/Degreaser (2)
Buffer cleaning pad
Commercial floor buffer
Nitrile gloves (1 box)

Mr. Phon hired Handyman to apply Concrete and Masonry Degreaser to a three car with a damaged garage floor. His friend Carl was also there to lend a hand. Mr. Phon owned a beautiful home overlooking Azusa Hills, California. Carl and the Handyman used nitrile gloves to protect our hands.

This post shows the five steps to use the degreaser on the garage floor.

According to the Behr website BEHR Premium 1 gal. Concrete and Masonry Cleaner and Degreaser specifically formulated to remove grease oil stains, algae stains, mildew stains, dirt and most auto fluids from concrete surfaces. To obtain more information on this product please click on the name. BEHR Premium 1 gal. Concrete and Masonry Cleaner and Degreaser.

Step 1: The floor must be cleaned. After the cleaning the floor, the area must be wet before applying BEHR Concrete and Masonry Cleaner and Degreaser. Above fig.1 shows the use of the leaf blower to remove any dirt from the garage area.
Step 2: Fig.2 shows Carl wetting the floor with a power washer. Fig.3 shows a power washer used in this project.
Fig.2 Floor Power washing
Fig.3 Carl washing the floor
Step 3: Fig.4 shows the white swirls show that the dirt is being removed by the degreaser and the commercial floor buffer with a clean pad. Fig.5 shows Carl is cleaning the floor with a Commercial floor polisher with a scrubbing pad.
Fig.4 First row with 
floor buffer
Fig.5 Carl with floor buffer
Step 4: Fig.6 show the buffer pulling cleaning the floor. Two complete passes with the Floor Polisher was applied to this floor. Fig.7 shows how the power washer is being used on a difficult spot on the floor.
Fig.6 Floor buffer swirls
Fig.7 Power sprayer 
cleaned the cement
Step 5: The floor is finished and ready for the next phase of this project. Fig.8 shows the floor near the exterior door is clean and streak free. 
Fig.8 No marks on the floor

Garage Epoxy:


Update: DIY Advisor has New blogs check them today:

  • Cookie Alert: European Union laws requires that you know that this blog uses cookies. If you are concerned about this please click here to see how Google uses this information.

Note: The DIY Advisor assumes no liability for omissions, errors or the outcome of any jobs. The reader must always exercise reasonable caution, follow current codes and regulations that may apply, and is urged to consult with a licensed contractor if in doubt about any steps on these posts. All names were changed to protect client's privacy. DIY Advisor. Reproduction of site content including photos without permission prohibited. All rights reserved. © Copyright 2011-

Saturday, February 9, 2013

How to Caulk Used Bathroom Sink

Angel Fish
Angel Fish
By Gary Boutin

Supplies and Tools:
A love for aquarium Angelfish
Manual caulking gun
Nitrile gloves (blue)
White silicone tube

Mrs. Angelfish had the largest aquarium on the block. According to Wikipedia, the free encyclopedia the Fresh Water Angelfish is scientifically named Pterophyllum scalare. Her aquarium was filled with many varieties, such as the Altum Angelfish or Deep Angelfish, teardrop angelfish, leopold's angelfish, dwarf angelfish, or Roman-nosed angelfish. For more information on fresh water angelfish please click the scientific name above. Mrs. Angelfish is an environmentalist so when she purchased s used sink, she had a plumber replace the faucet. What she needed was someone to caulk her sink.

This post shows the six steps on how to caulk a used bathroom sink. 

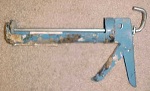
Step 1: Fig.1 shows a caulking gun. Place a new silicone tube into the caulking gun. Fig.2 shows the silicone tubes available at your local hardware store. 
Fig.1 Caulk Gun
Fig.2 Tubes
Step 2: This sink is a bottom install, and it needs to be caulked between the sink and the counter top. Fig.3 shows the tip of the caulking tube is moved around the top of the sink and around the vanity counter top.
Step 3: Fig.4 below shows that there are gaps in the caulking. To fix this the caulking tube tip needs to be moved around the entire perimeter of the sink thus filling the gaps. 
Step 4: Next push the silicone with your fingers into the cracks thus sealing the area. 

Note: Use white silicone instead of latex caulking because it lasts longer and will not crack like latex caulking. It is much harder to use the silicone caulking than latex but the overall effect is better for areas that are used everyday.  
Fig.3 Calking tip releasing caulking
Fig.4 push silicone bead
Step 5: Fig.5 and fig.6 shows the sink has not gaps and the edge around the sink and counter top is smooth. Use nitrile gloves on your hands before applying the silicone to the sink area, because it far easier to remove the gloves off your hands than it is to remove the silicone.

Fig.5 Remove all gaps

Fig.6 Use mirror to make sure 
all gaps are filled 
with silicone caulking
Step 6: Fig.7 shows the sink is finally caulked and the job is finished. The angelfish clip art top right was obtain from Squidoo category fish clip art. An incredible web site that shows children how to draw fish.
Fig.7 Job done


Update: DIY Advisor has New blogs check them today:

  • Cookie Alert: European Union laws requires that you know that this blog uses cookies. If you are concerned about this please click here to see how Google uses this information.

Note: The DIY Advisor assumes no liability for omissions, errors or the outcome of any jobs. The reader must always exercise reasonable caution, follow current codes and regulations that may apply, and is urged to consult with a licensed contractor if in doubt about any steps on these posts. All names were changed to protect client's privacy. DIY Advisor. Reproduction of site content including photos without permission prohibited. All rights reserved. © Copyright 2011-