Showing posts with label gloves. Show all posts

Saturday, April 9, 2016

How to Repair Dining Room Ceiling Leak - Part 1 of 2 - Ceiling Repair

Fig.1 Wet ceiling 
from leaking copper pipe
By Gary Boutin

Supplies and Tools:
500-watt lamps (3)
Drywall 36 inch by 36 inch
Drywall knives
Drywall sander (manual)
Drywall saw 
Drywall screws coarse 1-1/4 inch
Gloves (protect hands)
Joint Compound Fast set 20 minutes
Ladder 6 feet
Sanding screens
Wall tape (paper)

Mr. Johnson lives in Norco, California. He had called a plumber to repair a leaking copper pipe. The damaged pipe had been leaking for a long time and the entire ceiling was wet and soggy. The local plumber punctured the ceiling just enough to repair the copper pipe and the ABS sewage pipe. Two pipes were leaking, the copper pressure tee pipe, and an ABS drain pipe. The copper pressure tee pipe was replaced and soldered. The ABS pipe was not glued in place and was loose at the union. The plumber managed to pull it apart and insert ABS cement inside the pipe. This pipe was not under pressure like the copper pipe so repairs were easier. Mr. Johnson called my repair service to repair and paint his dining room ceiling. The catch was the job had to be done in one day because the family was leaving to New Mexico the next day.

This post shows the nine steps to quickly repair the dining room ceiling.   

Step 1: Fig.1 shows a little hole in the dining ceiling were the plumber did all of his repairs.  
Step 2: Fig.2 shows a close up of the copper tee that was repaired. Fig.3 through fig.6 shows the wood studs that will be used to pull up the ceiling. 
Fig.2 Copper tee
Fig.3 Wood studs
Fig.4 Another ceiling view

Fig.5  Cutting the corner
Fig.6 Ceiling is apart
from  the wood stud

Step 3: Fig.7 and fig.8 shows the tools for this job. Fig.7 shows painter's tarp placed on the floor to cover the dining room tile. Fig.8 shows a joint compound, yellow mud pan, drywall knives and sanding screens required for this job. 

Note: To make the joint compound dry faster use Westpac Fast Set 20 Lite Setting joint compound. This compound dries hard in 20 minutes.
Fig.7 Tarp the floor
Fig.8 Joint compound, 
texture and tools
Step 4: Fig.9 and fig.10 shows the drywall saw cutting the hole into a square and near wood studs. The studs are important because the ceiling is so wet that it needed to dry out. Placing drywall screws with flat washers will pull up the wet ceiling. Later the washer were removed and new drywall screws were inserted. Luckily this would dry as the new drywall was replaced. Fig.11 shows the new drywall piece cut at 36 inches was easier to put into the ceiling then cutting several pieces of wallboard.
Fig.9 Cuting the 
ceiling square
Fig.10 Cut the black line
Fig.11 New wallboard 
secured to ceiling
Note: While the ceiling area was cut, three 500-watt lamps were placed on the floor to help dry the  ceiling. 

Step 5: Fig.11 shows the wallboard (drywall) has been placed into the ceiling area. Many 1-1/4 inch coarse drywall screws were used to secure the wet drywall to the ceiling studs.
Step 6: Fig.12 and fig.13 the wall has been patched and now is drying. 
Note: Using three 500-watts lamp baked the ceiling patch. 
Fig.12 Wall tape was 
used on all edges
Fig.13 Patch is drying
 now needs sanding
Step 7: Fig.14 and fig.15 shows the addition of joint compound. Now make the ceiling as flat as possible. The last coat was a very light coat to finish the ceiling.
Fig.14 Load up the ceiling
Fig.15 Flatten the joint 
compound using a wall knife
Step 8: Fig.16 shows the ceiling is drying the outer edges are dry and the center part of the patch is still wet.
Fig.16 Patch is drying
Step 9: Fig.17 shows that gloves must be worn when sanding joint compound. Fig.18 shows a hand sander with a sanding screen. Fig.19 shows a drywall (Hook and Loop) pole sander with 120 grit sanding screen aids in making the ceiling flat.
Fig.17 Wear gloves 
lime irritates the skin
Fig.18 Hand sander
Fig.19 Pole Sander


How To Repair a Dining Room Ceiling Leak:

Update: DIY Advisor has New blogs check them today:

  • Cookie Alert: European Union laws requires that you know that this blog uses cookies. If you are concerned about this please click here to see how Google uses this information.

Note: The DIY Advisor assumes no liability for omissions, errors or the outcome of any jobs. The reader must always exercise reasonable caution, follow current codes and regulations that may apply, and is urged to consult with a licensed contractor if in doubt about any steps on these posts. All names were changed to protect client's privacy. DIY Advisor. Reproduction of site content including photos without permission prohibited. All rights reserved. © Copyright 2011-

Monday, April 6, 2015

How to Repair Kitchen Nook Wall - Part 5 of 5 - Applying Wallpaper

Fig.1 Dining room walls damages
Left, middle and right wall repair
By Gary Boutin
 
Supplies and Tools: 
Gloves
Razor knife and extra blades
Sponge yellow
Tarps cotton 9 ft. x 12 ft.
Wallpaper adhesive (Kitchen and bath)

A client in Santa Clarita, California were selling their home and moving to Colorado. Their Realtor checked each room of their home and noticed a repair that needed  to be addressed immediately. This job was to repair the kitchen nook dining room wallpaper. Two kitchen windows had bad rubber seals and had completely dried up. Sprinkler water had passed the rubber seal creating the damages on the kitchen walls. The windows were replaced by the time the wall was finished.

This post shows the four steps showing the damages to this kitchen nook wall.

Step 1: Fig.1 shows the kitchen nook walls that needed repair. 
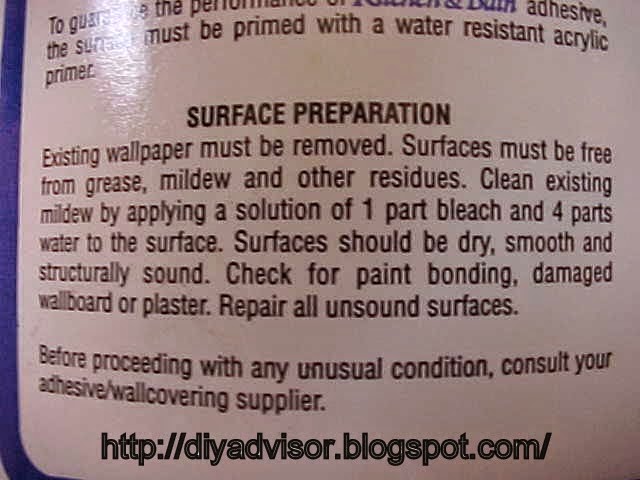
Step 2: Fig.2 and fig.3 shows Kitchen & Bath Wallpaper Adhesive to reapply the kitchen nook wallpaper to the wall.
Fig.2 Wallpaper adhesive

Fig.3 Wallpaper instructions
Step 2: Fig.4 and fig.5 shows the application of wallpaper adhesive so the old wallpaper can be reapplied to the wall.
Fig.4 Apply water to wall
Fig.5 Paste can be seen on wall
Step 3: Fig.6 shows the right side of the wall all repaired including applying wallpaper.

Fig.6 Right side paper
Step 4: Fig.7 shows the left side of the room now finished. 
Fig.7 Job done
How To Repair a Kitchen Nook Wall:

Update: DIY Advisor has New blogs check them today:
  • Cookie Alert: European Union laws requires that you know that this blog uses cookies. If you are concerned about this please click here to see how Google uses this information.


Note: The DIY Advisor assumes no liability for omissions, errors or the outcome of any jobs. The reader must always exercise reasonable caution, follow current codes and regulations that may apply, and is urged to consult with a licensed contractor if in doubt about any steps on these posts. All names were changed to protect client's privacy. DIY Advisor. Reproduction of site content including photos without permission prohibited. All rights reserved. © Copyright 2011-

Wednesday, January 28, 2015

How to Paint Dividing Hallway, Laundry Room and Bedrooom Door Jambs

Fig.1 Tools
By Gary Boutin
 

Supplies and Tools: 
Blue gloves
Blue painter's tape
Clear plastic film
Cutting brush 
Film clear 3 millimeter
FrogTape® Green Painter's tape
Paint interior flat 
Paint can opener
Paint roller cover
Paint frame
Paint stir stick (Free)
Painter's tarps

Mrs. Jujube wanted her hallways between her two bedrooms painted. She was having company and wanted all the discolored paint to be freshen up.

This post shows the twelve steps to paint an interior hallway between two bedrooms, laundry unit and a bathroom.

Step 1: Fig.1 shows the tools used for this job. Roller cover and paint frame, cutting brush, paint can opener, blue gloves, paint tray liner, paint stir stick and paint tarp.
Step 2: Fig.2 and Fig.3 shows the application of Blue painter's tape along the edges of the door jamb.
Fig.2 Door edge taped
Fig.3 Door edges taped
Step 3: Fig.4 and fig.5 shows all the doors have clear film over each door and the painter's tarp has been applied to the floor.
Fig.4 bedrooms #1 + #2

Fig.5 Bedroom #2
Step 4: Fig.6 shows laundry doors and the bathroom door had clear film placed over the door.
Fig.6 Laundry + Bathroom
Step 5: Fig.7, through fig.9 shows unit plug was taped.
Fig.7 Duplex taped
Fig.8 Thermostat taped
Fig.9 Fire alarm taped
Step 6: Fig.10, through fig.12 shows the application of FrogTape® tape to the ceiling edges.
Fig.10 Hallway bedroom ceiling #1
Fig.11 Hallway bedroom ceilings #2
Fig.12 Bathroom/laundry ceiling

Step 7: Fig.13, through fig.15 shows the pictures hooks painted around, and wall door plaques were also painted.
Fig.13 Nail painted
Fig.14 picture hook painted
Fig.15 door knob plate painted
Step 8: Fig.16, and fig.17 shows that cutting took place before the walls were rolled.

Fig.16 Interior flat paint
Fig.17 Step ladder for cutting
Step 9: Fig.18, and fig.19 shows the hallway walls were rolled with two coats of paint.
Fig.18 Rolling bedroom  #1
Fig.19 Rolling with paint stick
Step 10: Fig.20, through fig.22 shows that the painter's tape is being removed from the baseboards and the ceiling areas.
Fig.20 Removing Blue tape
Fig.21 FrogTape® removed
Fig.22
FrogTape® removed
Step 11: Fig.23 shows the pictures are placed back on the wall. 
Fig.23 #2 Bedroom walls painted


Step 12: Fig.24 shows the laundry side of the wall now repainted and ready for use.
Fig.24 Laundry + bathroom painted


Update: DIY Advisor has New blogs check them today:
  • Cookie Alert: European Union laws requires that you know that this blog uses cookies. If you are concerned about this please click here to see how Google uses this information.

Note: The DIY Advisor assumes no liability for omissions, errors or the outcome of any jobs. The reader must always exercise reasonable caution, follow current codes and regulations that may apply, and is urged to consult with a licensed contractor if in doubt about any steps on these posts. All names were changed to protect client's privacy. DIY Advisor. Reproduction of site content including photos without permission prohibited. All rights reserved. © Copyright 2011-