By Gary Boutin
 |
| Claw Hammer |
Supplies and Tools:
Cordless screwdriver with Phillip bit
Claw hammer
Deck screws 3-inch
Drill bit set
Level 4-foot and 2-foot level
Painter scraper thick blade
Pre-hung metal door
Mr. Victor Longpont hired my services to remove his garage door that had become damaged after a bad rain storm. The door had not been painted for over 30 years, the bottom of the door was damaged by a badly worn door shoe and sweep that allowed water into the bottom of the door. In this job Dave Vickers, was
invaluable in solving the details of this job.
This post shows the ten steps on how to install a pre-hung garage door.
Step 1: Fig.1 shows Dave's truck that was used to pick up and deliver the
pre-hung door. Fig.2 shows the
pre-hung door that was purchased at Lowe's Warehouse Store.
 |
| Fig.1 Truck to transport door |
 |
| Fig.2 New door and wood frame |
Step 2: Fig.3 shows the door must be unpacked before placing it in the door area.
Remove all the cardboard packaging around the door. The hard fiberboard on the bottom of the door and both sides of the door shoe will needs to be removed.
Fig.4 shows a
claw hammer with a
thick blade scraper that will pull away the fiberboard away from the door. There are staples in place to protect the bottom of the door. The
staples are very sharp watch your hands.
 |
Fig.3 Remove hardboard
from bottom of door |
 |
| Fig.4 Use a scraper |
Step 3: After the fiberboard
have been removed, the next step is to remove the plastic lock plate. The lock plate
locks the door in place while at the store to prevent the door from popping its hinges and damaging its integrity. This plastic lock must to be removed before the door is placed in the doorway area.
Fig.5 shows the black plastic lock in the pre-drilled lock plate area.
 |
| Fig.5 Remove lock bolt |
Step 4: The door has has brass hinges plastic caps, remove them before placing the door in the doorway. The caps are there to keep the brass hinge polished and in good condition for transport.
Step 5: Next with a friend place the pre-hung door in the doorway. Use a
4-foot level to level the door in both directions.
Step 6: Notice
fig.6 and
fig.7 shows the door is in the doorway, the door is not secured and needs to be screwed into the wood studs.
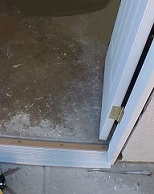 |
| Fig.6 New threshold plate |
 |
| Fig.7 Sides need caulking |
Step 7: Fig.8 shows the handyman holding two small wood drills that will be used to pre-drilled the door wood frame. This pilot hole will reduce damage to the exterior wood frame prior to installing the decks screws into the door. Some installers use nails but with screws the door can be adjusted within the door area to get a good fit.
 |
| Fig.8 Titanium wood drills |
Step 8: Fig.9, fig.10 and
fig.11 shows the drill used to make the pilot holes.
Three holes on the side of each door jamb top, middle and bottom and matching on the other side. The top door jamb only needs tow holes on each side.
 |
| Fig.9 Pilot hole for the top |
 |
| Fig.10 Pilot hole for the middle area |
 |
| Fig.11 Pilot hole for the bottom jamb |
Step 9: Fig. 12 and
fig.13 shows that after the pilot holes have been drilled, use the
cordless screwdriver to drive in the deck screws into the wood stud.
 |
| Fig.12 Inserting deck screws |
 |
Fig.13 Inserting
bottom latch side |
Step 10: Fig.14 shows the one hole by the brass hinge and
fig.15 shows the two holes that have been screwed into the wood stud.
 |
| Fig.14 New clean hinge |
 |
| Fig.15 Holes in new frame |
How to Hang a Pre-hung Door:
Part 1 of 15 Introduction Why Replace This Garage Door
Part 2 of 15 Removing The Damaged Door
Part 3 of 15 Door Hardware Removed
Part 4 of 15 Door Threshold Removal
Part 5 of 15 Installing Door
Part 6 of 15 Recycled Metal Removed
Part 7 of 15 Caulking Outside Door Edges
Part 8 of 15 New Door Hardware Installed
Part 9 of 15 Caulking Door Screws Holes
Part 10 of 15 Inside Door Mud
Part 11 of 15 Inside Door Taping
Part 12 of 15 Inside Door Painted
Part 13 of 15 Applying Stucco To Door Edge
Part 14 of 15 Exterior Door Molding
Part 15 of 15 Old Door Cut to Trash
Update: DIY Advisor has New blogs check them today:
- Cookie Alert: European Union laws requires that you know that this blog uses cookies. If you are concerned about this please click here to see how Google uses this information.
Note: The DIY Advisor assumes no liability for omissions, errors or the outcome of any jobs. The reader must always exercise reasonable caution, follow current codes and regulations that may apply, and is urged to consult with a licensed contractor if in doubt about any steps on these posts. All names were changed to protect client's privacy. DIY Advisor. Reproduction of site content including photos without permission prohibited. All rights reserved. © Copyright 2011-


