Showing posts with label paint scraper. Show all posts

Thursday, April 25, 2013

How to Hang Pre-hung Door - Part 9 of 15 - Caulking Door Screws Holes

By Gary Boutin

Supplies and Tools:
DAP Drydex Spackling and Nail Hole Filler, 5.5 oz
Paint scraper 1-inch

Mr. Victor Longpont hired my services to remove his garage door that had become damaged after a bad rain storm. The door had not been painted for over 30 years, the bottom of the door was damaged by a badly worn door shoe and sweep that allowed water into the bottom of the door.

This post shows the three steps to caulking the drill holes within the pre-hung door frame.

Step 1: Use DAP Nail Hole Filler to fill in the holes from the drill. DAP states from their website that the Nail Hole Filler contains an indicator that causes the application to change from pink to white. This spackling compound is good for outdoor use. It did shrink a little but applying a second coat to the nail holes fix that problem, and the nail hole filler was easy to sand and later paint. 
Step 2: Fig.1 shows two areas that hole filler was applied and filled the holes. 
Step 3: Fig.2 shows the hinge side of the door frame, notice the pink holes in the frame show that the area is still drying.
Fig.1 Latch side of door
Fig.2 Hinge side of the door

How to Hang a Pre-hung Door:


  • Part 1 of 15 Introduction Why Replace This Garage Door
  • Part 2 of 15 Removing The Damaged Door
  • Part 3 of 15 Door Hardware Removed
  • Part 4 of 15 Door Threshold Removal
  • Part 5 of 15 Installing Door
  • Part 6 of 15 Recycled Metal Removed
  • Part 7 of 15 Caulking Outside Door Edges
  • Part 8 of 15 New Door Hardware Installed
  • Part 9 of 15 Caulking Door Screws Holes
  • Part 10 of 15 Inside Door Mud
  • Part 11 of 15 Inside Door Taping
  • Part 12 of 15 Inside Door Painted
  • Part 13 of 15 Applying Stucco To Door Edge
  • Part 14 of 15 Exterior Door Molding
  • Part 15 of 15 Old Door Cut to Trash


  • Update: DIY Advisor has New blogs check them today:

    • Cookie Alert: European Union laws requires that you know that this blog uses cookies. If you are concerned about this please click here to see how Google uses this information.

    Note: The DIY Advisor assumes no liability for omissions, errors or the outcome of any jobs. The reader must always exercise reasonable caution, follow current codes and regulations that may apply, and is urged to consult with a licensed contractor if in doubt about any steps on these posts. All names were changed to protect client's privacy. DIY Advisor. Reproduction of site content including photos without permission prohibited. All rights reserved. © Copyright 2011-

    Monday, April 22, 2013

    How to Hang Pre-hung Door - Part 6 of 15 - Recycled Metal Removed

    Fig.1 The Tools
    By Gary Boutin

    Supplies and Tools:
    Cordless Screwdriver with Phillip bit
    Claw Hammer 
    Paint scraper

    Mr. Victor Longpont hired my services to remove his garage door that had become damaged after a bad rain storm. The door had not been painted for over 30 years, the bottom of the door was completely rusted. 

    This post shows the seven steps to recycle the damaged door hardware. 

    Step 1: Fig.1 shows the door that has been removed and set on its side.  
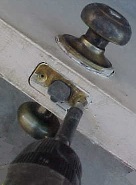
    Step 2: Fig.2 shows the use of a cordless drill with a Phillip screwdriver bit to remove the latch and door handle from the door.
    Fig.2 Door Hardware
    Fig.3 Hardware
    Step 3: Fig.4 shows the removal of the dead bolt lock assembly. Notice the long metal screw, it's made of brass and so is most of the lock assembly. Use the cordless screwdriver to remove the lock parts.
    Fig.4 Strike Plate
    Step 4: Fig.5 shows the removal of the metal hinges. On this door there were three sets of metal hinges. Using the cordless screwdriver remove each brass screw and save for later. 
    Step 5: Fig.6 shows the removal of the aluminum weatherstripping seal that was around the door. Save the metal for later.
    Fig.5 Hinges
    Fig.6 Removing aluminum weatherstrip
    Step 6: Fig.7 shows all the metal from the damaged door ready for recycling. The aluminum weatherstripping, brass door hardware for the door handle, screws and dead bolt. The metal door sweep and the aluminum threshold plate will be used to make other materials instead of landing in the waste dump.
    Fig.7 Recycle Metal
    Step 7: Recycling is not a money maker, its hard work to separate each type of metal.  Sometimes what looks like brass is plated metal but recycling metal parts is a good a way to keep our environment cleaner.

    How to Hang a Pre-hung Door:

  • Part 1 of 15 Introduction Why Replace This Garage Door
  • Part 2 of 15 Removing The Damaged Door
  • Part 3 of 15 Door Hardware Removed
  • Part 4 of 15 Door Threshold Removal
  • Part 5 of 15 Installing Door
  • Part 6 of 15 Recycled Metal Removed
  • Part 7 of 15 Caulking Outside Door Edges
  • Part 8 of 15 New Door Hardware Installed
  • Part 9 of 15 Caulking Door Screws Holes
  • Part 10 of 15 Inside Door Mud
  • Part 11 of 15 Inside Door Taping
  • Part 12 of 15 Inside Door Painted
  • Part 13 of 15 Applying Stucco To Door Edge
  • Part 14 of 15 Exterior Door Molding
  • Part 15 of 15 Old Door Cut to Trash


  • Update: DIY Advisor has New blogs check them today:

    • Cookie Alert: European Union laws requires that you know that this blog uses cookies. If you are concerned about this please click here to see how Google uses this information.

    Note: The DIY Advisor assumes no liability for omissions, errors or the outcome of any jobs. The reader must always exercise reasonable caution, follow current codes and regulations that may apply, and is urged to consult with a licensed contractor if in doubt about any steps on these posts. All names were changed to protect client's privacy. DIY Advisor. Reproduction of site content including photos without permission prohibited. All rights reserved. © Copyright 2011-

    Tuesday, April 9, 2013

    How to Sand and Paint Second Floor White French Door

    By Gary Boutin
    Painters cap

    Supplies and Tools:
    BEHR® Premium Plus Ultra Ultra Pure White
    BEHR® primer paint
    Blue paint tape
    Paint brush 2-inch
    Paint tray
    Paint scraper
    Sandpaper 120-grit

    Dr. Jeorge Valvus called me from an advertisement from a Bing advertisement campaign. Dr. Valvus home is under 30-year but he had not kept on the maintenance for his home. Today job was to re-paint his second floor patio door frame. The door needed re-painting but the frame needed complete re-scraping, priming and painting.

    This post shows the five steps to repainting the patio french door.

    Step 1: Look at the door damage, the door needed re-painted only, the exterior door jamb were in bad shape and will need scraping. Fig.1 shows the application of the blue tape around the perimeter of the door.

    Fig.1 French 
    balcony doors
    Step 2: Fig.2 through fig.4 shows both sides of the door jamb that needed scraping. 
    Fig.2 Scraping
     the paint
    Fig.3 More paint
    Fig.4 Blue 
    painter's tape
    Step 3: Fig.5 shows that after a good scraping, the next step is to apply white latex primer to the door jamb. After the primer has been applied, paint two coats of white semi gloss paint on the door frame.
    Fig.5 Trim painted
    Step 4: Fig.6 shows that after the french door were painted the stucco needed to be touched up on all sides. Fig.7 shows the door frame is repaired.
    Fig.6 
    Stucco painted
    Fig.7 
    Trim painted
    Step 5: Fig.8
    shows the door and the frame are finished. Now Dr. Valvus can enjoy his bedroom patio door.
    Fig.8 Job if finished


    Update: DIY Advisor has New blogs check them today:

    • Cookie Alert: European Union laws requires that you know that this blog uses cookies. If you are concerned about this please click here to see how Google uses this information.

    Note: The DIY Advisor assumes no liability for omissions, errors or the outcome of any jobs. The reader must always exercise reasonable caution, follow current codes and regulations that may apply, and is urged to consult with a licensed contractor if in doubt about any steps on these posts. All names were changed to protect client's privacy. DIY Advisor. Reproduction of site content including photos without permission prohibited. All rights reserved. © Copyright 2011-

    Sunday, April 3, 2011

    How to Replace Bathtub Diverter Spout Tile

    Handyman removing tub spout with channel lock pliers
    Fig.1 Gary
    By Gary Boutin

    Supplies and Tools:
    Channel locks® pliers
    Caulking white silicone
    Diverter instructions
    Electric drill
    Pencil or permanent market
    Shoe Booties (protects bath)
    Shower tile
    Spring clamps 4 inch
    Teflon tape(white)
    Tile adhesive
    Tile hole saw kit
    Tile scraper 1/4 inch gaps

    Dr. Valvus called me from an advertisement from a Bing advertisement campaign. He was related to the late Dr. Valvus who invented the valve. Dr. Valvus wanted his shower tile repaired after a local plumber worked on the shower spout.

    This post shows the eighteen steps on how to drill a hole in a shower tile, and how to replace a missing diverter valve.  

    Step 1: A local plumber repaired the shower mixing valve but would not repair the damages or the diverter valve and stated that the doctor should get a handyman to finish the job. Plumbers do not repair tile or wall damages, they just can not make enough money to cover their time and cost. 
    Step 2: Fig.1 shows the Handyman removing the diverter spout with a pair of Channel locks
    ®
    pliers
    , now twist off the diverter spout away from the wall. 
    Step 3: Fig.2 shows the diverter valve has been removed and only the pipe is left.
    This shower/tub is missing the tile by the water pipe
    Fig.2 Tub with missing tile
    Step 4: Fig.3 shows are Channel locks® pliers that were used for this job. The handyman is wearing shoe booties on his shoes to protect the tub sides.
    Channel locks® pliers
    Fig.3
    Channel Locks pliers

    Step 5: The next step is to cut the hole in the tile. From your local hardware store, or a plumbers store purchase a tile hole saw kit, make sure that the hole saw is the same diameter has the water spout. This kit comes with a tile hole saw and a base.   
    Step 6: Fig.4 shows the tile hole saw is being drawn with a pencil on the backside of the shower tile
    .
    This Tile Hole Saw Kit is used to cut the tile for the water pipe
    Fig.4 Circular tile cutter
    Step 7: Fig.5 shows the circle drawn in pencil.
    Use a pencil to trace the cut in the tile
    Fig.5 Tile to be used
    Step 8: Fig.6 shows the base is placed on top of the tile. In this example the hole needs to be position as the left upper side of the tile, not an easy cut.

    The tile cutter base allows the tile to be cut without damaging the tile
    Fig.6 Circular base 
    for water pipe
    Step 9: Fig.7 shows the drill drilling the into the backside of the tile. In this example an electric drill was used.
    The use of an electric drill provide constant power to cut the tile
    Fig.7 Drilling tile hole
    Step 10: Fig.8 shows the hole from the tile saw, the cut has been made. Dr. Valvus had to help me steady the drill and the clamps so the drill hole saw would cut straight.
    This hole saw has diamond on it tip to cut this tile
    Fig.8 Hole Cut
    Step 11: Fig.9 shows the orange tabs are the spring clamps that held the base of the tile hole saw. Two sets of 4 inch spring clamps were used to do this project.
    The Hole tile Base is gray and the Orange tip is a spring clamp on the tile
    Fig.9 Removing the base
    Step 12: Fig.10 shows the hole in the tile and on the new spout the plumber placed into the shower. The end piece is not new, its the piece between the spout and the valve that needed to be replaced, this picture does not show that part.
    Tile is on the water pipe
    Fig.10 Fitting the copper pipe 
    around the newly cut tile
    Step 13: Fig.11 shows the hole in the tile ready to be applied to the shower wall.
    Ready to be applied to shower wall
    Fig.11 Hole cut
    Step 14: Fig.12 shows Teflon tape is being applied on the new copper pipe threads. This Teflon tape came with the diverter package.
    White tape is being applied to the threads of the water pipe
    Fig.12 Teflon the end
    Step 15: Fig.13 shows the instructions on how to install a diverter on a spout pipe.
    Hole Saw Directions
    Fig.13 Direction
    Step 16: Fig.14 shows the tile adhesive being mix to place behind the new tile to glue to the shower wall. I used a tile scraper with 1/4 inch gaps to allow the adhesive on the tile.
    Grout is being mixed for the wall
    Fig.14 Tile grout
    Step 17: Fig.15 shows the tube grout being applied to the edges of the tile.
    After the grout the caulking is for the metal pipe
    Fig.15 Applying caulking


    Step 18: Fig.16 shows the new wall tile and the new tub diverter valve. Now Dr. Valvus can enjoy his new shower in his new home.
    The job is done and the tub spout and tile is like new
    Fig.16 Job finished new 
    tile with new fixtures

  • Handyman Blog: DIY Advisor
  • Food Blog: From Kiwis To Pistachios
  • Artwork Blog: Light in Dark Artwork
  • Class-A Tests: DIY Class-A Drivers License Tests

    • Cookie Alert: European Union laws requires that you know that this blog uses cookies. If you are concerned about this please click here to see how Google uses this information.

    Note: The DIY Advisor assumes no liability for omissions, errors or the outcome of any jobs. The reader must always exercise reasonable caution, follow current codes and regulations that may apply, and is urged to consult with a licensed contractor if in doubt about any steps on these posts. All names were changed to protect client's privacy. DIY Advisor. Reproduction of site content including photos without permission prohibited. All rights reserved. © Copyright 2011-