Monday, April 22, 2013

How to Hang Pre-hung Door - Part 6 of 15 - Recycled Metal Removed

Fig.1 The Tools
By Gary Boutin

Supplies and Tools:
Cordless Screwdriver with Phillip bit
Claw Hammer 
Paint scraper

Mr. Victor Longpont hired my services to remove his garage door that had become damaged after a bad rain storm. The door had not been painted for over 30 years, the bottom of the door was completely rusted. 

This post shows the seven steps to recycle the damaged door hardware. 

Step 1: Fig.1 shows the door that has been removed and set on its side.  
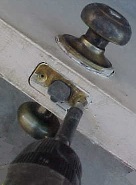
Step 2: Fig.2 shows the use of a cordless drill with a Phillip screwdriver bit to remove the latch and door handle from the door.
Fig.2 Door Hardware
Fig.3 Hardware
Step 3: Fig.4 shows the removal of the dead bolt lock assembly. Notice the long metal screw, it's made of brass and so is most of the lock assembly. Use the cordless screwdriver to remove the lock parts.
Fig.4 Strike Plate
Step 4: Fig.5 shows the removal of the metal hinges. On this door there were three sets of metal hinges. Using the cordless screwdriver remove each brass screw and save for later. 
Step 5: Fig.6 shows the removal of the aluminum weatherstripping seal that was around the door. Save the metal for later.
Fig.5 Hinges
Fig.6 Removing aluminum weatherstrip
Step 6: Fig.7 shows all the metal from the damaged door ready for recycling. The aluminum weatherstripping, brass door hardware for the door handle, screws and dead bolt. The metal door sweep and the aluminum threshold plate will be used to make other materials instead of landing in the waste dump.
Fig.7 Recycle Metal
Step 7: Recycling is not a money maker, its hard work to separate each type of metal.  Sometimes what looks like brass is plated metal but recycling metal parts is a good a way to keep our environment cleaner.

How to Hang a Pre-hung Door:

  • Part 1 of 15 Introduction Why Replace This Garage Door
  • Part 2 of 15 Removing The Damaged Door
  • Part 3 of 15 Door Hardware Removed
  • Part 4 of 15 Door Threshold Removal
  • Part 5 of 15 Installing Door
  • Part 6 of 15 Recycled Metal Removed
  • Part 7 of 15 Caulking Outside Door Edges
  • Part 8 of 15 New Door Hardware Installed
  • Part 9 of 15 Caulking Door Screws Holes
  • Part 10 of 15 Inside Door Mud
  • Part 11 of 15 Inside Door Taping
  • Part 12 of 15 Inside Door Painted
  • Part 13 of 15 Applying Stucco To Door Edge
  • Part 14 of 15 Exterior Door Molding
  • Part 15 of 15 Old Door Cut to Trash


  • Update: DIY Advisor has New blogs check them today:

    • Cookie Alert: European Union laws requires that you know that this blog uses cookies. If you are concerned about this please click here to see how Google uses this information.

    Note: The DIY Advisor assumes no liability for omissions, errors or the outcome of any jobs. The reader must always exercise reasonable caution, follow current codes and regulations that may apply, and is urged to consult with a licensed contractor if in doubt about any steps on these posts. All names were changed to protect client's privacy. DIY Advisor. Reproduction of site content including photos without permission prohibited. All rights reserved. © Copyright 2011-

    How to Hang Pre-hung Door - Part 3 of 15 - Door Hardware Removed

    Fig.1 door hardware
    By Gary Boutin

    Supplies and Tools:
    Cordless screwdriver with Phillip bit
    Hammer
    Paint scraper thick metal 

    Mr. Victor Longpont hired my services to remove his garage door that had become damaged after a bad rain storm. The door had not been painted for over 30 years, the bottom of the door was damaged by a badly worn door sweep that allowed water into the bottom of the door.

    This post shows the five steps to removing door hardware from the damaged door.

    Step 1: Fig.1 shows the door that has been removed and set on its side. Now check each part of the door hardware to see what tools will be needed to remove the lock and plate screws. 
    Step 2: Fig.2 and fig.3 shows the use of a cordless drill with a Phillip screwdriver bit to remove the latch from the door edge. To remove the door assembly the latch must be released first.
    Fig.2 Phillip tip
    Fig.3 Latch removed using 
    Cordless drill
    Step 3: Fig.4 and fig.5 shows the screws that hold the door handle assembly being removed. Unscrew one screw at a time and remove the door lock assembly.
    Fig.4 Top screw
    Fig.5 unscrew handle
    Step 4: Fig.6 shows the hammer and a thick metal paint scraper was used to remove the door handle from the door. Normally the door handle would just fall off but this door handle had been on for so many years that is was stuck on the door. These tools were the only way the door handle could be removed.
    Fig.6 Hammer painted edge

    Step 5: Fig.7 shows the removal of the metal hinges. Now that the door hardware has been removed the next step is how to recycle the door hardware. 
    Step 6: If these parts are saved, they can serve to honor the planet instead of landing in a refuse heap.
    Fig.7 Old painted hinge and screws

    How to Hang a Pre-hung Door:


  • Part 1 of 15 Introduction Why Replace This Garage Door
  • Part 2 of 15 Removing The Damaged Door
  • Part 3 of 15 Door Hardware Removed
  • Part 4 of 15 Door Threshold Removal
  • Part 5 of 15 Installing Door
  • Part 6 of 15 Recycled Metal Removed
  • Part 7 of 15 Caulking Outside Door Edges
  • Part 8 of 15 New Door Hardware Installed
  • Part 9 of 15 Caulking Door Screws Holes
  • Part 10 of 15 Inside Door Mud
  • Part 11 of 15 Inside Door Taping
  • Part 12 of 15 Inside Door Painted
  • Part 13 of 15 Applying Stucco To Door Edge
  • Part 14 of 15 Exterior Door Molding
  • Part 15 of 15 Old Door Cut to Trash


  • Update: DIY Advisor has New blogs check them today:

    • Cookie Alert: European Union laws requires that you know that this blog uses cookies. If you are concerned about this please click here to see how Google uses this information.

    Note: The DIY Advisor assumes no liability for omissions, errors or the outcome of any jobs. The reader must always exercise reasonable caution, follow current codes and regulations that may apply, and is urged to consult with a licensed contractor if in doubt about any steps on these posts. All names were changed to protect client's privacy. DIY Advisor. Reproduction of site content including photos without permission prohibited. All rights reserved. © Copyright 2011-


    How to Hang Pre-hung Door - Part 4 of 15 - Door Threshold Removal

    Impact driver 
    on stuck screw
    By Gary Boutin

    Supplies and Tools:
    Hammer
    Heavy leather gloves 
    Impact screwdriver
    Phillips bit
    Phillips metal screws 1-1/2 inch

    Mr. Victor Longpont hired my repair services to remove his garage door threshold plate.

    This post shows the removal a threshold plate.

    Step 1: An impact driver is a spring-loaded mechanism that moves a wedge and cam built inside it.
    Please click here to continue this post.
    Fig.1 Manual impact driver

     How to Hang a Pre-hung Door:


  • Part 1 of 15 Introduction - Why Replace This Garage Door
  • Part 2 of 15 Removing The Damaged Door
  • Part 3 of 15 Door Hardware Removed
  • Part 4 of 15 Door Threshold Removal
  • Part 5 of 15 Installing Door
  • Part 6 of 15 Recycled Metal Removed
  • Part 7 of 15 Caulking Outside Door Edges
  • Part 8 of 15 New Door Hardware Installed
  • Part 9 of 15 Caulking Door Screws Holes
  • Part 10 of 15 Inside Door Mud
  • Part 11 of 15 Inside Door Taping
  • Part 12 of 15 Inside Door Painted
  • Part 13 of 15 Applying Stucco To Door Edge
  • Part 14 of 15 Exterior Door Molding
  • Part 15 of 15 Old Door Cut to Trash


  • Update: DIY Advisor has New blogs check them today:

    • Cookie Alert: European Union laws requires that you know that this blog uses cookies. If you are concerned about this please click here to see how Google uses this information.

    Note: The DIY Advisor assumes no liability for omissions, errors or the outcome of any jobs. The reader must always exercise reasonable caution, follow current codes and regulations that may apply, and is urged to consult with a licensed contractor if in doubt about any steps on these posts. All names were changed to protect client's privacy. DIY Advisor. Reproduction of site content including photos without permission prohibited. All rights reserved. © Copyright 2011-