Tuesday, January 5, 2016

How to Create and Install Xenon Pucks into a Bedroom Light Tier - Part 8 of 8 - Fine Tuning

Fig.1 Ryobi Drill
By Gary Boutin 

Supplies and Tools:
#8 Wood screws 
18-Volt Ryobi Cordless Phillip Screwdriver

In 1991 we received a bed set with a light tier over the bed. It had side drawers tiers tall enough to hold over the mirror a bridge that housed 3-incandescent lights that could be dimmable from a switch within the headboard. Theses posts shows my solution. 
 
This is the final post of this series that shows how to use an existing lamp parts and the installation of the
Commercial Electric® Xenon puck light to an aging wood tier.

Step 1: Fig.1 above right shows that two lights are operational.
Step 2: Fig.2 show the a close up of what the lamp looks like when installed on the wooden tier.

Step 3: Fig.3 shows the job is finished. All three lamps are installed and working.


How to Create and Install Xenon Pucks into a Bedroom Light Tier:

Update: DIY Advisor has New blogs check them today:

  • Cookie Alert: European Union laws requires that you know that this blog uses cookies. If you are concerned about this please click here to see how Google uses this information.

Note: The DIY Advisor assumes no liability for omissions, errors or the outcome of any jobs. The reader must always exercise reasonable caution, follow current codes and regulations that may apply, and is urged to consult with a licensed contractor if in doubt about any steps on these posts. All names were changed to protect client's privacy. DIY Advisor. Reproduction of site content including photos without permission prohibited. All rights reserved. © Copyright 2011-

Monday, January 4, 2016

How to Create and Install Xenon Pucks into a Bedroom Light Tier - Part 7 of 8 - Assembling the Lamp on the Metal Base

Fig.1 The manual tools
By Gary Boutin

Supplies and Tools:
Electric tape
Jewel screwdriver Phillip Tip
Ryobi Electric drill 
Ryobi Titanium drill 1/16

We received a bed set with a light tier over the bed. It had two side drawers tiers tall enough to hold over the mirror a bridge that housed 3-incandescent lights.   
 
This post shows seven steps to install the Xenon lamp into the metal lamp base. 


Step 1: Fig.1 shows the Jewel Screwdriver Phillip Tip that will be needed to install the Xenon lamp kit. Fig.2 shows the vinyl tape the will add another layer of protection to the lamp wires. Fig.3 shows the wires go through the top to the bottom of the lamp.
Fig.2 Vinyl electric tape
Fig.3 Lamp cord
Step 2: Fig.4 and fig.5 shows the application of the vinyl tape to the electrical cord.
Fig.4 Electrical tape
Fig.5 Protecting the cord

Step 3: Fig.6 through fig.8 shows the electrical cord is taped with vinyl tape.
Fig.6 Tape pass 
through the lamp
Fig.7 Tape within the lamp
Fig.8

Step 4: Fig.9 and fig.10 shows the 1/16 the Titanium drill bit used to drill into the sheet metal to attach the lamp.
Fig.9 Cordless drill 
with drill bit

Fig.10 1/16 drill

Step 5: Fig.11 and fig.12 shows the attachment of the first metal screw into the lamp and into the sheet metal base.
Fig.11 Removing screws
Fig.12 Using the 
existing holes
Step 6: Fig.13 and fig.14 shows the the drill is moved to the next spot on the lamp.
Fig.13

Fig.14

Step 7: Fig.15 shows the lamp is finished and ready to be placed on the platform wooden tier.


Fig.15

How to Create and Install Xenon Pucks into a Bedroom Light Tier:

Update: DIY Advisor has New blogs check them today:

  • Cookie Alert: European Union laws requires that you know that this blog uses cookies. If you are concerned about this please click here to see how Google uses this information.

Note: The DIY Advisor assumes no liability for omissions, errors or the outcome of any jobs. The reader must always exercise reasonable caution, follow current codes and regulations that may apply, and is urged to consult with a licensed contractor if in doubt about any steps on these posts. All names were changed to protect client's privacy. DIY Advisor. Reproduction of site content including photos without permission prohibited. All rights reserved. © Copyright 2011-

Saturday, January 2, 2016

How to Create and Install Xenon Pucks into a Bedroom Light Tier - Part 6 of 8 - Cutting the Xenon Plug Hole

Fig.1 Commercial 
Electric® 
Xenon Lamp Kit
By Gary Boutin 

Supplies and Tools:
#8 Wood screws 
18-Volt Ryobi Cordless Phillip Screwdriver
Claw hammer (small)
Commercial Electric® 3 Light Xenon Task Kit
Electrical tape (black)
Galvanized flat sheet metal (36 in by 48 in)
Jewelers Precision Screwdriver Set
Marking pen (any color)
Metal files
Metal Hole saw kit
Needlenose pliers
Spring clips small (green)

In 1991 we received a bed set with a light tier over the bed. It had side drawers tiers tall enough to hold over the mirror a bridge that housed 3-incandescent lights that could be dimmable from a switch within the headboard. Theses posts shows my solution. 

This post shows eight steps to installing the Commercial Electric® puck lights

Step 1:
Fig.1 and fig.2 shows the Commercial Electric® 3 Light Xenon Task and Accent Light Kit.
Fig.2 Open the Kit

Step 2: Fig.3 shows the puck Commercial Electric® Xenon® light that will be installed on the old lamp.
Fig.3 Xenon light

Step 3: Fig.4 and fig.5 shows that using a permanent marker will mark the area to be cut.
Fig.4 Marker

Fig.5 Place in the middle

Step 4: Fig.6 shows the outer edges of the Commercial Electric® Xenon® lamp makes a perfect template to cut.
Fig.6 The Template

Step 5: Fig.7 shows to place the Commercial Electric® Xenon plug into the size of the hole saw to make sure it fit correctly. Fig.8 shows the needlepoint vice grip® pliers and Ryobi cordless drill with a hole saw to cut into the base of the lamp. Fig.9 shows that using a claw hammer to knock down the sheet metal that was cut from the hole saw.
Fig.7 Puck plug

Fig.8 Cutting the lamp

Fig.9 Claw hammer

Step 6: Fig.10 and fig.11 shows the hardware screws organizer.
Fig.10 Hardware
Fig.11 Wood screws

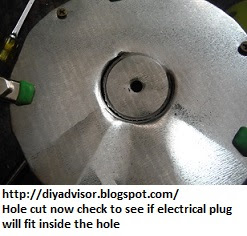
Step 7: Fig.12 shows that using the same hole saw to cut through the sheet metal. Fig.13 and fig.14 shows the sheet metal is cut and there is enough metal to push through the metal base.
Fig.12 Sheet metal

Fig.13
Fig.14 Push hole through
Step 8: Fig.15 and fig.16 shows the electrical wiring plug fits through hole.
Fig.15

Fig.16 Lamp sealed
with electrical tape


How to Create and Install Xenon Pucks into a Bedroom Light Tier


Update: DIY Advisor has New blogs check them today:

  • Cookie Alert: European Union laws requires that you know that this blog uses cookies. If you are concerned about this please click here to see how Google uses this information.

Note: The DIY Advisor assumes no liability for omissions, errors or the outcome of any jobs. The reader must always exercise reasonable caution, follow current codes and regulations that may apply, and is urged to consult with a licensed contractor if in doubt about any steps on these posts. All names were changed to protect client's privacy. DIY Advisor. Reproduction of site content including photos without permission prohibited. All rights reserved. © Copyright 2011-