Thursday, September 4, 2014

How to Remove Aging Patio Cover - Part 3 of 6 - Removed Wood Beams Hexagonal Bolts

Claw Hammer
By Gary Boutin

Supplies and Tools:
Adjustable Crescent Wrench 8-inch
Gloves with rubber fingers
Hammer Claw
Metal punch 
Pipe wrench
Socket wrench 1/2-inch pry bar
Trash cans
Local recycle yard

A good friend hired my services to remove his aging patio cover in his backyard and he wanted to install a new garage kit.

This post shows ten steps on how to remove 10-inch bolts from the wooden beams. 

Step 1: Fig.1 shows the tools needed to remove six 10-inch bolts. Pipe wrench and crescent wrench will be needed to pry the rusted nuts from the bolts. These bolts have been securing the patio cover to the metal pipes for over thirty years.
Fig.1 Crescent and  
pipe wrench
Step 2: Fig.2 shows the bolt drilled through the 4 by 8 wood beam.
Fig.2 Bolts that need 
to be removed

Step 3: Fig.3 shows the crescent wrench being used on the left in combination with a 1/2 inch socket wrench pry bar. Noticed the handyman wore gloves to protect his hands from wood splinters and rust metal chards from metal posts.

Fig.3 First bolt 
to be removed
Step 4: Fig.4 shows the crescent wrench in vertical position removing the nut from the bolt.
Fig.4 Pipe wrench
on bolt
Step 5: Fig.5 shows a crescent wrench in the horizontal position removing the nut.
Fig.5 Crescent 
wrench on nut

Step 6: Fig.6 shows the nut has been removed and fig.7 shows a claw hammer hitting the metal punch against the end of the bolt to push it out of the wood beam.
Fig.6 Nut is gone
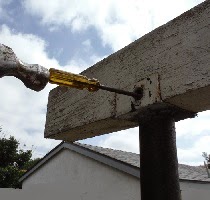
Fig.7 Metal punch hammered 
bolt out of the slot
Step 7: Fig.8 shows the bolt being pushed out by the screwdriver and now can be removed.
Fig.8 bolt coming out
Step 8: Fig.9 shows the wood beam being released from the metal framework. Fig.10 shows the wood beam is removed from its base.
Fig.9 bolt removed 
and beam pulled out
Fig.10 Wood beam removed
Step 9: Fig.11 shows the removed wood beam now laying on cement patio.
Fig.11 Wood beam 
ready to be cut

Step 10: Fig.12 shows the wood support removed ready for disposal. All the metal bolts, washers and nuts were sold at a local recycle shop.
Fig.12 wood beam 
ready for disposal


How to Remove an Aging Patio Cover:

Update: DIY Advisor has New blogs check them today:
  • Cookie Alert: European Union laws requires that you know that this blog uses cookies. If you are concerned about this please click here to see how Google uses this information.

Note: The DIY Advisor assumes no liability for omissions, errors or the outcome of any jobs. The reader must always exercise reasonable caution, follow current codes and regulations that may apply, and is urged to consult with a licensed contractor if in doubt about any steps on these posts. All names were changed to protect client's privacy. DIY Advisor, Reproduction of site content including photos without permission prohibited. All rights reserved. © Copyright 2011-

How to Remove an Aging Patio Cover - Part 2 of 6 - Removed Wood Rafters Supports

Fig.1 Burkebar
By Gary Boutin

Supplies and Tools:
Burkebar Metal Prybar 56 inches

This post shows four steps on how to remove the rafters blocks from the patio cover.  

A good friend hired my services to remove his aging patio cover in his backyard and install a new garage kit purchased on-line, install a garage gate and remove an aging patio cover. His back fence was adjacent to an alley.

Step 1: Fig.1 shows the Burkebar ready to be used. The Burkebar is a heavy pry bar perfect to demolish a patio cover. The 3-inch spring-steel head is curved to create better leverage when taking apart wood blocks.
Step 2: Fig.2 shows that the burkebar purpose is an all purpose demolition and construction bar used to remove cement forms.
Fig.2 
Burkebar
Step 3: Fig.3 through fig.5 shows Gary using the Burkebar knocking the rafters blocks supports right out of the wood rafters.

Fig.3 Blocks falling out 
of the wood rafters!
Fig.4 Gary is near the edges 
of the Patio Cover
Fig.5 Only one block left to go
Step 4: Fig.6 shows the wood block completely removed from the wood patio rafters.
Fig.6 Block and metal nails removed

How to Remove an Aging Patio Cover:

Update: DIY Advisor has New blogs check them today:
  • Cookie Alert: European Union laws requires that you know that this blog uses cookies. If you are concerned about this please click here to see how Google uses this information.

Note: The DIY Advisor assumes no liability for omissions, errors or the outcome of any jobs. The reader must always exercise reasonable caution, follow current codes and regulations that may apply, and is urged to consult with a licensed contractor if in doubt about any steps on these posts. All names were changed to protect client's privacy. DIY Advisor. Reproduction of site content including photos without permission prohibited. All rights reserved. © Copyright 2011-


Monday, May 5, 2014

How to Remove an Aging Patio Cover - Part 1 of 6 - Trash Pickup

Demolition claw
By Gary Boutin

Supplies and Tools:
Demolition Claw
Heavy work gloves 
Trash can or trash bags

This post shows two steps on how to clear damaged items from the patio area.  

A good friend hired my services to remove his aging patio cover in his backyard. He wanted to install a new garage kit purchased on-line, break down the cement wall, install a garage gate and remove an aging patio cover. His back fence was adjacent to an alley. These six post shows the progression of the removal of the patio structure from his property. This post shows the cleanup of the patio area in preparations of removing the aging structure.

Step 1: Fig.1 and fig.2 shows that the patio area was full of aging debris and decaying garbage, and dead bushes. The first step was to remove all the trash from the patio area. Everything was disposed in the local trash, all metal and glass was recycled. Most of the objects were damaged and beyond repair.
Fig.1 Patio debris
Fig.2 Patio side view
Step 2: Fig.3 shows the patio debris has been removed except a glass door. It was solid oak and his family wanted to keep it.
Fig.3 Patio cleaned job done


How to Remove an Aging Patio Cover:

Update: DIY Advisor has New blogs check them today:
  • Cookie Alert: European Union laws requires that you know that this blog uses cookies. If you are concerned about this please click here to see how Google uses this information.

Note: The DIY Advisor assumes no liability for omissions, errors or the outcome of any jobs. The reader must always exercise reasonable caution, follow current codes and regulations that may apply, and is urged to consult with a licensed contractor if in doubt about any steps on these posts. All names were changed to protect client's privacy. DIY Advisor. Reproduction of site content including photos without permission prohibited. All rights reserved. © Copyright 2011-