Showing posts with label sheetrock screws. Show all posts

Monday, March 23, 2015

How to Make a Commercial Signage

Fig.1 The parts
By Gary Boutin

Supplies and Tools:
Advertisement board 2 ft. x 4 ft.
Concrete pier block 8-3/4 in. x 10-3/4 in. x 10-3/4 in.
Cordless drill with 1/8 inch drill bit
Claw hammer 
Drill bit 1/8 inch
Fender washers (4) 
Hand staple with 1/4 inch staples
Lag bolts (4) 
Open and closed end wrench 1/4 inch
Post - Douglas Fir 4 x 4 x 8
Metal tie 4-In. by 4-In. Simpson strong tie
Sheetrock screws 1-1/4 inch
Torpedo level magnetic

This project was put together because the Lumber/Building Materials needed a sign to sell insulation. 

This post explains how to make a simple post advertisement that can be used in many application. This sign is used inside a warehouse store, but it can also be adapted to be used at garage sales and parties.

Step 1: Fig.1 shows some of the parts used in this project. 4-lag screws, 4-fender washers and 1-concrete pier block.
Step 2: Fig.2 shows the advertisement sign, 4x4x8 Douglas Fir post, Simpson tie metal post bracket on top of a orange Home Depot Cart.
Fig.2 cart with parts
Step 3: Fig.3 shows the tools on top of The Home Depot cart. Cordless drill with drill bit 1/8 inch, claw hammer, closed-end wrench 1/4 inch, torpedo level and crescent wrench. Fig.4 shows that a lag screw with a fender washer (Oversize Washer) being screwed into the concrete pier and attaching the Simpson metal tie in place. Two lag screws were used to secure the tie to the concrete pier.
Fig.3 Cart with tools
Fig.4 Closed-end wrench
Step 4: Fig.5 shows a torpedo level leveling the wood post to the Simpson metal tie.
Fig.5 Torpedo leveling
the wood post
Step 5: Fig.6 and fig.7 shows a Lag Screw being screwed into the post. Fig.7 shows that a socket wrench with a 1/4 inch socket is being used to drive the lag screw in place. One lag screw per side and a total of two lag screws were used to secure the wood post to the Simpson metal tie.
Fig.6 Lag screw
Fig.7 Socket Wrench

Step 6: Fig.8 and fig.9 shows that one this side is secured, and the post is ready to receive its advertisement board. Fig.9 shows a top view of the secured post.
Fig.8 This side finished
Fig.9 Top view
Step 7: Fig.10 and fig.11 shows that the post was laid on top of a flat cart. This is the easiest way to attach the 2 by 4 foot advertisement board. 
Fig.10 Laying the post
Fig.11 Positioning the post
Step 8: Fig.12 shows the advertisement board is attached with sheetrock Screws 1-1/4 is just fine.  Create a paper sign and use a hand stapler to attache the sign to the wood board. Fig.13 shows the signage in place advertising interior fiberglass.
Fig.12 Ad board
Fig.13 Job done

Update: DIY Advisor has New blogs check them today:
  • Cookie Alert: European Union laws requires that you know that this blog uses cookies. If you are concerned about this please click here to see how Google uses this information.

Note: The DIY Advisor assumes no liability for omissions, errors or the outcome of any jobs. The reader must always exercise reasonable caution, follow current codes and regulations that may apply, and is urged to consult with a licensed contractor if in doubt about any steps on these posts. All names were changed to protect client's privacy.  Reproduction of site content including photos without permission prohibited. All rights reserved. © Copyright 2011-

Friday, March 22, 2013

How to Repair Kitchen Drawer Slides

Fig.1 Damaged
By Gary Boutin

Supplies and Tools:
Cordless screwdriver with Phillips bit
Sheetrock screws

This kitchen had imported its cabinets from Mexico. The entire cabinets was stapled and had plastic edges that were stapled to hold the drawer slide in place.  The problem is that the slides were all loose and Mrs. Jan wanted a quick fix to repair the problem but not replace the drawer slides.

This post shows the two steps on how to solves the kitchen drawer slides.

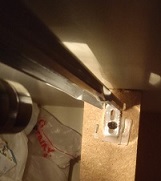
Step 1: Locate the damaged slides and Fig.1 and fig.2 shows one screw has been placed to secure the slide.
Fig.2 Secured
Step 2: Each of the slides was made of metal and each had a hole in the top of the bracket. One sheetrock screws per slide took care of the problem. Fig.3 shows the cordless driver placing a Phillips sheetrock screw into the drawer slide. Now Mrs. Jan could have her ladies group over without having her kitchen all torn apart to repair the damaged slides.
Fig.3 Cordless driver

Update: DIY Advisor has New blogs check them today:

  • Cookie Alert: European Union laws requires that you know that this blog uses cookies. If you are concerned about this please click here to see how Google uses this information.

Note: The DIY Advisor assumes no liability for omissions, errors or the outcome of any jobs. The reader must always exercise reasonable caution, follow current codes and regulations that may apply, and is urged to consult with a licensed contractor if in doubt about any steps on these posts. All names were changed to protect client's privacy. DIY Advisor. Reproduction of site content including photos without permission prohibited. All rights reserved. © Copyright 2011-

Wednesday, January 16, 2013

Bedroom Wall Repair

Fig.1 This is the back of
 a shower assembly
By Gary Boutin

Supplies and Tools: 
Cordless drill with Phillip tip
Fiberglass wall tape 
Orange Peel spray texture
1x2 wood pieces 18-inch long 
Roller cover and frame 
Sheetrock screws 
Sponge and wet rags 
Square metal
Utility knife blade 
Wallboard also named gypsum board  
Wall knives 10-inch wide (large scrapers) 
White latex primer
 
When John Truman noticed that the bedroom wall was covered with mold he called a plumber thinking it was a simple fix. The plumber replaced the leaking shower assembly but would not repair the wall damage. John and I met met each other at our local The Home Depot® hardware store. He was checking the prices on gypsum board, and he told me his problem.

This post shows the fifteen steps to replace and repair the plumber's wall damage. 

Step 1: Fig.1 shows the back of a shower assembly.
Step 2: Identify the problem? The work the plumber had done was still fresh but inside the wall the area was dry.
Step 3: Repair the hole: Cut up a 1x2x6 piece of wood into two 18-inch pieces and place them on both sides of the brass shower assembly. 
Step 4: Fig.2 and fig.3 shows the pieces are held together by a sheet rock screw 1-3/4 inch Long, driven through the existing wallboard. Place one screw above and below the wood pieces this will become the backing for the new piece of wallboard.
Fig.2 Apply backing
Fig.3 Cordless drill
Step 5: Fig.4 shows the use a metal square to measure the sheetrock.
Fig.4 Yellow square
Step 6: Next use a utility knife blade to cut to piece of wallboard and placed the board in the existing hole.
Step 7: Fig.5 the piece was cut and installed, 4-sheetrock screws were screwed into the new wallboard and into the 1x2 wood supports.
Fig.5 Drywall
Step 8: Next pre-mixed mud was placed over the edges of the new wallboard.
Step 9: After the first coat of mud over the new edges of the wall board apply fiberglass tape around the entire square of the new wall board.
Step 10: Fig.6 shows the final coat over the fiberglass tape. It was applied to the wall to give the wall strength. A thick layer of mud was applied over the tape.
Fig.6 Final coat
Step 11: After the wall was dried, and using a wet rag which removed the edges of the dried mud on the wall. Wet sanding is used in areas were the dust might prove to be harmful to the clients. Wet sanding stopped the mud dust from going all over the bedroom. 
Step 12:  After the wall dried apply orange peel texture was applied to the wall.
Step 13: Fig.7 and fig.8 shows a sponge was used to remove the large mud nubs to flatten them like the surrounding wall texture.
Fig.7 Sponge
Fig.8 Sponge
Step 14: Now the wall looked like when finished, normal wall texture.
Step 15: Fig.9 shows that after the texture had dried, one coat of latex primer needed to be applied to the wall area. Now that the job is done, John plans on re-painting his entire bedroom.
Fig.9 Latex primer


DIY Advisor Blogs:
  • Handyman Blog: DIY Advisor
  • Food Blog: From Gary Boutin
  • Artwork Blog: Light in Dark Artwork
  • Class-A Tests: DIY Class-A Drivers License Tests
    • Cookie Alert: European Union laws requires that you know that this blog uses cookies. If you are concerned about this please click here to see how Google uses this information.

    Note: The DIY Advisor assumes no liability for omissions, errors or the outcome of any jobs. The reader must always exercise reasonable caution, follow current codes and regulations that may apply, and is urged to consult with a licensed contractor if in doubt about any steps on these posts. All names were changed to protect client's privacy. DIY Advisor. Reproduction of site content including photos without permission prohibited. All rights reserved. © Copyright 2011-